m (Added link to AF3 comparisons.) |
m (Updating DNC stats.) Tag: Visual edit |
||
| (35 intermediate revisions by 22 users not shown) | |||
| Line 8: | Line 8: | ||
[[File:DNCJOBPAGE.png|right|240px|Dancer]] |
[[File:DNCJOBPAGE.png|right|240px|Dancer]] |
||
<br> |
<br> |
||
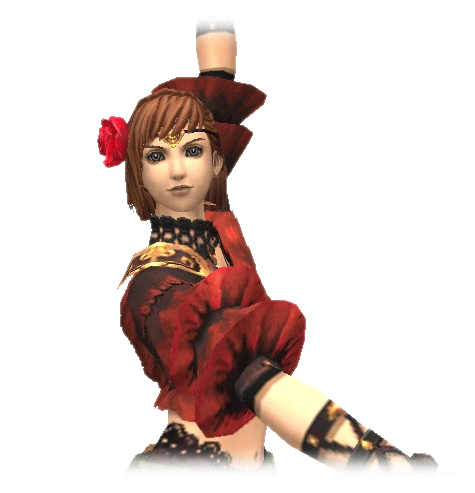
| − | :Dancers (DNC) are front-line healers that can both benefit the [[party]] and enfeeble monsters. Not only are they competent fighters, but the [[Tactical Points|TP]] they accumulate is used to fuel their various abilities. They execute [[Waltz]]es and [[Samba]]s to heal and create beneficial effects, and perform [[Steps]] to inflict negative effects upon the enemy. A touch of customization is added with [[Flourish]], which allows a step to be completed with a variety of bonuses to aid the Dancer's party. Obtained by completing the [[Lakeside Minuet]] |
+ | :Dancers (DNC) are front-line healers that can both benefit the [[party]] and enfeeble monsters. Not only are they competent fighters, but the [[Tactical Points|TP]] they accumulate is used to fuel their various abilities. They execute [[Waltz]]es and [[Samba]]s to heal and create beneficial effects, and perform [[Steps]] to inflict negative effects upon the enemy. A touch of customization is added with [[Flourish]], which allows a step to be completed with a variety of bonuses to aid the Dancer's party. Obtained by completing the [[Lakeside Minuet]] quest. |
<br> |
<br> |
||
{| border="2" cellpadding="5" cellspacing="0" align="center" width="60%" | |
{| border="2" cellpadding="5" cellspacing="0" align="center" width="60%" | |
||
|<div align="center">'''Table of Contents:'''<br> |
|<div align="center">'''Table of Contents:'''<br> |
||
[[#Job Abilities|Abilities]] • [[#Job Traits|Traits]] • [[#Group 1 Merits|Merits]] • [[#Art of the Dance|Dances, Steps, & Flourishes]]<br> |
[[#Job Abilities|Abilities]] • [[#Job Traits|Traits]] • [[#Group 1 Merits|Merits]] • [[#Art of the Dance|Dances, Steps, & Flourishes]]<br> |
||
| − | [[#Combat Skill Ratings|Combat Skills]] • [[#Artifact Equipment|Artifact Equipment |
+ | [[#Combat Skill Ratings|Combat Skills]] • [[#Artifact Equipment|Artifact Equipment]] • [[#Dancer Guides|Dancer Guides]]</div> |
|} |
|} |
||
<br> |
<br> |
||
| Line 46: | Line 46: | ||
|align="center" |40 |
|align="center" |40 |
||
| [[Flourishes II]] |
| [[Flourishes II]] |
||
| + | |- valign="top" BGCOLOR="#EAF0FF" |
||
| + | |align="center" |50 |
||
| + | | [[Contradance]] |
||
|- valign="top" BGCOLOR="#EAF0FF" |
|- valign="top" BGCOLOR="#EAF0FF" |
||
|align="center" |75 ([[Merit Points|Merit]]) |
|align="center" |75 ([[Merit Points|Merit]]) |
||
| Line 60: | Line 63: | ||
|- valign="top" BGCOLOR="#EAF0FF" |
|- valign="top" BGCOLOR="#EAF0FF" |
||
|align="center" |80 |
|align="center" |80 |
||
| − | | [[Flourishes| |
+ | | [[Flourishes|Flourishes III]] |
| + | |- valign="top" BGCOLOR="#EAF0FF" |
||
| + | |align="center" |96 |
||
| + | | [[Grand Pas]] |
||
|} |
|} |
||
:''See [[Dancer/Abilities|Dancer Abilities]] for an expanded list of all Dancer job abilities.'' |
:''See [[Dancer/Abilities|Dancer Abilities]] for an expanded list of all Dancer job abilities.'' |
||
| Line 143: | Line 149: | ||
|align="center" |~90? |
|align="center" |~90? |
||
| [[Critical Attack Bonus|Critical Attack Bonus II]] |
| [[Critical Attack Bonus|Critical Attack Bonus II]] |
||
| + | |- valign="top" BGCOLOR="#EAF0FF" |
||
| + | |align="center" |97 |
||
| + | | [[Skillchain Bonus|Skillchain Bonus V]] |
||
|} |
|} |
||
|align="left" valign="top" | |
|align="left" valign="top" | |
||
| Line 172: | Line 181: | ||
* '''[[Steps]]''' are used to enfeeble an enemy, while at the same time generating the [[Finishing Moves]] required to perform [[Flourishes]]. The [[enfeebling]] effects produced by Steps can be stacked up to five times. The more times an effect is stacked, the more powerful it becomes. The Finishing Move effect lasts two hours or until used. |
* '''[[Steps]]''' are used to enfeeble an enemy, while at the same time generating the [[Finishing Moves]] required to perform [[Flourishes]]. The [[enfeebling]] effects produced by Steps can be stacked up to five times. The more times an effect is stacked, the more powerful it becomes. The Finishing Move effect lasts two hours or until used. |
||
* '''[[Flourishes]]''' are used to produce various powerful effects by consuming the finishing moves generated by Steps. Each type of Flourish requires a certain number of finishing moves to perform. |
* '''[[Flourishes]]''' are used to produce various powerful effects by consuming the finishing moves generated by Steps. Each type of Flourish requires a certain number of finishing moves to perform. |
||
| − | **Flourishes are divided into three categories: [[Flourishes I]], [[Flourishes II]] and [[ |
+ | **Flourishes are divided into three categories: [[Flourishes I]], [[Flourishes II]] and [[Flourishes III]]. Each category has its own recast time. |
{| border="0" width="100%" cellpadding="5" cellspacing="2"| |
{| border="0" width="100%" cellpadding="5" cellspacing="2"| |
||
| Line 268: | Line 277: | ||
|align="center" |55 |
|align="center" |55 |
||
| [[Chocobo Jig]] |
| [[Chocobo Jig]] |
||
| + | |- BGCOLOR="#EEEEFF" |
||
| + | |align="center" |70 |
||
| + | | [[Chocobo Jig II]] |
||
|} |
|} |
||
|valign="top" width="25%"| |
|valign="top" width="25%"| |
||
| + | |||
==[[Flourishes I]]== |
==[[Flourishes I]]== |
||
{|border="1" width="100%" cellspacing="0" cellpadding="2" |
{|border="1" width="100%" cellspacing="0" cellpadding="2" |
||
| Line 304: | Line 317: | ||
|
|
||
| valign="top" width="12%"| |
| valign="top" width="12%"| |
||
| − | ==[[ |
+ | ==[[Flourishes III]]== |
{|border="1" width="100%" cellspacing="0" cellpadding="2" |
{|border="1" width="100%" cellspacing="0" cellpadding="2" |
||
!BGCOLOR="#CCAAFF" width="28%" align="center" |Level |
!BGCOLOR="#CCAAFF" width="28%" align="center" |Level |
||
| Line 314: | Line 327: | ||
|align="center" |89 |
|align="center" |89 |
||
| [[Striking Flourish]] |
| [[Striking Flourish]] |
||
| + | |- BGCOLOR="#EEEEFF" |
||
| + | |align="center" |93 |
||
| + | | [[Ternary Flourish]] |
||
|} |
|} |
||
|} |
|} |
||
| Line 322: | Line 338: | ||
!width="15%" style="background:#CDC8B1;"|Skill Ranking |
!width="15%" style="background:#CDC8B1;"|Skill Ranking |
||
!width="20%" style="background:#CDC8B1;"|Cap at Level 1 |
!width="20%" style="background:#CDC8B1;"|Cap at Level 1 |
||
| − | !width="20%" style="background:#CDC8B1;"|Cap at Level |
+ | !width="20%" style="background:#CDC8B1;"|Cap at Level 49 |
| − | !width="20%" style="background:#CDC8B1;"|Cap at Level |
+ | !width="20%" style="background:#CDC8B1;"|Cap at Level 99 |
|- valign="top" style="background:#F5F5F5;" |
|- valign="top" style="background:#F5F5F5;" |
||
| [[:Category:Daggers|Dagger]] |
| [[:Category:Daggers|Dagger]] |
||
| − | |align="center"| |
+ | | align="center" |A+ |
| − | |align="center"| |
+ | | align="center" |6 |
| − | |align="center"| |
+ | | align="center" |150 |
| − | |align="center"| |
+ | | align="center" |424 |
|- valign="top" style="background:#F5F5F5;" |
|- valign="top" style="background:#F5F5F5;" |
||
| [[:Category:Hand-to-Hand|Hand-to-Hand]] |
| [[:Category:Hand-to-Hand|Hand-to-Hand]] |
||
|align="center"|D |
|align="center"|D |
||
|align="center"|4 |
|align="center"|4 |
||
| − | |align="center"| |
+ | |align="center"|133 |
| − | |align="center"| |
+ | |align="center"|334 |
|- valign="top" style="background:#F5F5F5;" |
|- valign="top" style="background:#F5F5F5;" |
||
| [[:Category:Swords|Sword]] |
| [[:Category:Swords|Sword]] |
||
|align="center"|D |
|align="center"|D |
||
|align="center"|4 |
|align="center"|4 |
||
| − | |align="center"| |
+ | |align="center"|133 |
| − | |align="center"| |
+ | |align="center"|334 |
|- valign="top" style="background:#CDC8B1;" |
|- valign="top" style="background:#CDC8B1;" |
||
!width="25%" align="left" style="background:#CDC8B1;"| |
!width="25%" align="left" style="background:#CDC8B1;"| |
||
| Line 352: | Line 368: | ||
|align="center"|C+ |
|align="center"|C+ |
||
|align="center"|5 |
|align="center"|5 |
||
| − | |align="center"| |
+ | |align="center"|139 |
| − | |align="center"| |
+ | |align="center"|378 |
|- valign="top" style="background:#CDC8B1;" |
|- valign="top" style="background:#CDC8B1;" |
||
!width="25%" align="left" style="background:#CDC8B1;"| |
!width="25%" align="left" style="background:#CDC8B1;"| |
||
| Line 364: | Line 380: | ||
|align="center"|B+ |
|align="center"|B+ |
||
|align="center"|5 |
|align="center"|5 |
||
| − | |align="center"| |
+ | |align="center"|144 |
| − | |align="center"| |
+ | |align="center"|404 |
|- valign="top" style="background:#F5F5F5;" |
|- valign="top" style="background:#F5F5F5;" |
||
| [[Parrying]] |
| [[Parrying]] |
||
|align="center"|B |
|align="center"|B |
||
|align="center"|5 |
|align="center"|5 |
||
| − | |align="center"| |
+ | |align="center"|144 |
| − | |align="center"| |
+ | |align="center"|398 |
|- |
|- |
||
|} |
|} |
||
| Line 483: | Line 499: | ||
|align="center" |75 |
|align="center" |75 |
||
| [[Etoile Casaque +1]] |
| [[Etoile Casaque +1]] |
||
| + | |- valign="top" BGCOLOR="#FFEAF0" |
||
| + | |}<br> |
||
| + | {|border="1" width="100%" cellspacing="0" cellpadding="2" |
||
| + | | BGCOLOR="#E87093" align="center" colspan="3"| '''[[Etoile Attire +2 Set|Relic Set +2]]''' |
||
| + | |- BGCOLOR="#E87093" |
||
| + | ! width="30%" | Level |
||
| + | ! width="70%" | Relic |
||
| + | |- valign="top" BGCOLOR="#FFEAF0" |
||
| + | |align="center" |90 |
||
| + | | [[Etoile Bangles +2]] |
||
| + | |- valign="top" BGCOLOR="#FFEAF0" |
||
| + | |align="center" |90 |
||
| + | | [[Etoile Tiara +2]] |
||
| + | |- valign="top" BGCOLOR="#FFEAF0" |
||
| + | |align="center" |90 |
||
| + | | [[Etoile Toe Shoes +2]] |
||
| + | |- valign="top" BGCOLOR="#FFEAF0" |
||
| + | |align="center" |90 |
||
| + | | [[Etoile Tights +2]] |
||
| + | |- valign="top" BGCOLOR="#FFEAF0" |
||
| + | |align="center" |90 |
||
| + | | [[Etoile Casaque +2]] |
||
|- valign="top" BGCOLOR="#FFEAF0" |
|- valign="top" BGCOLOR="#FFEAF0" |
||
|} |
|} |
||
| + | |||
| valign="top" width="20%" | |
| valign="top" width="20%" | |
||
{|border="1" width="100%" cellspacing="0" cellpadding="2" |
{|border="1" width="100%" cellspacing="0" cellpadding="2" |
||
| − | | BGCOLOR="#E87093" align="center" colspan="3"| ''' |
+ | | BGCOLOR="#E87093" align="center" colspan="3"| '''[[:Category:Mythic Weapons|Mythic]]/[[:Category:Empyrean Weapons|Empyrean]] Weapons''' |
|- BGCOLOR="#E87093" |
|- BGCOLOR="#E87093" |
||
! width="25%" | Level |
! width="25%" | Level |
||
| Line 493: | Line 532: | ||
|- valign="top" BGCOLOR="#FFEAF0" |
|- valign="top" BGCOLOR="#FFEAF0" |
||
|align="center" |75 |
|align="center" |75 |
||
| − | | [[Terpsichore |
+ | | [[Terpsichore|Terpsichore]] (Mythic) |
|- valign="top" BGCOLOR="#FFEAF0" |
|- valign="top" BGCOLOR="#FFEAF0" |
||
| − | |rowspan=" |
+ | |rowspan="2" align="center" |80 |
| − | | [[ |
+ | | [[Terpsichore (80)|Terpsichore]] (Mythic) |
| + | |- valign="top" BGCOLOR="#FFEAF0" |
||
| + | | [[Twashtar|Twashtar]] (Empyrean) |
||
| + | |- valign="top" BGCOLOR="#FFEAF0" |
||
| + | |rowspan="2" align="center" |85 |
||
| + | | [[Terpsichore (85)|Terpsichore]] (Mythic) |
||
| + | |- valign="top" BGCOLOR="#FFEAF0" |
||
| + | | [[Twashtar (85)|Twashtar]] (Empyrean) |
||
| + | |- valign="top" BGCOLOR="#FFEAF0" |
||
| + | |rowspan="2" align="center" |90 |
||
| + | | [[Terpsichore (90)|Terpsichore]] (Mythic) |
||
| + | |- valign="top" BGCOLOR="#FFEAF0" |
||
| + | | [[Twashtar (90)|Twashtar]] (Empyrean) |
||
| + | |- valign="top" BGCOLOR="#FFEAF0" |
||
| + | |rowspan="2" align="center" |95 |
||
| + | | [[Terpsichore (95)|Terpsichore]] (Mythic) |
||
| + | |- valign="top" BGCOLOR="#FFEAF0" |
||
| + | | [[Twashtar (95)|Twashtar]] (Empyrean) |
||
|} |
|} |
||
| valign="top" width="20%" | |
| valign="top" width="20%" | |
||
| Line 530: | Line 586: | ||
|} |
|} |
||
| − | |}<br> |
+ | |}<br><br> |
=Dancer Guides= |
=Dancer Guides= |
||
| Line 537: | Line 593: | ||
*[[Job Specific Equipment/Dancer]] |
*[[Job Specific Equipment/Dancer]] |
||
*[[How-To Guide: Dancer|How-to Guide: Dancer]] |
*[[How-To Guide: Dancer|How-to Guide: Dancer]] |
||
| − | *[[Dancer Equipment Guide by Eclipstic]] |
+ | *[[Dancer Equipment Guide by Eclipstic|Dancer Equipment Guide by Eclipstic (updated to 90)]] |
*[[Dancer: Guide to Weapons and Armor]] |
*[[Dancer: Guide to Weapons and Armor]] |
||
*[[Dancer Equipment Guide Chart]] |
*[[Dancer Equipment Guide Chart]] |
||
| Line 547: | Line 603: | ||
*[[Dancer Guide by Wasa]] |
*[[Dancer Guide by Wasa]] |
||
*[[Shattering Stars/Dancer]] ( a guide to DNC's limit break 5, "A Furious Finale") |
*[[Shattering Stars/Dancer]] ( a guide to DNC's limit break 5, "A Furious Finale") |
||
| + | *[[A Furious Finale: A Strategy for Dancer Limit Break]] by Nelka of Cerberus |
||
*[[Dancer Solo Guide 55+ by Squidgy]] |
*[[Dancer Solo Guide 55+ by Squidgy]] |
||
| + | *[[Dancer Empyrean equipment guide]] by [[User:Kraftlos|Kraftlos]] |
||
|} |
|} |
||
Revision as of 17:08, 17 October 2014
Job Overview
|
Art of the Dance
Dancer job abilities are divided into five categories: Sambas, Waltzes, Jigs, Steps, and Flourishes. Each of the dances within these categories is acquired at a different level, and requires a certain amount of TP to use (with the exception of Flourishes and Jigs). Each category has its own recast time, and using a dance will prevent the use of other dances within the same category until the recast time has expired. In addition, the effect of a Samba dance will be overwritten by other dances within the Samba category, regardless of the remaining duration.
- Sambas act as an Additional Effect on melee attacks. The Dancer inflicts the mob with a "Daze" for a short duration with each melee strike; this daze allows other party members striking the mob to drain additional effects from the mob (this effect does not stack with other Additional Effects).
- Waltzes cure HP or remove ailments from party members and Non Party members. Unlike magic spells, they are not interrupted by movement or mob hits (but can be Stunned).
- Jigs require no TP to use, and are typically not used for combat-related purposes.
- Steps are used to enfeeble an enemy, while at the same time generating the Finishing Moves required to perform Flourishes. The enfeebling effects produced by Steps can be stacked up to five times. The more times an effect is stacked, the more powerful it becomes. The Finishing Move effect lasts two hours or until used.
- Flourishes are used to produce various powerful effects by consuming the finishing moves generated by Steps. Each type of Flourish requires a certain number of finishing moves to perform.
- Flourishes are divided into three categories: Flourishes I, Flourishes II and Flourishes III. Each category has its own recast time.
Sambas
|
Waltzes
|
Steps
| ||||||||||||||||||||||||||||||||||||||||||
Jigs
|
Flourishes I
|
Flourishes II
| ||||||||||||||||||||||||||||||||||||||||||
|
|
Flourishes III
|
Combat Skill Ratings
| Skill | Skill Ranking | Cap at Level 1 | Cap at Level 49 | Cap at Level 99 |
|---|---|---|---|---|
| Dagger | A+ | 6 | 150 | 424 |
| Hand-to-Hand | D | 4 | 133 | 334 |
| Sword | D | 4 | 133 | 334 |
| Throwing | C+ | 5 | 139 | 378 |
| Evasion | B+ | 5 | 144 | 404 |
| Parrying | B | 5 | 144 | 398 |
See Dancer Skill Caps for a by-level breakdown of Weapon Skill limits.
Artifact Equipment
- To see a side by side comparison of Artifact/Relic sets visit Dancer Artifact/Relic Sets Comparison.
- To see a side by side comparison of Empyrean sets visit Charis Sets Comparison.
|
|
| |||||||||||||||||||||||||||||||||||||||||||||||||||
|
|
| ||||||||||||||||||||||||||||||||||||||||||||||||||||||||||||||||||||||
Dancer Guides
|
See also
| Jobs | |
|---|---|
| |
|