(→Walkthrough: clarifying which Cermet Door Rukususu is behind) |
mNo edit summary |
||
| (21 intermediate revisions by 15 users not shown) | |||
| Line 1: | Line 1: | ||
| + | {{Quest |
||
| − | {|border="0" width="100%" |
||
| ⚫ | |||
| − | |width="70%" valign="top"| |
||
| ⚫ | |||
| − | {|border="0" width="70%" cellpadding="0" cellspacing="3" |
||
| + | |items={{KeyItem}}[[Shantotto's New Spell]] |
||
| − | |valign="top" BGCOLOR="#D5D9FF"| '''Start NPC:''' |
||
| ⚫ | |||
| − | |valign="top" BGCOLOR="#E0E0E0"| [[Shantotto]] - [[Windurst Walls]] (K-7)<br> |
||
| + | |repeatable=No |
||
| − | |- |
||
| ⚫ | |||
| − | |valign="top" BGCOLOR="#D5D9FF"| '''Requirements:'''<br> |
||
| ⚫ | |||
| ⚫ | |||
| + | |next= |
||
| − | |- |
||
| + | | cutscenes = |
||
| − | |valign="top" BGCOLOR="#D5D9FF"| '''Items Needed:''' |
||
| + | {{Quest/Cutscene|''Optional:''<br>Curses, Foiled A-Golem!? (pt.1)|[[Goblin Footprint]] {{Location|Fei'Yin|map=Map 1|F-11}}}} |
||
| − | |valign="top" BGCOLOR="#E0E0E0"| [[Key Item]]: [[Shantotto's New Spell]]<br> |
||
| + | {{Quest/Cutscene|Curses, Foiled A-Golem!? (pt.2)|[[Goblin Footprint]] {{Location|Fei'Yin|map=Map 1|F-11}}}} |
||
| − | |- |
||
| + | {{Quest/Cutscene|Curses, Foiled A-Golem!?|[[Juvillie]] {{Location|Windurst Walls|D-6}}}} |
||
| − | |valign="top" BGCOLOR="#D5D9FF"| '''Title:''' |
||
| ⚫ | |||
| ⚫ | |||
| + | |||
| − | |- |
||
| − | |valign="top" BGCOLOR="#D5D9FF"| '''Repeatable:''' |
||
| − | |valign="top" BGCOLOR="#E0E0E0"| No. |
||
| − | |- |
||
| − | |valign="top" BGCOLOR="#D5D9FF"| '''Reward:''' |
||
| ⚫ | |||
| − | |- |
||
| − | |valign="top" BGCOLOR="white"| |
||
| − | |valign="top" BGCOLOR="white"| |
||
| − | |- |
||
| − | |valign="top" BGCOLOR="#D5D9FF"| '''Previous Quest:''' |
||
| ⚫ | |||
| − | |- |
||
| − | |valign="top" BGCOLOR="#D5D9FF"| '''Next Quest:''' |
||
| − | |valign="top" BGCOLOR="#E0E0E0"| None. |
||
| ⚫ | |||
| − | |width="30%" valign="top"| |
||
| − | __TOC__ |
||
| ⚫ | |||
| ⚫ | |||
| ⚫ | |||
==Walkthrough== |
==Walkthrough== |
||
| ⚫ | |||
| ⚫ | |||
| + | [[Image:FeiYin1.png|thumb|Fei'Yin 1]] |
||
| ⚫ | |||
| ⚫ | |||
| ⚫ | |||
| ⚫ | |||
| ⚫ | |||
| + | ''If you are on certain quests or missions, speaking to [[Shantotto]] more than once may be necessary. |
||
| ⚫ | |||
| + | *Speak to [[Shantotto]], who asks a question. Choose the second option, "Ask if you're worthy." |
||
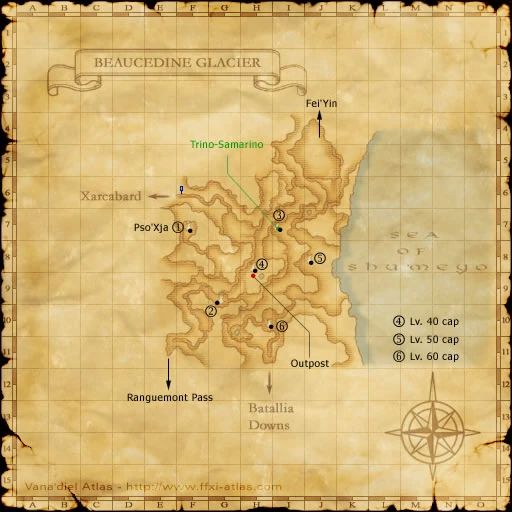
| − | *Head out to [[Beaucedine Glacier]] and pass the first tower. At the fork in the road (H-9), head east. At (I-8) take the slope downward and head north to the tower at (I-7) and [[Torino-Samarino]]. |
||
| ⚫ | |||
| ⚫ | |||
| ⚫ | |||
| ⚫ | |||
| ⚫ | |||
| − | **There are 2 [[Living Statue]] mobs inside the tower near [[Torino-Samarino]] - be careful if using Sneak and Invis. |
||
| ⚫ | |||
| − | *Head back outside to the glacier and head south to (I-9) and head down another slope. Head east to (J-9) then head north, past the tower and a frozen pond to (J-6) where you will need to head down another slope that leads to an open field. Head north and you'll see [[Fei'Yin]]. |
||
| + | *Head to the tower at ({{Location Tooltip|area=Beaucedine Glacier|pos=I-7}}) in [[Beaucedine Glacier]] |
||
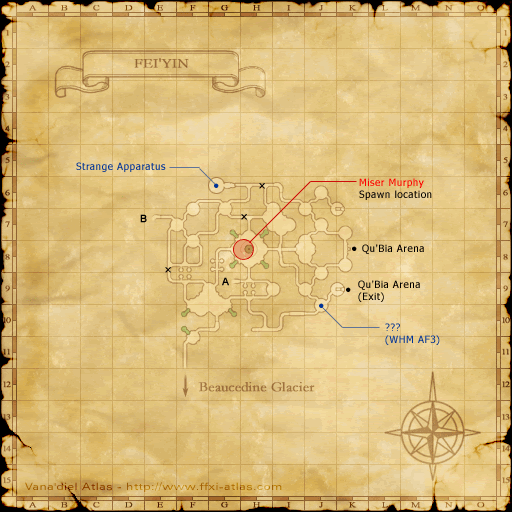
| − | *Once inside [[Fei'Yin]], head to (F-6) on the second map. Open the first cermet door on your right (approaching from the North) and you'll see a cutscene with [[Rukususu]]. |
||
| + | **From the [[Beaucedine Glacier]] outpost, take the downramp and turn left at the bottom. Follow this around to another downramp. Follow it and turn left at the bottom. The tower appears shortly. |
||
| − | :*If you kill too many [[Magic Pot|magic pots]], [[Doll|dolls]], or [[Shadow|shadow]]-type enemies, you will get the message, "A change has occured in the [[Shantotto's New Spell]]". A [[Shantotto's Ex-spell]] will replace the old key item. [[Rukususu]] will tell you to retrieve another scroll from the Tarutaru in Beaucedine. |
||
| ⚫ | |||
| ⚫ | |||
| ⚫ | |||
| + | *Head back outside to the glacier and to [[Fei'Yin]]. |
||
| + | **You may also use Fei'Yin [[Home Point]] #2 to reach the second map quickly. |
||
| + | *Once inside [[Fei'Yin]], head to ({{Location Tooltip|area=Fei'Yin|map=Map 2|pos=F-6}}) on the second map. |
||
| + | *Click the first cermet door on your right (approaching from the north; [[Rukususu]] is visible through the door) for a cutscene. |
||
| ⚫ | |||
| + | |||
| ⚫ | |||
| + | |client=[[Shantotto]] (Manor, [[Windurst Walls]]) |
||
| ⚫ | |||
| ⚫ | |||
| + | {{spoiler2}} |
||
| ⚫ | |||
| ⚫ | |||
| − | '''Summary''': |
||
| ⚫ | |||
[[Category:Quests]][[Category:Windurst Quests]] |
[[Category:Quests]][[Category:Windurst Quests]] |
||
[[de:Flüche, vereitelt vom Golem!?]] |
[[de:Flüche, vereitelt vom Golem!?]] |
||
Revision as of 19:55, 16 December 2019
| Start NPC | Shantotto - Windurst Walls (K-7) |
|---|---|
| Requirements | Windurst Reputation 4 Level 10 |
| Items Needed | |
| Title Granted | Total Loser Doctor Shantotto's Flavor of the Month |
| Repeatable | No |
| Reward | Scroll of Warp II |
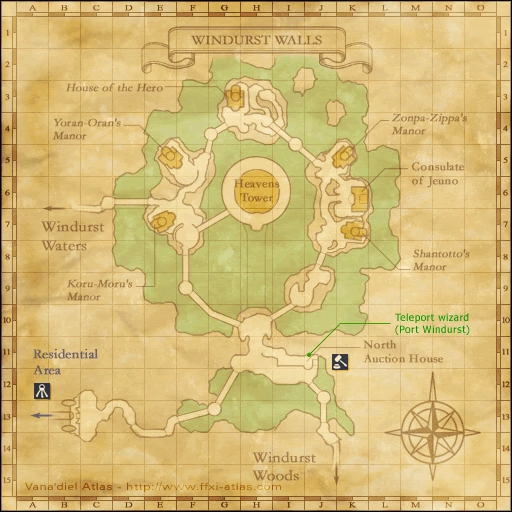
| ← Previous Quest | Next Quest → |
|---|---|
| Curses, Foiled...Again!? | None |
Walkthrough
Beaucedine Glacier

Fei'Yin 1

Fei'Yin 2
You must zone after completing Curses, Foiled...Again!?. If you are on certain quests or missions, speaking to Shantotto more than once may be necessary.
- Speak to Shantotto, who asks a question. Choose the second option, "Ask if you're worthy."
- Shantotto then asks another question; choose the second option, "Whatchu talkin' 'bout Shantotto?"
- Shantotto bestows you with the title "Total Loser" if you choose the first option, "Yes mommy" instead of the second option. If you do not choose this option, however, you can still get the title at the title-changing NPC after the quest has been completed.
- The title "Total Loser" is not necessary for this quest. Choosing the second option on the first question is, however. It is possible to get the title without activating the quest.
- Shantotto tells you to go to the Beaucedine Glacier and find Rukususu. The quest now appears in the log.
- Head to the tower at (I-7) in Beaucedine Glacier
- From the Beaucedine Glacier outpost, take the downramp and turn left at the bottom. Follow this around to another downramp. Follow it and turn left at the bottom. The tower appears shortly.
- Speak to Torino-Samarino, who asks a question. Select the first option to get
 Shantotto's New Spell.
- If you are on Desires of Emptiness, Torino-Samarino may give you optional dialogue from that mission. Simply speak with Torino-Samarino again to get the dialogue for this quest.
- Head back outside to the glacier and to Fei'Yin.
- You may also use Fei'Yin Home Point #2 to reach the second map quickly.
- Once inside Fei'Yin, head to (F-6) on the second map.
- Click the first cermet door on your right (approaching from the north; Rukususu is visible through the door) for a cutscene.
- Return to Windurst Walls and talk to Shantotto for Warp II scroll and the title "Doctor Shantotto's Flavor of the Month."
Game Description
- Client
- Shantotto (Manor, Windurst Walls)
- Summary
- Shantotto wants you to go ask the Rhinostery's Rukususu about how her magic is performing. Rukususu's party is said to be at the tower ruins on the Beaucedine Glacier.