| Line 130: | Line 130: | ||
|- BGCOLOR=#d3d3df |
|- BGCOLOR=#d3d3df |
||
|align=left width=5%|[[Omega's Eye]] ([[Homam Zucchetto]]) |
|align=left width=5%|[[Omega's Eye]] ([[Homam Zucchetto]]) |
||
| − | |{{Abundance|213| |
+ | |{{Abundance|213|334}} |
|- BGCOLOR=#d3d3df |
|- BGCOLOR=#d3d3df |
||
|align=left width=5%|[[Omega's Heart]] ([[Homam Corazza]]) |
|align=left width=5%|[[Omega's Heart]] ([[Homam Corazza]]) |
||
| − | |{{Abundance| 90| |
+ | |{{Abundance| 90|334}} |
|- BGCOLOR=#d3d3df |
|- BGCOLOR=#d3d3df |
||
|align=left width=5%|[[Omega's Foreleg]] ([[Homam Manopolas]]) |
|align=left width=5%|[[Omega's Foreleg]] ([[Homam Manopolas]]) |
||
| − | |{{Abundance| |
+ | |{{Abundance|30|334}} |
|- BGCOLOR=#d3d3df |
|- BGCOLOR=#d3d3df |
||
|align=left width=5%|[[Omega's Hind Leg]] ([[Homam Cosciales]]) |
|align=left width=5%|[[Omega's Hind Leg]] ([[Homam Cosciales]]) |
||
| − | |{{Abundance| |
+ | |{{Abundance|134|334}} |
|- BGCOLOR=#d3d3df |
|- BGCOLOR=#d3d3df |
||
|align=left width=5%|[[Omega's Tail]] ([[Homam Gambieras]]) |
|align=left width=5%|[[Omega's Tail]] ([[Homam Gambieras]]) |
||
| − | |{{Abundance|138| |
+ | |{{Abundance|138|334}} |
|} |
|} |
||
|} |
|} |
||
Revision as of 23:53, 8 June 2009

- Central Apollyon is a subsection of the Apollyon zone in the Limbus region.
- It is reached via the Teleport-Dem (or Mea) crag entrance to Al'Taieu.
- Enter by trading Charcoal Chip, Magenta Chip, Smalt Chip, and Smoky Chip to the Swirling Vortex in Apollyon.
- A Red Card or Black Card is required to enter this area.
- Cosmo-Cleanse is also required to enter this area.
- 30 minute limit, no extensions.
- There is only one level.
- Title granted: Apollyon Ravager
- Xbox 360 Achievement granted: Apollyon Ravager (20 Gamerscore)
Drop Chart
Proto-Omega
Quadrupedal Form

Bipedal Form
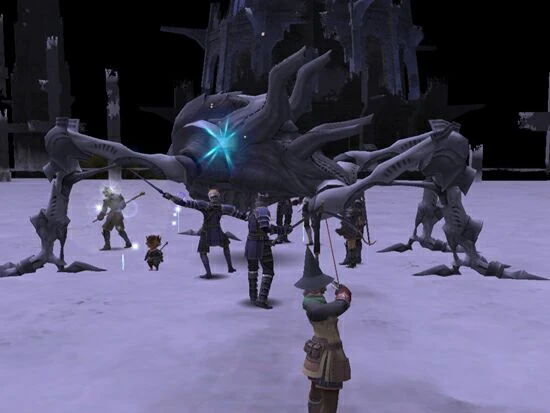
Proto-Omega has about 26000 HP.
- Auto-Regen (low-middle)
- It is immune to Gravity, Bind, Dispel, and Blind.
- It is susceptible to Slow, Paralyze, Elegy, Requiem, Threnody, Finale, and Stun.
- It seems to take the most damage from Blizzard nukes (~618), but Thunder is also good (~581).
- It is highly resistant to Dark elemental spells/effects.
- It is not affected by CCB Polymer Pumps.
- It has party aggro (just like all Limbus mobs), so anyone using zombie tactics to keep DoT on and prevent regeneration after a wipe must drop from party first.
Proto-Omega periodically switches between two stances, shown at right. It starts out on four legs and switches stances every two minutes after first aggro.
- On all four legs, he is extremely resistant to physical damage, and nukes hit for about 70% damage.
- Melee attacks inflict ~200 damage, sometimes with additional effect Stun.
- Suggested strategy: Tank with shadows, melees maybe build TP but then stand back, BLMs DD some but be ready for the Gunpod when it moves to two legs.
- Just free stun in this form, no stunnable attacks.
- On two legs he is vulnerable to physical damage, and nukes hit for about 10% damage.
- Melee attacks inflict ~500 damage.
- Suggested strategy: Tank with shadows, melees DD, BLMs stun, healers stand far back and be ready with Paralyna and Silena.
- If you try to stun whenever you see the red lines of a TP move in this form, you'll probably just stun Stun Cannon and Floodlight, which works out well.
- At 25% HP it switches into his final form, which looks the same as bipedal form, but is significantly different.
- Melee attacks are extremely damaging; over ~600 damage.
- The final form takes 50% damage from both physical and magical attacks.
- The final form has Regain, allowing it to spam special attacks (Pod Ejection, Colossal Blow and Laser Shower).
- Suggested strategy: Kite while farming gunpods and slowly bringing its HP down so you can kill it fast when time gets low.
- Alternately, Chainspell Stun, tank in place and zerg it down fast.
- Avoiding hate reset from Colossal Blow is important; either kiting or Stun can accomplish that.
Proto-Omega incorporates many of Omega's special attacks, plus some new ones. They differ by form:
- Quadrupedal Form:
- Guided Missile: Targeted 10'(?) AoE ~400-750 physical damage, absorbed by Utsusemi
- Ion Efflux: Cone Attack Paralysis
- Target Analysis: 10'(?) AoE Absorb-ALL, absorbed by Utsusemi
- Pile Pitch: Massive damage, hate reset and Bind (30 sec), ignores Utsusemi (90% of current HP, reduced by -physical damage gear)
- Rear Lasers: Damage and Petrification, used when someone behind Omega gets hate
- Bipedal Form:
- Sometimes uses Pod Ejection while switching into two leg form.
- Guided Missile II: Targeted 15'(?) AoE ~475 magic damage, ignores Utsusemi
- Floodlight: Targeted 15'(?) AoE ~300 magic damage, Flash, Blind and Silence, ignores Utsusemi
- Hyper Pulse: 20' AoE ~300 magic damage, Gravity and short Bind, wipes Utsusemi
- Stun Cannon: Targeted 20'(?) AoE ~300 magic damage and Paralysis, ignores Utsusemi
- Final Form (always bipdal):
- Colossal Blow: Massive damage, knockback and hate reset, ignores Utsusemi
- Laser Shower: Cone Attack ~150-900 damage
- Damage is reduced by kiting or standing off-center; this seems to follow the same rules as Wyrm breath.
- Pod Ejection: Spawn a Gunpod. Used at the beginning of final form, and then periodically afterwards.
- Gunpods do not link with Proto-Omega, they seem to choose their target randomly.
- The Gunpods have about 2000 HP, so two Tier IV nukes or Spirits Withins should knock them out. Kill them ASAP, they hit hard.
- One BLM/NIN can be useful for pulling Gunpods.
- They drop one of the following: 6 Ancient Beastcoins, an AF+1 material, one of the chips you used to enter the battle, or a synthesis material.
When Proto-Omega is defeated the final Armoury Crate appears in the middle of the arena. It contains 5-6 Ancient Beastcoins and 2-3 Omega body parts.
Don't be in too much of a hurry to kill Proto-Omega; the more Gunpods it spawns, the more loot you can get from them. If you can survive the final form for a while, it's best to keep kiting it around farming Gunpods until you're almost out of time.
| Limbus | |
|---|---|
| Apollyon | |
| Temenos | |
| Rewards | |
| NPCs | |