| (27 intermediate revisions by 13 users not shown) | |||
| Line 4: | Line 4: | ||
| imagesize = 300px |
| imagesize = 300px |
||
| System = Dragons |
| System = Dragons |
||
| − | | Subspecies = |
+ | | Subspecies = Legendary Wyvern, Ajattara |
| Behavior = A, S |
| Behavior = A, S |
||
| Weak = {{Resist Dark}} |
| Weak = {{Resist Dark}} |
||
| Line 19: | Line 19: | ||
| XP Bonus = |
| XP Bonus = |
||
| Notes = |
| Notes = |
||
| − | | Description = [[:category:Dragons|Dragons]], [[:category:Wyverns| |
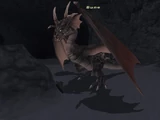
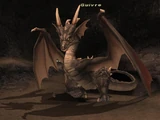
+ | | Description = [[:category:Dragons|Dragons]], [[:category:Wyverns|wyverns]], and [[:category:Wyrms|wyrms]] are often confused by adventurers young and old. In between the gigantic wyrm and the smaller dragon are the Wyvern, who are also the most prevalent of the three in [[Vana'diel]]. Wyverns tend to be gold in color, and have very good sight; wyverns can see in front of them and from the side for a very long distance. The notable difference between a wyvern and a wyrm is the fact wyverns rarely fly. With a wide wingspan and two primary legs, wyvern are almost birdlike in appearance (compare to the [[:Category:Rocs|rocs]]). |
Defeated wyverns can leave behind [[Wyvern Skin|skin]], [[Wyvern Skull|skulls]] and [[Wyvern Wing|wings]] – each of which has their uses by expert crafters. Some of the more notorious wyvern have developed a taste for hoarding treasure akin to their larger wyrm cousins. Defeating these creatures can be almost as rewarding as defeating a wyrm itself. |
Defeated wyverns can leave behind [[Wyvern Skin|skin]], [[Wyvern Skull|skulls]] and [[Wyvern Wing|wings]] – each of which has their uses by expert crafters. Some of the more notorious wyvern have developed a taste for hoarding treasure akin to their larger wyrm cousins. Defeating these creatures can be almost as rewarding as defeating a wyrm itself. |
||
| Line 37: | Line 37: | ||
|BGCOLOR="#e3e6ff" width="12%" align="center"|[[Pankration]] |
|BGCOLOR="#e3e6ff" width="12%" align="center"|[[Pankration]] |
||
|- |
|- |
||
| − | |BGCOLOR="#FFE4E1" |'''[[Dispelling Wind]]:''' [[Distance|10']] [[AoE]] [[Dispel]]. |
+ | |BGCOLOR="#FFE4E1" |'''[[Dispelling Wind]]:''' [[Distance|10']] [[AoE]] 3 buff [[Dispel]]. |
|BGCOLOR="#E3E6FF" align="center"|{{Check}} |
|BGCOLOR="#E3E6FF" align="center"|{{Check}} |
||
|BGCOLOR="#e3e6ff" align="center"|{{Check}} |
|BGCOLOR="#e3e6ff" align="center"|{{Check}} |
||
|BGCOLOR="#E3E6FF" align="center"|{{Check}} |
|BGCOLOR="#E3E6FF" align="center"|{{Check}} |
||
|BGCOLOR="#e3e6ff" align="center"|{{Check}} |
|BGCOLOR="#e3e6ff" align="center"|{{Check}} |
||
| − | |BGCOLOR="#E3E6FF" align="center"|{{ |
+ | |BGCOLOR="#E3E6FF" align="center"|{{Check}} |
|- |
|- |
||
|BGCOLOR="#FFE4E1" |'''[[Dread Shriek]]:''' [[Distance|10']] [[AoE]] [[Paralysis]]. Very potent. |
|BGCOLOR="#FFE4E1" |'''[[Dread Shriek]]:''' [[Distance|10']] [[AoE]] [[Paralysis]]. Very potent. |
||
| Line 49: | Line 49: | ||
|BGCOLOR="#E3E6FF" align="center"|{{Check}} |
|BGCOLOR="#E3E6FF" align="center"|{{Check}} |
||
|BGCOLOR="#e3e6ff" align="center"|{{Check}} |
|BGCOLOR="#e3e6ff" align="center"|{{Check}} |
||
| − | |BGCOLOR="#E3E6FF" align="center"|{{ |
+ | |BGCOLOR="#E3E6FF" align="center"|{{Check}} |
|- |
|- |
||
|BGCOLOR="#FFE4E1" |'''[[Deadly Drive]]:''' Single attack. Potential one-shotter, but not as likely as Fang Rush. |
|BGCOLOR="#FFE4E1" |'''[[Deadly Drive]]:''' Single attack. Potential one-shotter, but not as likely as Fang Rush. |
||
| Line 56: | Line 56: | ||
|BGCOLOR="#E3E6FF" align="center"|{{Check}} |
|BGCOLOR="#E3E6FF" align="center"|{{Check}} |
||
|BGCOLOR="#e3e6ff" align="center"|{{Check}} |
|BGCOLOR="#e3e6ff" align="center"|{{Check}} |
||
| − | |BGCOLOR="#E3E6FF" align="center"|{{ |
+ | |BGCOLOR="#E3E6FF" align="center"|{{Check}} |
|- |
|- |
||
|BGCOLOR="#FFE4E1" |'''[[Fang Rush]]:''' Single target three hit attack. Has strong potential to one-shot anyone. |
|BGCOLOR="#FFE4E1" |'''[[Fang Rush]]:''' Single target three hit attack. Has strong potential to one-shot anyone. |
||
| Line 70: | Line 70: | ||
|BGCOLOR="#E3E6FF" align="center"|{{Check}} |
|BGCOLOR="#E3E6FF" align="center"|{{Check}} |
||
|BGCOLOR="#e3e6ff" align="center"|{{Check}} |
|BGCOLOR="#e3e6ff" align="center"|{{Check}} |
||
| − | |BGCOLOR="#E3E6FF" align="center"|{{ |
+ | |BGCOLOR="#E3E6FF" align="center"|{{Check}} |
|- |
|- |
||
|BGCOLOR="#66CCFF" |'''[[Radiant Breath]]:''' {{Light|Light}}-based [[Breath Attack]] that inflicts [[Slow (Status Effect)|Slow]] and [[Silence (Status Effect)|Silence]]. |
|BGCOLOR="#66CCFF" |'''[[Radiant Breath]]:''' {{Light|Light}}-based [[Breath Attack]] that inflicts [[Slow (Status Effect)|Slow]] and [[Silence (Status Effect)|Silence]]. |
||
| Line 77: | Line 77: | ||
|BGCOLOR="#E3E6FF" align="center"|{{Check}} |
|BGCOLOR="#E3E6FF" align="center"|{{Check}} |
||
|BGCOLOR="#e3e6ff" align="center"|{{Check}} |
|BGCOLOR="#e3e6ff" align="center"|{{Check}} |
||
| − | |BGCOLOR="#E3E6FF" align="center"|{{ |
+ | |BGCOLOR="#E3E6FF" align="center"|{{Check}} |
|- |
|- |
||
|BGCOLOR="#FFE4E1" |'''[[Tail Crush]]:''' Single-target physical damage that inflicts [[Poison (Status Effect)|Poison]]. |
|BGCOLOR="#FFE4E1" |'''[[Tail Crush]]:''' Single-target physical damage that inflicts [[Poison (Status Effect)|Poison]]. |
||
| Line 83: | Line 83: | ||
|BGCOLOR="#e3e6ff" align="center"|{{Check}} |
|BGCOLOR="#e3e6ff" align="center"|{{Check}} |
||
|BGCOLOR="#E3E6FF" align="center"|{{Check}} |
|BGCOLOR="#E3E6FF" align="center"|{{Check}} |
||
| + | |BGCOLOR="#e3e6ff" align="center"|{{Check}} |
||
| + | |BGCOLOR="#E3E6FF" align="center"|{{Check}} |
||
| + | |- |
||
| + | |BGCOLOR="#FFE4E1" |'''[[Blizzard Breath]]:''' {{Ice}}-based [[Breath Attack]] (only used by certain Notorious Monsters) |
||
| + | |BGCOLOR="#E3E6FF" align="center"|{{Check}} |
||
| ⚫ | |||
| ⚫ | |||
| + | |BGCOLOR="#e3e6ff" align="center"|{{Check}} |
||
| + | |BGCOLOR="#E3E6FF" align="center"|{{Question}} |
||
| + | |- |
||
| + | |BGCOLOR="#FFE4E1" |'''[[Chaos Breath]]:''' {{Dark}}-based [[Breath Attack]] (only used by certain Notorious Monsters) |
||
| + | |BGCOLOR="#E3E6FF" align="center"|{{Check}} |
||
| + | |BGCOLOR="#e3e6ff" align="center"|{{X}} |
||
| + | |BGCOLOR="#E3E6FF" align="center"|{{X}} |
||
| + | |BGCOLOR="#e3e6ff" align="center"|{{Check}} |
||
| + | |BGCOLOR="#E3E6FF" align="center"|{{Question}} |
||
| + | |- |
||
| + | |BGCOLOR="#66CCFF" |'''[[Thunder Breath]]:''' {{Lightning}}-based [[Breath Attack]] (only used by certain Notorious Monsters) |
||
| + | |BGCOLOR="#E3E6FF" align="center"|{{Check}} |
||
| + | |BGCOLOR="#e3e6ff" align="center"|{{X}} |
||
| + | |BGCOLOR="#E3E6FF" align="center"|{{X}} |
||
| + | |BGCOLOR="#e3e6ff" align="center"|{{Check}} |
||
| + | |BGCOLOR="#E3E6FF" align="center"|{{Question}} |
||
| + | |- |
||
| + | |BGCOLOR="#FFE4E1" |'''[[Hurricane Breath]]:''' {{Wind}}-based [[Breath Attack]] that removes one piece of equipment (only used by certain Notorious Monsters) |
||
| + | |BGCOLOR="#E3E6FF" align="center"|{{X}} |
||
| + | |BGCOLOR="#e3e6ff" align="center"|{{X}} |
||
| + | |BGCOLOR="#E3E6FF" align="center"|{{X}} |
||
|BGCOLOR="#e3e6ff" align="center"|{{Check}} |
|BGCOLOR="#e3e6ff" align="center"|{{Check}} |
||
|BGCOLOR="#E3E6FF" align="center"|{{Question}} |
|BGCOLOR="#E3E6FF" align="center"|{{Question}} |
||
| Line 101: | Line 129: | ||
|[[Aiatar]] |
|[[Aiatar]] |
||
|[[Lottery Spawn]] from the [[Flamedrake]]s around (G-7) |
|[[Lottery Spawn]] from the [[Flamedrake]]s around (G-7) |
||
| − | | align="center" | [[ |
+ | | align="center" | [[File:qmark.gif]] |
|[[Riverne - Site A01]] |
|[[Riverne - Site A01]] |
||
|[[Falconer's Hose]]<br>[[Sable Cuisses]] |
|[[Falconer's Hose]]<br>[[Sable Cuisses]] |
||
|- style="background:#EEE8AA;" valign="top" |
|- style="background:#EEE8AA;" valign="top" |
||
| − | |[[ |
+ | |[[Balaur]] |
| + | |Located @ (L-7) |
||
| ⚫ | |||
| − | | align="center" | |
+ | | align="center" | {{Information Needed}} |
| − | |[[ |
+ | |[[Abyssea - Konschtat]] |
| + | |[[Balaur Skull]]<br>[[Praeda Sabatons]]<br>[[Ravager's Gorget]]<br>{{KeyItem}}[[Atma of Stormbreath]] |
||
| ⚫ | |||
|- style="background:#EEE8AA;" valign="top" |
|- style="background:#EEE8AA;" valign="top" |
||
| Line 118: | Line 146: | ||
|[[Gustav Tunnel]] |
|[[Gustav Tunnel]] |
||
|[[Enhancing Sword]] |
|[[Enhancing Sword]] |
||
| − | |||
| ⚫ | |||
| ⚫ | |||
| ⚫ | |||
| ⚫ | |||
| ⚫ | |||
| ⚫ | |||
| − | |||
| ⚫ | |||
| ⚫ | |||
| ⚫ | |||
| ⚫ | |||
| ⚫ | |||
| ⚫ | |||
|- style="background:#EEE8AA;" valign="top" |
|- style="background:#EEE8AA;" valign="top" |
||
| Line 146: | Line 160: | ||
|[[Ruhotz Silvermines]] |
|[[Ruhotz Silvermines]] |
||
|[[Black Tathlum]]<br>[[Guivre's Skull]]<br>[[Zahak's Mail]] |
|[[Black Tathlum]]<br>[[Guivre's Skull]]<br>[[Zahak's Mail]] |
||
| + | |||
| ⚫ | |||
| + | |[[Minaruja]] |
||
| + | |[[Forced Spawn]] by trading a [[Pursuer's Wing]] to the [[???]] at (I-10) |
||
| + | | align="center" | {{question}} |
||
| + | |[[Abyssea - Grauberg]] |
||
| + | |[[Blur Mantle]]<br>[[Orison Seal: Hands]]<br>[[Bale Seal: Hands]]<br>[[Unkai Seal: Hands]]<br>[[Mavi Seal: Hands]]<br>[[Minaruja Skull]] |
||
| + | |||
| ⚫ | |||
| ⚫ | |||
| ⚫ | |||
| + | | align="center" | 80-82 |
||
| ⚫ | |||
| ⚫ | |||
|- style="background:#EEE8AA;" valign="top" |
|- style="background:#EEE8AA;" valign="top" |
||
| Line 153: | Line 181: | ||
|[[Ru'Aun Gardens]] |
|[[Ru'Aun Gardens]] |
||
|[[Aquarian Abjuration: Legs]]<br>[[Dryadic Abjuration: Head]]<br>[[Martial Abjuration: Head]]<br>[[Seal of Seiryu]]<br>[[Seiryu's Kote]]<br>[[Seiryu's Sword]]<br>[[Wyrmal Abjuration: Hands]] |
|[[Aquarian Abjuration: Legs]]<br>[[Dryadic Abjuration: Head]]<br>[[Martial Abjuration: Head]]<br>[[Seal of Seiryu]]<br>[[Seiryu's Kote]]<br>[[Seiryu's Sword]]<br>[[Wyrmal Abjuration: Hands]] |
||
| + | |||
| + | |- style="background:#EEE8AA;" valign="top" |
||
| ⚫ | |||
| ⚫ | |||
| + | | align="center" | 80-82 |
||
| ⚫ | |||
| ⚫ | |||
| + | |||
| + | |- style="background:#EEE8AA;" valign="top" |
||
| + | |[[Veri Selen]] |
||
| + | |[[Forced Spawn]] by trading an [[Ice Wyvern Scale]] to the [[???]] at (H-5) |
||
| + | | align="center" | {{question}} |
||
| + | |[[Abyssea - Uleguerand]] |
||
| + | |[[Vita Cape]]<br>[[Bale Seal: Hands]]<br>[[Ravager's Seal: Hands]]<br>[[Unkai Seal: Hands]]<br>[[Lancer's Seal: Hands]]<br>{{KeyItem}}[[Vermillion Abyssite of Guerdon]] |
||
| + | |||
| + | |- style="background:#EEE8AA;" valign="top" |
||
| + | |[[Vouivre]] |
||
| ⚫ | |||
| + | | align="center" | 79-80 |
||
| + | |[[Ifrit's Cauldron]] |
||
| ⚫ | |||
|- |
|- |
||
| Line 160: | Line 209: | ||
'''Mission NMs:''' [[Festive Firedrake]], [[Tatzlwurm]] |
'''Mission NMs:''' [[Festive Firedrake]], [[Tatzlwurm]] |
||
| − | '''Battlefield NMs:''' [[Blizzard Wyvern]] (BCNM), [[Chaos Wyvern]] (BCNM), [[Lightning Wyvern]] (BCNM), [[Radiant Wyvern]] (BCNM) |
+ | '''Battlefield NMs:''' [[Blizzard Wyvern]] (BCNM), [[Chaos Wyvern]] (BCNM), [[Lightning Wyvern]] (BCNM), [[Radiant Wyvern]] (BCNM), [[Simorg]] (ANNM) |
| − | ''' |
+ | '''Dynamis NMs:''' [[Andras's Vouivre]], [[Caim's Vouivre]] |
| + | |||
| + | '''Limbus NMs:''' [[Gorynich]] |
||
| + | |||
| + | '''Besieged NMs:''' [[War Wyvern]] |
||
| + | |||
| + | '''Campaign NMs:''' [[War Ajattara]] |
||
| + | |||
| + | '''Other NMs:''' [[Centycore]] ([[MMM]]), [[Haietlik]] (MMM - [[Actualization Team]]), [[Terrormonger]] (MMM - [[Appropriation Team]]) |
||
</small> |
</small> |
||
|} |
|} |
||
| Line 201: | Line 258: | ||
| align="center" | 75-78 |
| align="center" | 75-78 |
||
|[[Ifrit's Cauldron]] |
|[[Ifrit's Cauldron]] |
||
| + | |||
| + | |- style="background:#e3e6ff" valign="top" |
||
| + | |[[Kindred's Vouivre]] |
||
| + | | align="center" | {{Information Needed}} |
||
| + | |[[Dynamis - Xarcabard]] |
||
|- style="background:#E3E6FF;" valign="top" |
|- style="background:#E3E6FF;" valign="top" |
||
| Line 226: | Line 288: | ||
| align="center" | 82-83 |
| align="center" | 82-83 |
||
|[[Bhaflau Thickets]] |
|[[Bhaflau Thickets]] |
||
| + | |||
| + | |- style="background:#E3E6FF;" valign="top" |
||
| + | |[[Blazedrake]] |
||
| + | | align="center" | 85-87 {{verification}} |
||
| + | |[[Riverne - Site B01|Riverne - Site #B01]] |
||
| + | |||
| + | |- style="background:#E3E6FF;" valign="top" |
||
| + | |[[Viridis Wyvern]] |
||
| + | | align="center" | {{Question}} |
||
| + | |[[Abyssea - Konschtat]] |
||
| + | |||
| + | |- style="background:#E3E6FF;" valign="top" |
||
| + | |[[Ergdrake]] |
||
| + | | align="center" | {{Question}} |
||
| + | |[[Abyssea - Altepa]] |
||
| + | |||
| + | |- style="background:#E3E6FF;" valign="top" |
||
| + | |[[Faunus Wyvern]] |
||
| + | | align="center" | {{Question}} |
||
| + | |[[Abyssea - Grauberg]] |
||
| + | |||
| + | |- style="background:#E3E6FF;" valign="top" |
||
| + | |[[Svelldrake]] |
||
| + | | align="center" | {{Question}} |
||
| + | |[[Abyssea - Uleguerand]] |
||
|} |
|} |
||
Latest revision as of 21:50, 22 May 2020
|
Wyverns
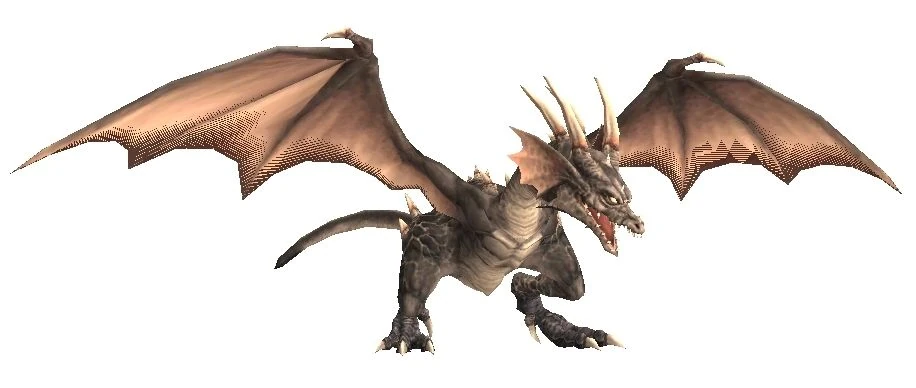 Defeated wyverns can leave behind skin, skulls and wings – each of which has their uses by expert crafters. Some of the more notorious wyvern have developed a taste for hoarding treasure akin to their larger wyrm cousins. Defeating these creatures can be almost as rewarding as defeating a wyrm itself. It should be noted that these wild wyvern are distinctly different from the domesticated pet wyvern, which are smaller and significantly more docile than their wild counterparts.
|
Family Information
|
Special Attacks
| Special Abilities | Original and Zilart Areas | Promathia Areas | Aht Urhgan Areas | Wings of the Goddess Areas | Pankration |
| Dispelling Wind: 10' AoE 3 buff Dispel. | |||||
| Dread Shriek: 10' AoE Paralysis. Very potent. | |||||
| Deadly Drive: Single attack. Potential one-shotter, but not as likely as Fang Rush. | |||||
| Fang Rush: Single target three hit attack. Has strong potential to one-shot anyone. | |||||
| Wind Wall: Gives Evasion Boost. Very potent. | |||||
| Radiant Breath: Light-based Breath Attack that inflicts Slow and Silence. | |||||
| Tail Crush: Single-target physical damage that inflicts Poison. | |||||
| Blizzard Breath: Ice-based Breath Attack (only used by certain Notorious Monsters) | |||||
| Chaos Breath: Dark-based Breath Attack (only used by certain Notorious Monsters) | |||||
| Thunder Breath: Lightning-based Breath Attack (only used by certain Notorious Monsters) | |||||
| Hurricane Breath: Wind-based Breath Attack that removes one piece of equipment (only used by certain Notorious Monsters) | |||||
| Note: Notorious Monsters in this family may use all of the above and/or additional unique special abilities. | |||||
Notorious Monsters in Family
Monsters in Family
| Name | Level | Zone |
|---|---|---|
| Firedrake | 41-43 | Riverne - Site #A01 |
| Flamedrake | 48-50 | Riverne - Site #A01 |
| Pyrodrake | 50-55 | Riverne - Site #B01 |
| Ignidrake | 58-60 | Riverne - Site #B01 |
| Wyvern | 72-75 | Labyrinth of Onzozo |
| Hurricane Wyvern | 75-78 | Ifrit's Cauldron |
| Kindred's Vouivre | Dynamis - Xarcabard | |
| Typhoon Wyvern | 78-80 | Gustav Tunnel |
| Ajattara | 79-82 | Grauberg (S) |
| Ladon | 80-82 | Kuftal Tunnel |
| Watch Wyvern | 81-83 | Mamook |
| Skoffin | 82-83 | Bhaflau Thickets |
| Blazedrake | 85-87 |
Riverne - Site #B01 |
| Viridis Wyvern | Abyssea - Konschtat | |
| Ergdrake | Abyssea - Altepa | |
| Faunus Wyvern | Abyssea - Grauberg | |
| Svelldrake | Abyssea - Uleguerand |
Historical Background
A wyvern (or wivern) is a winged reptilian legendary creature often found in medieval heraldry. Its usual blazon is statant (standing). The wyvern is similar to a European dragon (wyrm), but it differs in that it has only two legs (thus making it rather bird-like), cannot breathe fire, and has a barbed or snake-like tail. Occasionally, it is said to be smaller than a dragon or to be able to breathe fire. The wyvern is similar to another mythical creature, the cockatrice, which is similar to the basilisk. Its sounds are similar to the tone of a whistle or flute.


All items (49)


