Weather effects occur in certain areas. They can alter both gameplay and visual aspect.
Types of Weather
A Weather Effect is denoted by a symbol near the clock and compass, just above the Chat Log. The primary Weather Effects correspond to each of the eight Elements:
| Element | Weather Type |
|---|---|
| Fire | Hot Spells/Heat Waves |
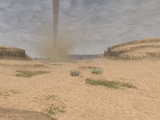
| Earth | Dust Storms/Sand Storms |
| Water | Rain/Squalls |
| Wind | Winds/Gales |
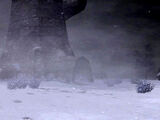
| Ice | Snow/Blizzards |
| Lightning | Thunder/Thunderstorms |
| Light | Auroras/Stellar Glare |
| Dark | Gloom/Miasma |
- Note that the Weather Reporter would use the above Weather Type terms to refer to elemental weather.
- Note that Weather Effects may not be visibly apparent in indoor areas, though they do appear as an icon and still have effects on elemental attacks.
- In addition to these sixteen elemental weather conditions, there are also four other weather types: fair, sunshine, clouds, and fog. Unlike the other weather conditions, these four do not have any corresponding elements, but they will still affect the appearance of the weather and possibly have other influences as well.
- There are several types of enemies will only spawn in outdoor areas during "foggy" weather, primarily monsters of the Bomb and Cluster families. If there is a weather icon on the screen, that means that it is not "foggy"—the fog weather condition can only happen in absence of other weather. Fog Weather normally occurs during 2:00-7:00 game time. (Early Morning)
Effects of Weather
Similar to the elemental days of the week, each elemental Weather Effect has a chance to increase the power of offensive magic that belongs to its corresponding element by 10%, as per the icons in your menu's magic listing. For instance, during Fire (or heat) weather, magic such as Fire and Firaga is increased in strength. Effects of Fire-based Enhancing Magic like Enfire and Blaze Spikes also receive a boost in damage. Magic Accuracy may also be improved as well. ![]()
Skillchains, being based on one or multiple elements, are also increased in power in their elemental weather. For instance, during the above Fire weather, Liquefaction and Fusion will have a chance to do more damage.
In addition, also similar to day, it is possible for a Weather Effect to decrease the power of offensive magic consisting of the element it beats. Using the same example of Fire weather, ice-type attacks have a chance to be weakened in power by 10%, as fire is superior to ice based on the elemental wheel.
Weather (and day) only has a chance to offer its 10% power boost to corresponding spells (approximately 33-50% chance). Wearing an elemental obi (obtained via the quest In the Name of Science) while using the corresponding magic during the corresponding weather/day makes the 10% boost guaranteed. For Fire spells, you would use a Karin Obi. Likewise, if Ice-element spells are cast under Fire weather or Firesday while wearing the Karin Obi, the 10% power reduction will also be guaranteed.
Note that these weather effects also apply to enemy attacks and spells as well. In this same instance, the Lizard-family's special attack "Fireball" can do more damage than usual.
Other Weather Factors
- In any area that a Weather Effect is active, there is a chance that Elementals will appear of the type matching the weather element, typically around terrain features that best represent said element (Water Elementals tend to spawn around bodies of water, for instance). They will despawn if they remain unclaimed when the weather effect ends.
- This is just speculation and needs further testing, but weather might also have an influence on crafting similar to day of the week. Currently unknow how much influence if there is some, but if anyone has experimented with this notion, it would be interesting to add the information here.
- During Weather Effects, Elemental Crystals (or Clusters during "Double" weather) that match the weather of that element may be obtained when Chocobo Digging.
- Scholar can change the weather effect you are submitted to, with storms and therefore control the weather benefits, for spells or trigger latent effects on some equipments.
Possible Weather Conditions by Area
- Some areas will have rare "Double" weather of a particular element, in addition to the normal, more common type of weather. (This is noted by two check marks on the chart below, and two elemental icons above the compass in-game.) This type of weather has the chance to boost elemental damage by 25% instead of 10% while the Weather Effect is active, and may also possibly increase the number of Elementals that spawn during that weather's period. "Double" Weather Effects also permit the Chocobo Digging of elemental clusters (in place of crystals during normal weather).
- Weather conditions for most areas can be forecast by various NPCs called Weather Reporters.
- Some connected areas share the same Weather Effects when they are active, thus remaining persistent across them. These areas share the same entries in the chart below.
- Elementals will obviously not spawn in town areas where weather has an effect (Selbina, Mhaura, Rabao, Tavnazian Safehold), though Weather Effects will still apply on Healing and Enhancing Magic cast in those areas.
- All Dynamis areas are always in "Double" Dark Weather, though no Dark Elementals spawn in these areas.
- All sections of the Limbus area Temenos are always in "Double" Light Weather, though no Light Elementals are known to spawn in these areas (that are not part of the standard enemy sequence).
- All sections of the Limbus area Apollyon are always in "Double" Dark Weather, though no Dark Elementals are known to spawn in these areas (that are not part of the standard enemy sequence).
- All "Cloister" areas are always in their "Double" elemental weather. (For instance, the Cloister of Storms is always in "Double" Lightning weather.)
- As a general rule, areas not listed here or below are not subject to Weather Effects (save fog in certain cases).
-
Beaucedine Glacier -
Crawlers' Nest -
Sea Serpent Grotto -
Western Altepa Desert -

Quicksand Caves -
Kuftal Tunnel -

Temple of Uggalepih -
Ru'Aun Gardens
All items (168)


-
Maze of Shakhrami

-
Maze of Shakhrami/Weather

-
Meriphataud Mountains

-
Meriphataud Mountains (S)

-
Meriphataud Mountains (S)/Weather
-
Meriphataud Mountains/Weather

-
Middle Delkfutt's Tower

-
Middle Delkfutt's Tower/Weather
-
Misareaux Coast

-
Misareaux Coast/Weather

-
Monastic Cavern

-
Monastic Cavern/Weather
-
Mount Zhayolm

-
Mount Zhayolm/Weather


