mNo edit summary |
|||
| (16 intermediate revisions by 7 users not shown) | |||
| Line 1: | Line 1: | ||
| + | [[Category:Events]] |
||
| + | |||
Introduced in [[Seekers of Adoulin]], the Delve battle system contains some of the most difficult battles that Vana'diel has ever seen. The primary rewards from Delve, however, are often the best equipment obtainable by far. Delve is a multilayered system that consists of farming pop and entry items, defeating individual notorious monsters with no time limit in field battles, and defeating multiple normal and notorious monsters in an instanced area known as a Fracture which culminates in a terrifying boss battle. |
Introduced in [[Seekers of Adoulin]], the Delve battle system contains some of the most difficult battles that Vana'diel has ever seen. The primary rewards from Delve, however, are often the best equipment obtainable by far. Delve is a multilayered system that consists of farming pop and entry items, defeating individual notorious monsters with no time limit in field battles, and defeating multiple normal and notorious monsters in an instanced area known as a Fracture which culminates in a terrifying boss battle. |
||
| Line 6: | Line 8: | ||
*[[Seekers of Adoulin]] installed and registered. |
*[[Seekers of Adoulin]] installed and registered. |
||
*{{KeyItem}}[[Adoulinian charter permit]] obtained. |
*{{KeyItem}}[[Adoulinian charter permit]] obtained. |
||
| − | *3-18 alliance members, all level |
+ | *3-18 alliance members, all level 95 minimum. |
*Alliance leader must possess a {{KeyItem}}[[Yantric planchette]]. |
*Alliance leader must possess a {{KeyItem}}[[Yantric planchette]]. |
||
===Field battles=== |
===Field battles=== |
||
| Line 13: | Line 15: | ||
==Delve Areas== |
==Delve Areas== |
||
| − | Field-based delve battles take place in outdoor areas which correspond with the locations of the seven [[Naakuals]]. Event-related items involved in each area are distinguished with the color corresponding with the element of that area's [[Naakual]]. Delve Fractures take place in [[Cirdas Caverns (U)]], and are entered at '''Veil'''s located in each field area. All players in the alliance and anywhere in the entry field zone will be taken into the Fracture upon entry. |
+ | Field-based delve battles take place in outdoor areas which correspond with the locations of the seven [[Naakuals]]. Event-related items involved in each area are distinguished with the color corresponding with the element of that area's [[Naakual]]. Delve Fractures take place in [[Cirdas Caverns (U)]] or [[Yorcia Weald (U)]], and are entered at '''Veil'''s located in each field area. All players in the alliance and anywhere in the entry field zone will be taken into the Fracture upon entry. |
| − | *[[ |
+ | *[[Ceizak Battlegrounds]]: Celadon - Veil: (H-8) nearest to Bivouac #1. |
*[[Foret de Hennetiel]]: Zaffre - Veil: (E-7) nearest to Bivouac #4, must cross a fallen [[Broadleaf Palm]]. |
*[[Foret de Hennetiel]]: Zaffre - Veil: (E-7) nearest to Bivouac #4, must cross a fallen [[Broadleaf Palm]]. |
||
| − | *[[ |
+ | *[[Morimar Basalt Fields]]: Alizarin - Veil: (I-5) nearest to Bivouac #2. |
| + | *[[Marjami Ravine]]: Phlox - Veil: (M-9) |
||
| + | *[[Yorcia Weald]]: Russet - Veil: (J-7) |
||
| + | *[[Kamihr Drifts]]: Aster - Veil: (H-11) |
||
==Progression== |
==Progression== |
||
Each area is considered a separate path and has progression independent from the others. Within each delve area there are two levels of combat: Notorious Monster Combat and Boss Combat. In order to progress to Boss Combat, a group must defeat all five unique notorious monsters either outside in the Field or inside a Fracture. |
Each area is considered a separate path and has progression independent from the others. Within each delve area there are two levels of combat: Notorious Monster Combat and Boss Combat. In order to progress to Boss Combat, a group must defeat all five unique notorious monsters either outside in the Field or inside a Fracture. |
||
| − | Each of the 15 notorious monsters has a unique characteristic which can be exploited resulting in a faster and/or easier win (refer to individual NM pages for details). The notorious monsters are divided into two difficulty tiers: NMs I-III make up the lower difficulty tier while NMs IV and V make up the higher difficulty tier in each area. Each area and tier has a corresponding key item which is automatically obtained after defeating any one of the associated NMs and allows the holder to use Mweya Plasm to purchase any equipment item which the associated NMs can drop. |
+ | Each of the 15 notorious monsters has a unique characteristic which can be exploited resulting in a faster and/or easier win (refer to individual NM pages for details). The notorious monsters are divided into two difficulty tiers: NMs I-III make up the lower difficulty tier while NMs IV and V make up the higher difficulty tier in each area. Each area and tier has a corresponding {{KeyItem}} key item which is automatically obtained after defeating any one of the associated NMs, and allows the holder to use Mweya Plasm to purchase any equipment item which the associated NMs can drop. |
==Rewards== |
==Rewards== |
||
| Line 76: | Line 81: | ||
|[[Ceizak Battlegrounds]]<br>[[Cirdas Caverns (U)]] |
|[[Ceizak Battlegrounds]]<br>[[Cirdas Caverns (U)]] |
||
|[[Rigor Baghnakhs]]<br> |
|[[Rigor Baghnakhs]]<br> |
||
| − | + | [[Dimmet Scythe]]<br> |
|
| − | + | [[Yaskomo's Pole]]<br> |
|
| − | + | [[Contriver's Cape]]<br> |
|
[[Airlixir +1]]<br> |
[[Airlixir +1]]<br> |
||
{{KeyItem}}[[Semi-pure celadon yggzi]] |
{{KeyItem}}[[Semi-pure celadon yggzi]] |
||
| Line 111: | Line 116: | ||
[[Airlixir +2]]<br> |
[[Airlixir +2]]<br> |
||
{{KeyItem}}[[Detached stinger]] |
{{KeyItem}}[[Detached stinger]] |
||
| + | |||
| + | |} |
||
| + | |||
| + | ===[[Foret de Hennetiel]] Delve=== |
||
| + | {| border="0" width="100%" cellpadding="2" cellspacing="2" |
||
| + | |- style="background:#ffdead;" |
||
| + | ! width="20%"|Name |
||
| + | ! width="10%"|Family |
||
| + | ! width="5%"|Rank |
||
| + | ! width="20%"|Zone(s) |
||
| + | ! width="30%"|Notable Drops |
||
| + | |||
| + | |- style="background:#ffd9d9;" valign="top" |
||
| + | |Align="Center"|[[Faded Craklaw]] |
||
| + | |Align="Center"|[[Craklaws]] |
||
| + | |Align="Center"|1 |
||
| + | |[[Foret de Hennetiel]]<br>[[Cirdas Caverns (U)]] |
||
| + | |[[Manibozho Gloves]]<br> |
||
| + | [[Psystorm Earring]]<br> |
||
| + | [[Airlixir +1]]<br> |
||
| + | {{KeyItem}}[[Impure zaffre yggzi]] |
||
| + | |||
| + | |- style="background:#ffd9d9;" valign="top" |
||
| + | |Align="Center"|[[Aberrant Uragnite]] |
||
| + | |Align="Center"|[[Uragnites]] |
||
| + | |Align="Center"|2 |
||
| + | |[[Foret de Hennetiel]]<br>[[Cirdas Caverns (U)]] |
||
| + | |[[Mikinaak Greaves]]<br> |
||
| + | [[Mephitis Grip]]<br> |
||
| + | [[Airlixir +1]]<br> |
||
| + | {{KeyItem}}[[Impure zaffre yggzi]] |
||
| + | |||
| + | |- style="background:#ffd9d9;" valign="top" |
||
| + | |Align="Center"|[[Divagating Jagil]] |
||
| + | |Align="Center"|[[Pugils]] |
||
| + | |Align="Center"|3 |
||
| + | |[[Foret de Hennetiel]]<br>[[Cirdas Caverns (U)]] |
||
| + | |[[Mikinaak Breastplate]]<br> |
||
| + | [[Dudgeon Earring]]<br> |
||
| + | [[Airlixir +1]]<br> |
||
| + | {{KeyItem}}[[Impure zaffre yggzi]] |
||
| + | |||
| + | |- style="background:#ffd9d9;" valign="top" |
||
| + | |Align="Center"|[[Nerrivik]] |
||
| + | |Align="Center"|[[:Category:Orobon|Orobon]] |
||
| + | |Align="Center"|4 |
||
| + | |[[Foret de Hennetiel]]<br>[[Cirdas Caverns (U)]] |
||
| + | |[[Aphotic Kukri]]<br> |
||
| + | [[Ophidian Trident]]<br> |
||
| + | [[Speleogen Bow]]<br> |
||
| + | [[Asperity Necklace]]<br> |
||
| + | [[Airlixir +1]]<br> |
||
| + | {{KeyItem}}[[Semi-pure zaffre yggzi]] |
||
| + | |||
| + | |- style="background:#ffd9d9;" valign="top" |
||
| + | |Align="Center"|[[Krabakarpo]] |
||
| + | |Align="Center"|[[Crabs]] |
||
| + | |Align="Center"|5 |
||
| + | |[[Foret de Hennetiel]]<br>[[Cirdas Caverns (U)]] |
||
| + | |[[Brethren Axe]]<br> |
||
| + | [[Mondaha Cudgel]]<br> |
||
| + | [[Alternator]]<br> |
||
| + | [[Airlixir +1]]<br> |
||
| + | {{KeyItem}}[[Semi-pure zaffre yggzi]] |
||
| + | |||
| + | |- style="background:#ffd9d9;" valign="top" |
||
| + | |Align="Center"|[[Dakuwaqa]] |
||
| + | |Align="Center"|[[Rockfins]] |
||
| + | |Align="Center"|6 |
||
| + | |[[Cirdas Caverns (U)]] |
||
| + | | |
||
| + | [[Illapa]]<br> |
||
| + | [[Izhiikoh]]<br> |
||
| + | [[Tsurumaru]]<br> |
||
| + | [[Whirlpool Mask]]<br> |
||
| + | [[Whirlpool Greaves]]<br> |
||
| + | [[Sangoma Ring]]<br> |
||
| + | [[Eddy Necklace]]<br> |
||
| + | [[Rockfin Fin]]<br> |
||
| + | [[Rockfin Tooth]]<br> |
||
| + | [[Airlixir +1]]<br> |
||
| + | [[Airlixir +2]]<br> |
||
| + | {{KeyItem}}[[Craggy fin]] |
||
|} |
|} |
||
| Line 197: | Line 285: | ||
|} |
|} |
||
| − | ===[[ |
+ | ===[[Yorcia Weald]] Delve=== |
{| border="0" width="100%" cellpadding="2" cellspacing="2" |
{| border="0" width="100%" cellpadding="2" cellspacing="2" |
||
|- style="background:#ffdead;" |
|- style="background:#ffdead;" |
||
| Line 207: | Line 295: | ||
|- style="background:#ffd9d9;" valign="top" |
|- style="background:#ffd9d9;" valign="top" |
||
| − | |Align="Center"|[[ |
+ | |Align="Center"|[[Xag'Nar]] |
| − | |Align="Center"|[[ |
+ | |Align="Center"|[[Panopts]] |
|Align="Center"|1 |
|Align="Center"|1 |
||
| − | |[[ |
+ | |[[Yorcia Weald]]<br>[[Yorcia Weald (U)]] |
| + | | |
||
| − | |[[Manibozho Gloves]]<br> |
||
| + | {{KeyItem}}[[Impure russet yggzi]] |
||
| − | [[Psystorm Earring]]<br> |
||
| − | [[Airlixir +1]]<br> |
||
| − | {{KeyItem}}[[Impure zaffre yggzi]] |
||
|- style="background:#ffd9d9;" valign="top" |
|- style="background:#ffd9d9;" valign="top" |
||
| − | |Align="Center"|[[ |
+ | |Align="Center"|[[Laevvid]] |
| − | |Align="Center"|[[ |
+ | |Align="Center"|[[Treants]] |
|Align="Center"|2 |
|Align="Center"|2 |
||
| − | |[[ |
+ | |[[Yorcia Weald]]<br>[[Yorcia Weald (U)]] |
| + | | |
||
| − | |[[Mikinaak Greaves]]<br> |
||
| + | {{KeyItem}}[[Impure russet yggzi]] |
||
| − | [[Mephitis Grip]]<br> |
||
| − | [[Airlixir +1]]<br> |
||
| − | {{KeyItem}}[[Impure zaffre yggzi]] |
||
|- style="background:#ffd9d9;" valign="top" |
|- style="background:#ffd9d9;" valign="top" |
||
| − | |Align="Center"|[[ |
+ | |Align="Center"|[[Morseiu]] |
| − | |Align="Center"|[[ |
+ | |Align="Center"|[[Snapweeds]] |
|Align="Center"|3 |
|Align="Center"|3 |
||
| − | |[[ |
+ | |[[Yorcia Weald]]<br>[[Yorcia Weald (U)]] |
| + | | |
||
| − | |[[Mikinaak Breastplate]]<br> |
||
| + | {{KeyItem}}[[Impure russet yggzi]] |
||
| − | [[Dudgeon Earring]]<br> |
||
| − | [[Airlixir +1]]<br> |
||
| − | {{KeyItem}}[[Impure zaffre yggzi]] |
||
|- style="background:#ffd9d9;" valign="top" |
|- style="background:#ffd9d9;" valign="top" |
||
| − | |Align="Center"|[[ |
+ | |Align="Center"|[[Ircinraq]] |
| − | |Align="Center"|[[ |
+ | |Align="Center"|[[Mandragoras]] |
|Align="Center"|4 |
|Align="Center"|4 |
||
| − | |[[ |
+ | |[[Yorcia Weald]]<br>[[Yorcia Weald (U)]] |
| + | | |
||
| − | |[[Aphotic Kukri]]<br> |
||
| + | {{KeyItem}}[[Semi-pure russet yggzi]] |
||
| − | [[Ophidian Trident]]<br> |
||
| − | [[Speleogen Bow]]<br> |
||
| − | [[Asperity Necklace]]<br> |
||
| − | [[Airlixir +1]]<br> |
||
| − | {{KeyItem}}[[Semi-pure zaffre yggzi]] |
||
|- style="background:#ffd9d9;" valign="top" |
|- style="background:#ffd9d9;" valign="top" |
||
| − | |Align="Center"|[[ |
+ | |Align="Center"|[[Hyoscya]] |
| − | |Align="Center"|[[ |
+ | |Align="Center"|[[Belladonnas]] |
|Align="Center"|5 |
|Align="Center"|5 |
||
| − | |[[ |
+ | |[[Yorcia Weald]]<br>[[Yorcia Weald (U)]] |
| + | |[[Magneto]]<br>{{KeyItem}}[[Semi-pure russet yggzi]] |
||
| − | |[[Brethren Axe]]<br> |
||
| − | [[Mondaha Cudgel]]<br> |
||
| − | [[Alternator]]<br> |
||
| − | [[Airlixir +1]]<br> |
||
| − | {{KeyItem}}[[Semi-pure zaffre yggzi]] |
||
|- style="background:#ffd9d9;" valign="top" |
|- style="background:#ffd9d9;" valign="top" |
||
| − | |Align="Center"|[[ |
+ | |Align="Center"|[[Wopket]] |
| − | |Align="Center"|[[ |
+ | |Align="Center"|[[Yggdreants]] |
|Align="Center"|6 |
|Align="Center"|6 |
||
| − | |[[ |
+ | |[[Yorcia Weald (U)]] |
| |
| |
||
| + | {{KeyItem}}[[Piece of inviolable bark]] |
||
| − | [[Illapa]]<br> |
||
| + | |||
| − | [[Izhiikoh]]<br> |
||
| + | |} |
||
| − | [[Tsurumaru]]<br> |
||
| + | |||
| − | [[Whirlpool Mask]]<br> |
||
| + | ===[[Marjami Ravine]] Delve=== |
||
| − | [[Whirlpool Greaves]]<br> |
||
| + | {| border="0" width="100%" cellpadding="2" cellspacing="2" |
||
| − | [[Sangoma Ring]]<br> |
||
| + | |- style="background:#ffdead;" |
||
| − | [[Eddy Necklace]]<br> |
||
| + | ! width="20%"|Name |
||
| − | [[Rockfin Fin]]<br> |
||
| + | ! width="10%"|Family |
||
| − | [[Rockfin Tooth]]<br> |
||
| + | ! width="5%"|Rank |
||
| − | [[Airlixir +1]]<br> |
||
| + | ! width="20%"|Zone(s) |
||
| − | [[Airlixir +2]]<br> |
||
| + | ! width="30%"|Notable Drops |
||
| − | {{KeyItem}}[[Craggy fin]] |
||
| + | |||
| + | |- style="background:#ffd9d9;" valign="top" |
||
| + | |Align="Center"|[[Broxa]] |
||
| + | |Align="Center"|[[Colibris]] |
||
| + | |Align="Center"|1 |
||
| + | |[[Marjami Ravine]]<br>[[Yorcia Weald (U)]] |
||
| + | | |
||
| + | {{KeyItem}}[[Impure phlox yggzi]] |
||
| + | |||
| + | |- style="background:#ffd9d9;" valign="top" |
||
| + | |Align="Center"|[[Plaguevein Bats]] |
||
| + | |Align="Center"|[[Bat Trios]] |
||
| + | |Align="Center"|2 |
||
| + | |[[Marjami Ravine]]<br>[[Yorcia Weald (U)]] |
||
| + | |[[Qaaxo Tights]]<br>{{KeyItem}}[[Impure phlox yggzi]] |
||
| + | |||
| + | |- style="background:#ffd9d9;" valign="top" |
||
| + | |Align="Center"|[[Hakawai]] |
||
| + | |Align="Center"|[[Tulfaires]] |
||
| + | |Align="Center"|3 |
||
| + | |[[Marjami Ravine]]<br>[[Yorcia Weald (U)]] |
||
| + | | |
||
| + | {{KeyItem}}[[Impure phlox yggzi]] |
||
| + | |||
| + | |- style="background:#ffd9d9;" valign="top" |
||
| + | |Align="Center"|[[Ironbeak Inguza]] |
||
| + | |Align="Center"|[[:Category:Apkallu|Apkallu]] |
||
| + | |Align="Center"|4 |
||
| + | |[[Marjami Ravine]]<br>[[Yorcia Weald (U)]] |
||
| + | | |
||
| + | {{KeyItem}}[[Semi-pure phlox yggzi]] |
||
| + | |||
| + | |- style="background:#ffd9d9;" valign="top" |
||
| + | |Align="Center"|[[Podarge]] |
||
| + | |Align="Center"|[[:Category:Harpeia|Harpeia]] |
||
| + | |Align="Center"|5 |
||
| + | |[[Marjami Ravine]]<br>[[Yorcia Weald (U)]] |
||
| + | | |
||
| + | {{KeyItem}}[[Semi-pure phlox yggzi]] |
||
| + | |||
| + | |- style="background:#ffd9d9;" valign="top" |
||
| + | |Align="Center"|[[Cailimh]] |
||
| + | |Align="Center"|[[Waktza]] |
||
| + | |Align="Center"|6 |
||
| + | |[[Yorcia Weald (U)]] |
||
| + | | |
||
| + | {{KeyItem}}[[Sparking tail feather]] |
||
| + | |||
| + | |} |
||
| + | |||
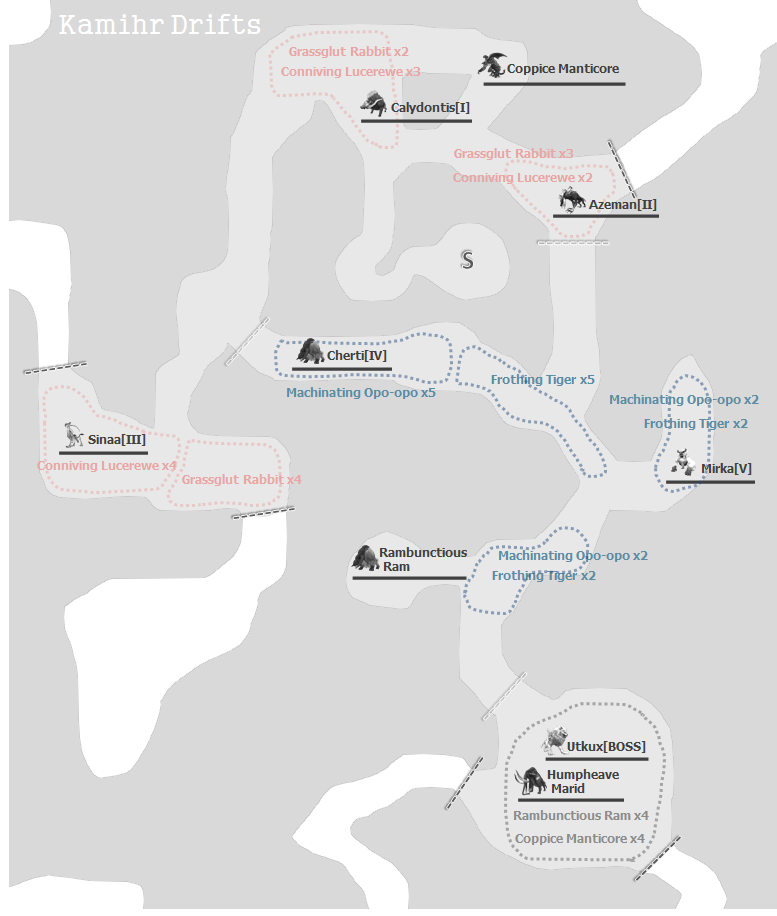
| + | ===[[Kamihr Drifts]] Delve=== |
||
| + | '''[[media:KamihrDriftsDelveMap.png|VIEW MAP]]''' |
||
| + | {| border="0" width="100%" cellpadding="2" cellspacing="2" |
||
| + | |- style="background:#ffdead;" |
||
| + | ! width="20%"|Name |
||
| + | ! width="10%"|Family |
||
| + | ! width="5%"|Rank |
||
| + | ! width="20%"|Zone(s) |
||
| + | ! width="30%"|Notable Drops |
||
| + | |||
| + | |- style="background:#ffd9d9;" valign="top" |
||
| + | |Align="Center"|[[Calydontis]] |
||
| + | |Align="Center"|[[Raaz]] |
||
| + | |Align="Center"|1 |
||
| + | |[[Kamihr Drifts]]<br>[[Yorcia Weald (U)]] |
||
| + | | |
||
| + | {{KeyItem}}[[Impure aster yggzi]] |
||
| + | |||
| + | |- style="background:#ffd9d9;" valign="top" |
||
| + | |Align="Center"|[[Azeman]] |
||
| + | |Align="Center"|[[Gnoles]] |
||
| + | |Align="Center"|2 |
||
| + | |[[Kamihr Drifts]]<br>[[Yorcia Weald (U)]] |
||
| + | | |
||
| + | {{KeyItem}}[[Impure aster yggzi]] |
||
| + | |||
| + | |- style="background:#ffd9d9;" valign="top" |
||
| + | |Align="Center"|[[Sinaa]] |
||
| + | |Align="Center"|[[Coeurls]] |
||
| + | |Align="Center"|3 |
||
| + | |[[Kamihr Drifts]] (I-10/11)<br>[[Yorcia Weald (U)]] |
||
| + | |[[Russet Yggzi Bead III]]<br>[[Qaaxo Harness]]<br>[[Imbodla Necklace]] |
||
| + | {{KeyItem}}[[Impure aster yggzi]] |
||
| + | |||
| + | |- style="background:#ffd9d9;" valign="top" |
||
| + | |Align="Center"|[[Cheriti]] |
||
| + | |Align="Center"|[[Rams]] |
||
| + | |Align="Center"|4 |
||
| + | |[[Kamihr Drifts]]<br>[[Yorcia Weald (U)]] |
||
| + | | |
||
| + | {{KeyItem}}[[Semi-pure aster yggzi]] |
||
| + | |||
| + | |- style="background:#ffd9d9;" valign="top" |
||
| + | |Align="Center"|[[Mirka]] |
||
| + | |Align="Center"|[[Yztargs]] |
||
| + | |Align="Center"|5 |
||
| + | |[[Kamihr Drifts]]<br>[[Yorcia Weald (U)]] |
||
| + | | |
||
| + | {{KeyItem}}[[Semi-pure aster yggzi]] |
||
| + | |||
| + | |- style="background:#ffd9d9;" valign="top" |
||
| + | |Align="Center"|[[Utkux]] |
||
| + | |Align="Center"|[[Cehuetzi]] |
||
| + | |Align="Center"|6 |
||
| + | |[[Yorcia Weald (U)]] |
||
| + | | |
||
| + | {{KeyItem}}[[Frosted incisor]] |
||
|} |
|} |
||
Revision as of 04:02, 18 December 2019
Introduced in Seekers of Adoulin, the Delve battle system contains some of the most difficult battles that Vana'diel has ever seen. The primary rewards from Delve, however, are often the best equipment obtainable by far. Delve is a multilayered system that consists of farming pop and entry items, defeating individual notorious monsters with no time limit in field battles, and defeating multiple normal and notorious monsters in an instanced area known as a Fracture which culminates in a terrifying boss battle.
Requirements
Fractures
In order to participate in Delve Fractures, the following must be met:
- Seekers of Adoulin installed and registered.
 Adoulinian charter permit obtained.
- 3-18 alliance members, all level 95 minimum.
- Alliance leader must possess a Yantric planchette.
Field battles
- Seekers of Adoulin installed and registered.
- Adoulinian charter permit obtained.
Delve Areas
Field-based delve battles take place in outdoor areas which correspond with the locations of the seven Naakuals. Event-related items involved in each area are distinguished with the color corresponding with the element of that area's Naakual. Delve Fractures take place in Cirdas Caverns (U) or Yorcia Weald (U), and are entered at Veils located in each field area. All players in the alliance and anywhere in the entry field zone will be taken into the Fracture upon entry.
- Ceizak Battlegrounds: Celadon - Veil: (H-8) nearest to Bivouac #1.
- Foret de Hennetiel: Zaffre - Veil: (E-7) nearest to Bivouac #4, must cross a fallen Broadleaf Palm.
- Morimar Basalt Fields: Alizarin - Veil: (I-5) nearest to Bivouac #2.
- Marjami Ravine: Phlox - Veil: (M-9)
- Yorcia Weald: Russet - Veil: (J-7)
- Kamihr Drifts: Aster - Veil: (H-11)
Progression
Each area is considered a separate path and has progression independent from the others. Within each delve area there are two levels of combat: Notorious Monster Combat and Boss Combat. In order to progress to Boss Combat, a group must defeat all five unique notorious monsters either outside in the Field or inside a Fracture.
Each of the 15 notorious monsters has a unique characteristic which can be exploited resulting in a faster and/or easier win (refer to individual NM pages for details). The notorious monsters are divided into two difficulty tiers: NMs I-III make up the lower difficulty tier while NMs IV and V make up the higher difficulty tier in each area. Each area and tier has a corresponding ![]() key item which is automatically obtained after defeating any one of the associated NMs, and allows the holder to use Mweya Plasm to purchase any equipment item which the associated NMs can drop.
key item which is automatically obtained after defeating any one of the associated NMs, and allows the holder to use Mweya Plasm to purchase any equipment item which the associated NMs can drop.
Rewards
See : Delve Rewards
The reward structure in Delve is unique in that all equipment can be obtained in two ways: either a direct drop from notorious monsters/bosses or purchased with Mweya Plasm which can be collected in various ways as long as a notorious monster which can drop the item has been defeated at least once. Additionally, the three primary sets of Delve armor can be diversified and upgraded in stages through a set augmentation system by utilizing Airlixirs, also obtained through Delve.
Ceizak Battlegrounds Delve
Foret de Hennetiel Delve
Morimar Basalt Fields Delve
Yorcia Weald Delve
| Name | Family | Rank | Zone(s) | Notable Drops |
|---|---|---|---|---|
| Xag'Nar | Panopts | 1 | Yorcia Weald Yorcia Weald (U) |
|
| Laevvid | Treants | 2 | Yorcia Weald Yorcia Weald (U) |
|
| Morseiu | Snapweeds | 3 | Yorcia Weald Yorcia Weald (U) |
|
| Ircinraq | Mandragoras | 4 | Yorcia Weald Yorcia Weald (U) |
|
| Hyoscya | Belladonnas | 5 | Yorcia Weald Yorcia Weald (U) |
Magneto |
| Wopket | Yggdreants | 6 | Yorcia Weald (U) |
Marjami Ravine Delve
Kamihr Drifts Delve
| Name | Family | Rank | Zone(s) | Notable Drops |
|---|---|---|---|---|
| Calydontis | Raaz | 1 | Kamihr Drifts Yorcia Weald (U) |
|
| Azeman | Gnoles | 2 | Kamihr Drifts Yorcia Weald (U) |
|
| Sinaa | Coeurls | 3 | Kamihr Drifts (I-10/11) Yorcia Weald (U) |
Russet Yggzi Bead III Qaaxo Harness Imbodla Necklace |
| Cheriti | Rams | 4 | Kamihr Drifts Yorcia Weald (U) |
|
| Mirka | Yztargs | 5 | Kamihr Drifts Yorcia Weald (U) |
|
| Utkux | Cehuetzi | 6 | Yorcia Weald (U) |
-

Utkux -

Cailimh -

Tojil -
Forri-Porri -
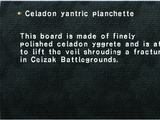
Celadon yantric planchette -

Cirdas Caverns (U) -

Unfettered Twitherym -

Dakuwaqa
All items (94)


