No edit summary |
|||
| (26 intermediate revisions by 9 users not shown) | |||
| Line 3: | Line 3: | ||
To participate, you must first obtain a {{KeyItem}}[[Pioneer's Badge]], which grants the first coalition rank, Petitioner, in all coalitions. From that point on, to rank up in an individual coalition, continue to complete assignments at that coalition. |
To participate, you must first obtain a {{KeyItem}}[[Pioneer's Badge]], which grants the first coalition rank, Petitioner, in all coalitions. From that point on, to rank up in an individual coalition, continue to complete assignments at that coalition. |
||
| − | Speak to the [[Task Delegator]] at the corresponding coalition to accept an assignment for which you are eligible. For every 20 assignments you do for a coalition your personal rank in that coalition increases by 1. Each rank opens up new assignments for you in that coalition. There are currently 8 ranks:<br> |
+ | Speak to the [[Task Delegator]] at the corresponding coalition to accept an assignment for which you are eligible. For every 20 assignments you do for a coalition your personal rank in that coalition increases by 1. Each rank opens up new assignments for you in that coalition. There are currently 8 ranks:<br /> |
| − | '''1. Petitioner<br>2. Probationer<br>3. Disciple<br>4. Contributor<br>5. Partner<br>6. Advisor< |
+ | '''1. Petitioner<br />2. Probationer<br />3. Disciple<br />4. Contributor<br />5. Partner<br />6. Advisor<br />7. Magnate<br />8. Legend''' |
| − | The [[Civil Registrar]] in each coalition can tell you your current rank.<br> |
+ | The [[Civil Registrar]] in each coalition can tell you your current rank.<br /> |
Also [[Iyvah Halohm]] at G-8 [[Eastern Adoulin]] will list your current ranks in all six Coalitions. |
Also [[Iyvah Halohm]] at G-8 [[Eastern Adoulin]] will list your current ranks in all six Coalitions. |
||
| Line 15: | Line 15: | ||
From zero Adoulin fame 80 [[Imprimatur]]s must be spent to advance past the main [[Adoulin]] storyline [[Mission]] [[Life on the Frontier]], which in turn allows participation in [[Wildskeeper Reive]]s. |
From zero Adoulin fame 80 [[Imprimatur]]s must be spent to advance past the main [[Adoulin]] storyline [[Mission]] [[Life on the Frontier]], which in turn allows participation in [[Wildskeeper Reive]]s. |
||
| + | It takes 840 imprimaturs (140*6) to get all six to Legend rank and an additional 11 to finish the assignments within Legend rank for a total of 851 before you can get [[Idris]], [[Epeolatry]], or {{KeyItem}}[[Golden shovel cordon]]. Imprimaturs by default take 360 minutes to replenish, which can be reduced to 330 with {{KeyItem}}[[Bronze shovel cordon]] (and 300 with {{KeyItem}}[[Silver shovel cordon]], but you'll be fully finished by then). |
||
| + | |||
| + | Depending on how many imprimaturs you start with upon unlocking this system{{Information Needed}}, that translates into somewhere between 5106 hours (212.75 days) and 5016 hours (209 days) if you don't get the key item at all. It takes 613 imprimaturs to get {{KeyItem}}[[Bronze shovel cordon]], which will take between 3678 hours (153.25 days) and 3588 hours (149.5 days). This shortens the remainder to 1309 hours (54.5416 days) for a grand total between 4987.5 hours (207.8125 days) and 4897.5 hours (204.0625 days). |
||
==Couriers' Coalition== |
==Couriers' Coalition== |
||
| − | Location: [[Western Adoulin]] (G-7)<br> |
+ | Location: [[Western Adoulin]] (G-7)<br /> |
{| border="0" width="100%" cellpadding="1" cellspacing="1" style="background-color:#DAA520" |
{| border="0" width="100%" cellpadding="1" cellspacing="1" style="background-color:#DAA520" |
||
| Line 30: | Line 33: | ||
|BGCOLOR="FFF8DC"|[[Support: Ceizak Battlegrounds]] |
|BGCOLOR="FFF8DC"|[[Support: Ceizak Battlegrounds]] |
||
|BGCOLOR="FFF8DC"|Deliver {{KeyItem}}[[Cei. FB op. materials container]] to a Bivouac Administrator in either [[Ceizak Battlegrounds]] or [[Yahse Hunting Grounds]]. |
|BGCOLOR="FFF8DC"|Deliver {{KeyItem}}[[Cei. FB op. materials container]] to a Bivouac Administrator in either [[Ceizak Battlegrounds]] or [[Yahse Hunting Grounds]]. |
||
| − | |align="Center" BGCOLOR="FFF8DC"|1: 500 ~ |
+ | |align="Center" BGCOLOR="FFF8DC"|1: 500 ~ 750<br /> |
| − | 2: 900 ~ 1, |
+ | 2: 900 ~ 1,350<br /> |
| − | 3: 1,200 ~ |
+ | 3: 1,200 ~ 1,800 |
|- |
|- |
||
|rowspan=2 BGCOLOR="F5DEB3"| |
|rowspan=2 BGCOLOR="F5DEB3"| |
||
| Line 38: | Line 41: | ||
|BGCOLOR="FFF8DC"|[[Provide: Foret de Hennetiel]] <span style="color:#BD33A4"><small>#1</small></span> |
|BGCOLOR="FFF8DC"|[[Provide: Foret de Hennetiel]] <span style="color:#BD33A4"><small>#1</small></span> |
||
|BGCOLOR="FFF8DC"|Deliver {{KeyItem}}[[Hen. FS building mat. container]] to a Station Administrator in [[Foret de Hennetiel]]. |
|BGCOLOR="FFF8DC"|Deliver {{KeyItem}}[[Hen. FS building mat. container]] to a Station Administrator in [[Foret de Hennetiel]]. |
||
| − | |align="Center" BGCOLOR="FFF8DC"|1: 750 {{Verification}} <br> |
+ | |align="Center" BGCOLOR="FFF8DC"|1: 750 {{Verification}} <br /> |
| − | 2: 1,350 {{Verification}} <br> |
+ | 2: 1,350 {{Verification}} <br /> |
3: 1,800 {{Verification}} |
3: 1,800 {{Verification}} |
||
|- |
|- |
||
|BGCOLOR="FFF8DC"|[[Provide: Morimar Basalt Fields]] <span style="color:#BD33A4"><small>#1</small></span> |
|BGCOLOR="FFF8DC"|[[Provide: Morimar Basalt Fields]] <span style="color:#BD33A4"><small>#1</small></span> |
||
|BGCOLOR="FFF8DC"|Deliver {{KeyItem}} [[Mor. FS building mat. container]] to a Station Administrator in [[Morimar Basalt Fields]]. |
|BGCOLOR="FFF8DC"|Deliver {{KeyItem}} [[Mor. FS building mat. container]] to a Station Administrator in [[Morimar Basalt Fields]]. |
||
| − | |align="Center" BGCOLOR="FFF8DC"|1: 750 {{Verification}} <br> |
+ | |align="Center" BGCOLOR="FFF8DC"|1: 750 {{Verification}} <br /> |
| − | 2: 1,350 {{Verification}} <br> |
+ | 2: 1,350 {{Verification}} <br /> |
3: 1,800 {{Verification}} |
3: 1,800 {{Verification}} |
||
|- |
|- |
||
| Line 52: | Line 55: | ||
|BGCOLOR="FFF8DC"|[[Support: Foret de Hennetiel]] |
|BGCOLOR="FFF8DC"|[[Support: Foret de Hennetiel]] |
||
|BGCOLOR="FFF8DC"|Deliver {{KeyItem}}[[Hen. FB op. materials container]] to a Bivvouac Aministrator in [[Foret de Hennetiel]]. |
|BGCOLOR="FFF8DC"|Deliver {{KeyItem}}[[Hen. FB op. materials container]] to a Bivvouac Aministrator in [[Foret de Hennetiel]]. |
||
| − | |align="Center" BGCOLOR="FFF8DC"|1: 2,500 ~ 3,000<br> |
+ | |align="Center" BGCOLOR="FFF8DC"|1: 2,500 ~ 3,000<br /> |
| − | 2: 4,500 ~ 5,400<br> |
+ | 2: 4,500 ~ 5,400<br /> |
3: 6,000 ~ 7,200 |
3: 6,000 ~ 7,200 |
||
|- |
|- |
||
|BGCOLOR="FFF8DC"|[[Support: Morimar Basalt Fields]] |
|BGCOLOR="FFF8DC"|[[Support: Morimar Basalt Fields]] |
||
|BGCOLOR="FFF8DC"|Deliver {{KeyItem}}[[Mor. FB op. materials container]] to a Bivvouac Administrator in [[Morimar Basalt Fields]]. |
|BGCOLOR="FFF8DC"|Deliver {{KeyItem}}[[Mor. FB op. materials container]] to a Bivvouac Administrator in [[Morimar Basalt Fields]]. |
||
| − | |align="Center" BGCOLOR="FFF8DC"|1: 2,500 ~ 3,500<br> |
+ | |align="Center" BGCOLOR="FFF8DC"|1: 2,500 ~ 3,500<br /> |
| − | 2: 4,500 ~ 6,300<br> |
+ | 2: 4,500 ~ 6,300<br /> |
3: 6,000 ~ 8,400 |
3: 6,000 ~ 8,400 |
||
|- |
|- |
||
| Line 66: | Line 69: | ||
|BGCOLOR="FFF8DC"|[[Deliver: Foret de Hennetiel]] |
|BGCOLOR="FFF8DC"|[[Deliver: Foret de Hennetiel]] |
||
|BGCOLOR="FFF8DC"|Deliver supplies from the Station Administrator in [[Foret de Hennetiel]] to the [[Task Delegator]]. |
|BGCOLOR="FFF8DC"|Deliver supplies from the Station Administrator in [[Foret de Hennetiel]] to the [[Task Delegator]]. |
||
| − | |align="Center" 1: BGCOLOR="FFF8DC"|1: 2,000<br> |
+ | |align="Center" 1: BGCOLOR="FFF8DC"|1: 2,000<br /> |
| − | 2: 3,600<br> |
+ | 2: 3,600<br /> |
3: 4,800 |
3: 4,800 |
||
|- |
|- |
||
|BGCOLOR="FFF8DC"|[[Deliver: Morimar Basalt Fields]] |
|BGCOLOR="FFF8DC"|[[Deliver: Morimar Basalt Fields]] |
||
|BGCOLOR="FFF8DC"|Deliver supplies from the Station Administrator in [[Morimar Basalt Fields]] to the [[Task Delegator]]. |
|BGCOLOR="FFF8DC"|Deliver supplies from the Station Administrator in [[Morimar Basalt Fields]] to the [[Task Delegator]]. |
||
| − | |align="Center" BGCOLOR="FFF8DC"|1: 2,000<br> |
+ | |align="Center" BGCOLOR="FFF8DC"|1: 2,000<br /> |
| − | 2: 3,600<br> |
+ | 2: 3,600<br /> |
3: 4,800 |
3: 4,800 |
||
|- |
|- |
||
| Line 80: | Line 83: | ||
|BGCOLOR="FFF8DC"|[[Provide: Marjami Ravine]] <span style="color:#BD33A4"><small>#1</small></span> |
|BGCOLOR="FFF8DC"|[[Provide: Marjami Ravine]] <span style="color:#BD33A4"><small>#1</small></span> |
||
|BGCOLOR="FFF8DC"|Deliver {{KeyItem}}[[Mar. FS building mat. container]] to a Station Administrator in [[Marjami Ravine]]. |
|BGCOLOR="FFF8DC"|Deliver {{KeyItem}}[[Mar. FS building mat. container]] to a Station Administrator in [[Marjami Ravine]]. |
||
| − | |align="Center" BGCOLOR="FFF8DC"|1: 1,500 {{Verification}} <br> |
+ | |align="Center" BGCOLOR="FFF8DC"|1: 1,500 {{Verification}} <br /> |
| − | 2: 2,700 {{Verification}} <br> |
+ | 2: 2,700 {{Verification}} <br /> |
3: 3,600 {{Verification}} |
3: 3,600 {{Verification}} |
||
|- |
|- |
||
|BGCOLOR="FFF8DC"|[[Provide: Yorcia Weald]] <span style="color:#BD33A4"><small>#1</small></span> |
|BGCOLOR="FFF8DC"|[[Provide: Yorcia Weald]] <span style="color:#BD33A4"><small>#1</small></span> |
||
|BGCOLOR="FFF8DC"|Deliver {{KeyItem}}[[Yor. FS building mat. container]] to a Station Administrator in [[Yorcia Weald]]. |
|BGCOLOR="FFF8DC"|Deliver {{KeyItem}}[[Yor. FS building mat. container]] to a Station Administrator in [[Yorcia Weald]]. |
||
| − | |align="Center" BGCOLOR="FFF8DC"|1: 1,750 {{Verification}} <br> |
+ | |align="Center" BGCOLOR="FFF8DC"|1: 1,750 {{Verification}} <br /> |
| − | 2: 3,150 {{Verification}} <br> |
+ | 2: 3,150 {{Verification}} <br /> |
3: 4,200 {{Verification}} |
3: 4,200 {{Verification}} |
||
|- |
|- |
||
| Line 94: | Line 97: | ||
|BGCOLOR="FFF8DC"|[[Deliver: Marjami Ravine]] |
|BGCOLOR="FFF8DC"|[[Deliver: Marjami Ravine]] |
||
|BGCOLOR="FFF8DC"|Deliver supplies from the Station Administrator in [[Marjami Ravine]] to the [[Task Delegator]]. |
|BGCOLOR="FFF8DC"|Deliver supplies from the Station Administrator in [[Marjami Ravine]] to the [[Task Delegator]]. |
||
| − | |align="Center" BGCOLOR="FFF8DC"|1: |
+ | |align="Center" BGCOLOR="FFF8DC"|1: 2,500<br /> |
| − | 2: |
+ | 2: 4,500 <br /> |
| − | 3: |
+ | 3: 6,000 |
|- |
|- |
||
|BGCOLOR="FFF8DC"|[[Deliver: Yorcia Weald]] |
|BGCOLOR="FFF8DC"|[[Deliver: Yorcia Weald]] |
||
|BGCOLOR="FFF8DC"|Deliver supplies from the Station Administrator in [[Yorcia Weald]] to the [[Task Delegator]]. |
|BGCOLOR="FFF8DC"|Deliver supplies from the Station Administrator in [[Yorcia Weald]] to the [[Task Delegator]]. |
||
| − | |align="Center" BGCOLOR="FFF8DC"|1: |
+ | |align="Center" BGCOLOR="FFF8DC"|1: 2,500<br /> |
| − | 2: |
+ | 2: 4,500<br /> |
| − | 3: |
+ | 3: 6,000 |
|- |
|- |
||
|BGCOLOR="FFF8DC"|[[Support: Marjami Ravine]] |
|BGCOLOR="FFF8DC"|[[Support: Marjami Ravine]] |
||
|BGCOLOR="FFF8DC"|Deliver {{KeyItem}}[[Mar. FB op. materials container]] to a Station Administrator in [[Marjami Ravine]]. |
|BGCOLOR="FFF8DC"|Deliver {{KeyItem}}[[Mar. FB op. materials container]] to a Station Administrator in [[Marjami Ravine]]. |
||
| − | |align="Center" BGCOLOR="FFF8DC"|1: 3,500 ~ 4,500<br> |
+ | |align="Center" BGCOLOR="FFF8DC"|1: 3,500 ~ 4,500<br /> |
| − | 2: 6,300 ~ 8,100<br> |
+ | 2: 6,300 ~ 8,100<br /> |
3: 8,400 ~ 10,800 |
3: 8,400 ~ 10,800 |
||
|- |
|- |
||
|BGCOLOR="FFF8DC"|[[Support: Yorcia Weald]] |
|BGCOLOR="FFF8DC"|[[Support: Yorcia Weald]] |
||
|BGCOLOR="FFF8DC"|Deliver {{KeyItem}}[[Yor. FB op. materials container]] to a Station Administrator in [[Yorcia Weald]] |
|BGCOLOR="FFF8DC"|Deliver {{KeyItem}}[[Yor. FB op. materials container]] to a Station Administrator in [[Yorcia Weald]] |
||
| − | |align="Center" BGCOLOR="FFF8DC"|1: 3,500 ~ 4,000<br> |
+ | |align="Center" BGCOLOR="FFF8DC"|1: 3,500 ~ 4,000<br /> |
| − | 2: 6,300 ~ 7,200<br> |
+ | 2: 6,300 ~ 7,200<br /> |
3: 8,400 ~ 9,600 |
3: 8,400 ~ 9,600 |
||
|- |
|- |
||
| Line 120: | Line 123: | ||
|BGCOLOR="FFF8DC"|[[Provide: Kamihr Drifts]] <span style="color:#BD33A4"><small>#1</small></span> |
|BGCOLOR="FFF8DC"|[[Provide: Kamihr Drifts]] <span style="color:#BD33A4"><small>#1</small></span> |
||
|BGCOLOR="FFF8DC"|Deliver {{KeyItem}}[[Kam. FS building mat. container]] to a Station Administrator in [[Kamihr Drifts]] |
|BGCOLOR="FFF8DC"|Deliver {{KeyItem}}[[Kam. FS building mat. container]] to a Station Administrator in [[Kamihr Drifts]] |
||
| − | |align="Center" BGCOLOR="FFF8DC"|1: 1,750 {{Verification}} <br> |
+ | |align="Center" BGCOLOR="FFF8DC"|1: 1,750 {{Verification}} <br /> |
| − | 2: 3,150 {{Verification}} <br> |
+ | 2: 3,150 {{Verification}} <br /> |
3: 4,200 {{Verification}} |
3: 4,200 {{Verification}} |
||
|- |
|- |
||
|BGCOLOR="FFF8DC"|[[Support: Kamihr Drifts]] |
|BGCOLOR="FFF8DC"|[[Support: Kamihr Drifts]] |
||
|BGCOLOR="FFF8DC"|Deliver {{KeyItem}}[[Kam. FB op. materials container]] to a Station Administrator in [[Kamihr Drifts]] |
|BGCOLOR="FFF8DC"|Deliver {{KeyItem}}[[Kam. FB op. materials container]] to a Station Administrator in [[Kamihr Drifts]] |
||
| − | |align="Center" BGCOLOR="FFF8DC"|1: 4,000~4,750<br> |
+ | |align="Center" BGCOLOR="FFF8DC"|1: 4,000~4,750<br /> |
| − | 2: 7,200~8,550<br> |
+ | 2: 7,200~8,550<br /> |
3: 9,600~11,400 |
3: 9,600~11,400 |
||
|- |
|- |
||
| Line 134: | Line 137: | ||
|BGCOLOR="FFF8DC"|[[Deliver: Kamihr Drifts]] |
|BGCOLOR="FFF8DC"|[[Deliver: Kamihr Drifts]] |
||
|BGCOLOR="FFF8DC"|Deliver supplies from the Station Administrator in [[Kamihr Drifts]] to the [[Task Delegator]]. |
|BGCOLOR="FFF8DC"|Deliver supplies from the Station Administrator in [[Kamihr Drifts]] to the [[Task Delegator]]. |
||
| − | |align="Center" |
+ | | align="Center" bgcolor="FFF8DC" |1: ~4750 <br /> |
| − | 2: |
+ | 2: ~8550 <br /> |
| − | 3: |
+ | 3: ~11,400 |
|} |
|} |
||
| − | <span style="color:#BD33A4"><small>#1</small></span> '''Provide''' assignments are only available in zones where the frontier station IS NOT in existence. They become permanently unavailable once the station has been constructed on a server.<br> |
+ | <span style="color:#BD33A4"><small>#1</small></span> '''Provide''' assignments are only available in zones where the frontier station IS NOT in existence. They become permanently unavailable once the station has been constructed on a server.<br /> |
<span style="color:#BD33A4"><small>#2</small></span> '''Support''' and '''Deliver''' assignments are only available in zones where the frontier station IS in existence. |
<span style="color:#BD33A4"><small>#2</small></span> '''Support''' and '''Deliver''' assignments are only available in zones where the frontier station IS in existence. |
||
| Line 157: | Line 160: | ||
|BGCOLOR="FFF8DC"|[[Gather: Rala Waterways]] |
|BGCOLOR="FFF8DC"|[[Gather: Rala Waterways]] |
||
|BGCOLOR="FFF8DC"|Obtain 3 [[Bloodthread]] for the [[Task Delegator]]. |
|BGCOLOR="FFF8DC"|Obtain 3 [[Bloodthread]] for the [[Task Delegator]]. |
||
| − | |align="Center" BGCOLOR="FFF8DC"|1: |
+ | |align="Center" BGCOLOR="FFF8DC"|1: 1000<br /> |
| − | 2: |
+ | 2: 1,800<br /> |
| − | 3: |
+ | 3: 2,400 |
|- |
|- |
||
|BGCOLOR="FFF8DC"|[[Gather: Ceizak Battlegrounds]] |
|BGCOLOR="FFF8DC"|[[Gather: Ceizak Battlegrounds]] |
||
|BGCOLOR="FFF8DC"|Obtain 5 [[Chapuli Wing]]s for the [[Task Delegator]]. |
|BGCOLOR="FFF8DC"|Obtain 5 [[Chapuli Wing]]s for the [[Task Delegator]]. |
||
| − | |align="Center" BGCOLOR="FFF8DC"|1: 750<br> |
+ | |align="Center" BGCOLOR="FFF8DC"|1: 750<br /> |
| − | 2: 1,350<br> |
+ | 2: 1,350<br /> |
3: 1,800 |
3: 1,800 |
||
|- |
|- |
||
|BGCOLOR="FFF8DC"|[[Gather: Yahse Hunting Grounds]] |
|BGCOLOR="FFF8DC"|[[Gather: Yahse Hunting Grounds]] |
||
|BGCOLOR="FFF8DC"|Obtain 5 [[Twitherym Wing]]s for the [[Task Delegator]]. |
|BGCOLOR="FFF8DC"|Obtain 5 [[Twitherym Wing]]s for the [[Task Delegator]]. |
||
| − | |align="Center" BGCOLOR="FFF8DC"|1: |
+ | |align="Center" BGCOLOR="FFF8DC"|1: 1000<br /> |
| − | 2: 1, |
+ | 2: 1,800<br /> |
| − | 3: |
+ | 3: 2,400 |
|- |
|- |
||
|rowspan=2 BGCOLOR="F5DEB3"| |
|rowspan=2 BGCOLOR="F5DEB3"| |
||
| Line 177: | Line 180: | ||
|BGCOLOR="FFF8DC"|[[Gather: Sih Gates]] |
|BGCOLOR="FFF8DC"|[[Gather: Sih Gates]] |
||
|BGCOLOR="FFF8DC"|Obtain 3 jars of [[Acuex Poison]] for the [[Task Delegator]]. |
|BGCOLOR="FFF8DC"|Obtain 3 jars of [[Acuex Poison]] for the [[Task Delegator]]. |
||
| − | |align="Center" BGCOLOR="FFF8DC"|1: 1,000<br> |
+ | |align="Center" BGCOLOR="FFF8DC"|1: 1,000<br /> |
| − | 2: 1,800<br> |
+ | 2: 1,800<br /> |
3: 2,400 |
3: 2,400 |
||
|- |
|- |
||
|BGCOLOR="FFF8DC"|[[Gather: Moh Gates]] |
|BGCOLOR="FFF8DC"|[[Gather: Moh Gates]] |
||
|BGCOLOR="FFF8DC"|Obtain 3 [[Matamata Shell]]s for the [[Task Delegator]]. |
|BGCOLOR="FFF8DC"|Obtain 3 [[Matamata Shell]]s for the [[Task Delegator]]. |
||
| − | |align="Center" BGCOLOR="FFF8DC"|1: 1,000<br> |
+ | |align="Center" BGCOLOR="FFF8DC"|1: 1,000<br /> |
| − | 2: 1,800<br> |
+ | 2: 1,800<br /> |
3: 2,400 |
3: 2,400 |
||
|- |
|- |
||
| Line 191: | Line 194: | ||
|BGCOLOR="FFF8DC"|[[Gather: Foret de Hennetiel]] |
|BGCOLOR="FFF8DC"|[[Gather: Foret de Hennetiel]] |
||
|BGCOLOR="FFF8DC"|Obtain 3 [[Craklaw Pincer]]s for the [[Task Delegator]]. |
|BGCOLOR="FFF8DC"|Obtain 3 [[Craklaw Pincer]]s for the [[Task Delegator]]. |
||
| − | |align="Center" BGCOLOR="FFF8DC"|1: 1, |
+ | |align="Center" BGCOLOR="FFF8DC"|1: 1,750<br /> |
| − | 2: |
+ | 2: 3,150<br /> |
| − | 3: |
+ | 3: 4,200 |
|- |
|- |
||
|BGCOLOR="FFF8DC"|[[Gather: Morimar Basalt Fields]] |
|BGCOLOR="FFF8DC"|[[Gather: Morimar Basalt Fields]] |
||
|BGCOLOR="FFF8DC"|Obtain 3 [[Peiste Stinger]]s for the [[Task Delegator]]. |
|BGCOLOR="FFF8DC"|Obtain 3 [[Peiste Stinger]]s for the [[Task Delegator]]. |
||
| − | |align="Center" BGCOLOR="FFF8DC"|1: 1,250<br> |
+ | |align="Center" BGCOLOR="FFF8DC"|1: 1,250<br /> |
| − | 2: 2,250<br> |
+ | 2: 2,250<br /> |
3: 3,000 |
3: 3,000 |
||
|- |
|- |
||
| Line 205: | Line 208: | ||
|BGCOLOR="FFF8DC"|[[Gather: Cirdas Caverns]] |
|BGCOLOR="FFF8DC"|[[Gather: Cirdas Caverns]] |
||
|BGCOLOR="FFF8DC"|Obtain 3 jars of [[Umbril Ooze]] for the [[Task Delegator]]. |
|BGCOLOR="FFF8DC"|Obtain 3 jars of [[Umbril Ooze]] for the [[Task Delegator]]. |
||
| − | |align="Center" BGCOLOR="FFF8DC"|1: 1,500<br> |
+ | |align="Center" BGCOLOR="FFF8DC"|1: 1,500<br /> |
| − | 2: 2,700<br> |
+ | 2: 2,700<br /> |
3: 3,600 |
3: 3,600 |
||
|- |
|- |
||
| Line 213: | Line 216: | ||
|BGCOLOR="FFF8DC"|[[Gather: Dho Gates]] |
|BGCOLOR="FFF8DC"|[[Gather: Dho Gates]] |
||
|BGCOLOR="FFF8DC"|Obtain 3 [[Slug Eye]]s for the [[Task Delegator]]. |
|BGCOLOR="FFF8DC"|Obtain 3 [[Slug Eye]]s for the [[Task Delegator]]. |
||
| − | |align="Center" BGCOLOR="FFF8DC"|1: |
+ | |align="Center" BGCOLOR="FFF8DC"|1: 2,750<br /> |
| − | 2: |
+ | 2: 4,950<br /> |
| − | 3: |
+ | 3: 6,600 |
|- |
|- |
||
|BGCOLOR="FFF8DC"|[[Gather: Marjami Ravine]] |
|BGCOLOR="FFF8DC"|[[Gather: Marjami Ravine]] |
||
|BGCOLOR="FFF8DC"|Obtain 3 [[Tulfaire Feather]]s for the [[Task Delegator]]. |
|BGCOLOR="FFF8DC"|Obtain 3 [[Tulfaire Feather]]s for the [[Task Delegator]]. |
||
| − | |align="Center" BGCOLOR="FFF8DC"|1: 2, |
+ | |align="Center" BGCOLOR="FFF8DC"|1: 2,750<br /> |
| − | 2: 4, |
+ | 2: 4,950<br /> |
| − | 3: |
+ | 3: 6,600 |
|- |
|- |
||
|rowspan=1 BGCOLOR="F5DEB3"| |
|rowspan=1 BGCOLOR="F5DEB3"| |
||
| Line 227: | Line 230: | ||
|BGCOLOR="FFF8DC"|[[Gather: Yorcia Weald]] |
|BGCOLOR="FFF8DC"|[[Gather: Yorcia Weald]] |
||
|BGCOLOR="FFF8DC"|Obtain 3 [[Snapweed Tendril]]s for the [[Task Delegator]]. |
|BGCOLOR="FFF8DC"|Obtain 3 [[Snapweed Tendril]]s for the [[Task Delegator]]. |
||
| − | |align="Center" BGCOLOR="FFF8DC"|1: 2,250 <br> |
+ | |align="Center" BGCOLOR="FFF8DC"|1: 2,250 <br /> |
| − | 2: 4,050 <br> |
+ | 2: 4,050 <br /> |
3: 5,400 |
3: 5,400 |
||
|- |
|- |
||
| Line 235: | Line 238: | ||
|BGCOLOR="FFF8DC"|[[Gather: Kamihr Drifts]] |
|BGCOLOR="FFF8DC"|[[Gather: Kamihr Drifts]] |
||
|BGCOLOR="FFF8DC"|Obtain 3 [[Raaz Tusk]]s for the [[Task Delegator]]. |
|BGCOLOR="FFF8DC"|Obtain 3 [[Raaz Tusk]]s for the [[Task Delegator]]. |
||
| − | |align="Center" BGCOLOR="FFF8DC"|1: 2,750<br> |
+ | |align="Center" BGCOLOR="FFF8DC"|1: 2,750<br /> |
| − | 2: 4,950<br> |
+ | 2: 4,950<br /> |
3: 6,600 |
3: 6,600 |
||
|- |
|- |
||
|BGCOLOR="FFF8DC"|[[Gather: Woh Gates]] |
|BGCOLOR="FFF8DC"|[[Gather: Woh Gates]] |
||
|BGCOLOR="FFF8DC"|Obtain 3 [[Snoll Arm]]s for the [[Task Delegator]]. |
|BGCOLOR="FFF8DC"|Obtain 3 [[Snoll Arm]]s for the [[Task Delegator]]. |
||
| − | |align="Center" BGCOLOR="FFF8DC"|1: 1,750<br> |
+ | |align="Center" BGCOLOR="FFF8DC"|1: 1,750<br /> |
| − | 2: 3,150<br> |
+ | 2: 3,150<br /> |
3: 4,200 |
3: 4,200 |
||
|- |
|- |
||
| − | |rowspan= |
+ | |rowspan=2 BGCOLOR="F5DEB3"| |
Legend |
Legend |
||
|BGCOLOR="FFF8DC"|[[Gather: Outer Ra'Kaznar]] |
|BGCOLOR="FFF8DC"|[[Gather: Outer Ra'Kaznar]] |
||
|BGCOLOR="FFF8DC"|Obtain 1 [[Dullahan Armor]] for the [[Task Delegator]]. |
|BGCOLOR="FFF8DC"|Obtain 1 [[Dullahan Armor]] for the [[Task Delegator]]. |
||
| − | |align="Center" BGCOLOR="FFF8DC"|1: |
+ | |align="Center" BGCOLOR="FFF8DC"|1: 4750<br /> |
| − | 2: |
+ | 2: 8550<br /> |
| − | 3: |
+ | 3: 11,400 |
| + | |- |
||
| + | |BGCOLOR="FFF8DC"|[[Gather: Ra'Kaznar Inner Court]] |
||
| + | |BGCOLOR="FFF8DC"|Obtain 3 [[Luminicloth]] for the [[Task Delegator]]. |
||
| + | |align="Center" BGCOLOR="FFF8DC"|1: 4750<br /> |
||
| + | 2: 8550<br /> |
||
| + | 3: 11,400 |
||
|} |
|} |
||
==Mummers' Coalition== |
==Mummers' Coalition== |
||
| − | Location: [[Western Adoulin]] (G-11)<br> |
+ | Location: [[Western Adoulin]] (G-11)<br /> |
{| border="0" width="100%" cellpadding="1" cellspacing="1" style="background-color:#DAA520" |
{| border="0" width="100%" cellpadding="1" cellspacing="1" style="background-color:#DAA520" |
||
| Line 269: | Line 278: | ||
|BGCOLOR="FFF8DC"|[[Recover: Ceizak Battlegrounds]] |
|BGCOLOR="FFF8DC"|[[Recover: Ceizak Battlegrounds]] |
||
|BGCOLOR="FFF8DC"|Find a [[Lost Article]] in either [[Ceizak Battlegrounds]] or [[Yahse Hunting Grounds]]. |
|BGCOLOR="FFF8DC"|Find a [[Lost Article]] in either [[Ceizak Battlegrounds]] or [[Yahse Hunting Grounds]]. |
||
| − | |align="Center" BGCOLOR="FFF8DC"|1: 1,500<br> |
+ | |align="Center" BGCOLOR="FFF8DC"|1: 1,500<br /> |
| − | 2: 2,700<br> |
+ | 2: 2,700<br /> |
3: 3,600 |
3: 3,600 |
||
|- |
|- |
||
|BGCOLOR="FFF8DC"|[[Research: Rala Waterways]] |
|BGCOLOR="FFF8DC"|[[Research: Rala Waterways]] |
||
|BGCOLOR="FFF8DC"|Have a [[Plantpassage Slug]] use [[Fuscous Ooze]] on you. |
|BGCOLOR="FFF8DC"|Have a [[Plantpassage Slug]] use [[Fuscous Ooze]] on you. |
||
| − | |align="Center" BGCOLOR="FFF8DC"|1: 750<br> |
+ | |align="Center" BGCOLOR="FFF8DC"|1: 750<br /> |
| − | 2: 1,350<br> |
+ | 2: 1,350<br /> |
3: 1,800 |
3: 1,800 |
||
|- |
|- |
||
| Line 283: | Line 292: | ||
|BGCOLOR="FFF8DC"|[[Research: Ceizak Battlegrounds]] |
|BGCOLOR="FFF8DC"|[[Research: Ceizak Battlegrounds]] |
||
|BGCOLOR="FFF8DC"|Have a [[Chapuli]] use [[Sanguinary Slash]] on you. |
|BGCOLOR="FFF8DC"|Have a [[Chapuli]] use [[Sanguinary Slash]] on you. |
||
| − | |align="Center" BGCOLOR="FFF8DC"|1: 1,000<br> |
+ | |align="Center" BGCOLOR="FFF8DC"|1: 1,000<br /> |
| − | 2: 1,800<br> |
+ | 2: 1,800<br /> |
3: 2,400 |
3: 2,400 |
||
|- |
|- |
||
|BGCOLOR="FFF8DC"|[[Boost: Foret de Hennetiel]] <span style="color:#BD33A4"><small> *</small></span> |
|BGCOLOR="FFF8DC"|[[Boost: Foret de Hennetiel]] <span style="color:#BD33A4"><small> *</small></span> |
||
|BGCOLOR="FFF8DC"|Cheer up a Station Worker in either [[Foret de Hennetiel]] or [[Morimar Basalt Fields]]. |
|BGCOLOR="FFF8DC"|Cheer up a Station Worker in either [[Foret de Hennetiel]] or [[Morimar Basalt Fields]]. |
||
| − | |align="Center" BGCOLOR="FFF8DC"|1: 500<br> |
+ | |align="Center" BGCOLOR="FFF8DC"|1: 500<br /> |
| − | 2: 900<br> |
+ | 2: 900<br /> |
3: 1,200 |
3: 1,200 |
||
|- |
|- |
||
| Line 297: | Line 306: | ||
|BGCOLOR="FFF8DC"|[[Recover: Foret de Hennetiel]] |
|BGCOLOR="FFF8DC"|[[Recover: Foret de Hennetiel]] |
||
|BGCOLOR="FFF8DC"|Find a [[Lost Article]] in either [[Foret de Hennetiel]] or [[Sih Gates]]. |
|BGCOLOR="FFF8DC"|Find a [[Lost Article]] in either [[Foret de Hennetiel]] or [[Sih Gates]]. |
||
| − | |align="Center" BGCOLOR="FFF8DC"|1: 1,500<br> |
+ | |align="Center" BGCOLOR="FFF8DC"|1: 1,500<br /> |
| − | 2: 2,700<br> |
+ | 2: 2,700<br /> |
3: 3,600 |
3: 3,600 |
||
|- |
|- |
||
|BGCOLOR="FFF8DC"|[[Recover: Morimar Basalt Fields]] |
|BGCOLOR="FFF8DC"|[[Recover: Morimar Basalt Fields]] |
||
|BGCOLOR="FFF8DC"|Find a [[Lost Article]] in either [[Morimar Basalt Fields]] or [[Moh Gates]]. |
|BGCOLOR="FFF8DC"|Find a [[Lost Article]] in either [[Morimar Basalt Fields]] or [[Moh Gates]]. |
||
| − | |align="Center" BGCOLOR="FFF8DC"|1: 1,500<br> |
+ | |align="Center" BGCOLOR="FFF8DC"|1: 1,500<br /> |
| − | 2: 2,700<br> |
+ | 2: 2,700<br /> |
3: 3,600 |
3: 3,600 |
||
|- |
|- |
||
| Line 311: | Line 320: | ||
|BGCOLOR="FFF8DC"|[[Research: Foret de Hennetiel]] |
|BGCOLOR="FFF8DC"|[[Research: Foret de Hennetiel]] |
||
|BGCOLOR="FFF8DC"|Have a [[Hoary Craklaw]] or [[Cunning Craklaw]] use [[Sundering Snip]] on you in [[Foret de Hennetiel]]. |
|BGCOLOR="FFF8DC"|Have a [[Hoary Craklaw]] or [[Cunning Craklaw]] use [[Sundering Snip]] on you in [[Foret de Hennetiel]]. |
||
| − | |align="Center" BGCOLOR="FFF8DC"|1: 1,750<br> |
+ | |align="Center" BGCOLOR="FFF8DC"|1: 1,750<br /> |
| − | 2: 3,150<br> |
+ | 2: 3,150<br /> |
3: 4,200 |
3: 4,200 |
||
|- |
|- |
||
|BGCOLOR="FFF8DC"|[[Research: Morimar Basalt Fields]] |
|BGCOLOR="FFF8DC"|[[Research: Morimar Basalt Fields]] |
||
|BGCOLOR="FFF8DC"|Have a [[Sinewy Matamata]] or [[Emberflash Matamata]] use [[Tail Thwack]] on you in [[Morimar Basalt Fields]]. |
|BGCOLOR="FFF8DC"|Have a [[Sinewy Matamata]] or [[Emberflash Matamata]] use [[Tail Thwack]] on you in [[Morimar Basalt Fields]]. |
||
| − | |align="Center" BGCOLOR="FFF8DC"|1: 1,750<br> |
+ | |align="Center" BGCOLOR="FFF8DC"|1: 1,750<br /> |
| − | 2: 3150<br> |
+ | 2: 3150<br /> |
3: 4,200 |
3: 4,200 |
||
|- |
|- |
||
| Line 325: | Line 334: | ||
|BGCOLOR="FFF8DC"|[[Recover: Marjami Ravine]] |
|BGCOLOR="FFF8DC"|[[Recover: Marjami Ravine]] |
||
|BGCOLOR="FFF8DC"|Find a [[Lost Article]] in either [[Marjami Ravine]] or [[Dho Gates]]. |
|BGCOLOR="FFF8DC"|Find a [[Lost Article]] in either [[Marjami Ravine]] or [[Dho Gates]]. |
||
| − | |align="Center" BGCOLOR="FFF8DC"|1: 2,250<br> |
+ | |align="Center" BGCOLOR="FFF8DC"|1: 2,250<br /> |
| − | 2: 4,050<br> |
+ | 2: 4,050<br /> |
3: 5,400 |
3: 5,400 |
||
|- |
|- |
||
|BGCOLOR="FFF8DC"|[[Boost: Marjami Ravine]] <span style="color:#BD33A4"><small> *</small></span> |
|BGCOLOR="FFF8DC"|[[Boost: Marjami Ravine]] <span style="color:#BD33A4"><small> *</small></span> |
||
|BGCOLOR="FFF8DC"|Cheer up a Station Worker in either [[Marjami Ravine]] or [[Yorcia Weald]]. |
|BGCOLOR="FFF8DC"|Cheer up a Station Worker in either [[Marjami Ravine]] or [[Yorcia Weald]]. |
||
| − | |align="Center" BGCOLOR="FFF8DC"|1: 2,000<br> |
+ | |align="Center" BGCOLOR="FFF8DC"|1: 2,000<br /> |
| − | 2: 3,600<br> |
+ | 2: 3,600<br /> |
3: 4,800 |
3: 4,800 |
||
|- |
|- |
||
| Line 339: | Line 348: | ||
|BGCOLOR="FFF8DC"|[[Recover: Yorcia Weald]] |
|BGCOLOR="FFF8DC"|[[Recover: Yorcia Weald]] |
||
|BGCOLOR="FFF8DC"|Find a [[Lost Article]] in either [[Yorcia Weald]] or [[Cirdas Caverns]]. |
|BGCOLOR="FFF8DC"|Find a [[Lost Article]] in either [[Yorcia Weald]] or [[Cirdas Caverns]]. |
||
| − | |align="Center" BGCOLOR="FFF8DC"|1: 2,500<br> |
+ | |align="Center" BGCOLOR="FFF8DC"|1: 2,500<br /> |
| − | 2: 4,500<br> |
+ | 2: 4,500<br /> |
3: 6,000 |
3: 6,000 |
||
|- |
|- |
||
|BGCOLOR="FFF8DC"|[[Research: Marjami Ravine]] |
|BGCOLOR="FFF8DC"|[[Research: Marjami Ravine]] |
||
| − | |BGCOLOR="FFF8DC"|Have a [[Tulfaire]] use [[Molting |
+ | |BGCOLOR="FFF8DC"|Have a [[Tulfaire]] use [[Molting Plumage]] on you. |
| − | |align="Center" BGCOLOR="FFF8DC"|1: 2,750<br> |
+ | |align="Center" BGCOLOR="FFF8DC"|1: 2,750<br /> |
| − | 2: 4,950<br> |
+ | 2: 4,950<br /> |
3: 6,600 |
3: 6,600 |
||
|- |
|- |
||
| Line 353: | Line 362: | ||
|BGCOLOR="FFF8DC"|[[Boost: Kamihr Drifts]] <span style="color:#BD33A4"><small> *</small></span> |
|BGCOLOR="FFF8DC"|[[Boost: Kamihr Drifts]] <span style="color:#BD33A4"><small> *</small></span> |
||
|BGCOLOR="FFF8DC"|Cheer up a Station Worker in [[Kamihr Drifts]]. |
|BGCOLOR="FFF8DC"|Cheer up a Station Worker in [[Kamihr Drifts]]. |
||
| − | |align="Center" BGCOLOR="FFF8DC"|1: 3,000<br> |
+ | |align="Center" BGCOLOR="FFF8DC"|1: 3,000<br /> |
| − | 2: 5,400<br> |
+ | 2: 5,400<br /> |
3: 7,200 |
3: 7,200 |
||
|- |
|- |
||
|BGCOLOR="FFF8DC"|[[Research: Yorcia Weald]] |
|BGCOLOR="FFF8DC"|[[Research: Yorcia Weald]] |
||
|BGCOLOR="FFF8DC"|Have a [[Snapweed]] in [[Yorcia Weald]] use [[Tickling Tendrils]] on you. |
|BGCOLOR="FFF8DC"|Have a [[Snapweed]] in [[Yorcia Weald]] use [[Tickling Tendrils]] on you. |
||
| − | |align="Center" BGCOLOR="FFF8DC"|1: 3,250<br> |
+ | |align="Center" BGCOLOR="FFF8DC"|1: 3,250<br /> |
| − | 2: 5,850<br> |
+ | 2: 5,850<br /> |
3: 7,800 |
3: 7,800 |
||
|- |
|- |
||
| Line 367: | Line 376: | ||
|BGCOLOR="FFF8DC"|[[Recover: Kamihr Drifts]] |
|BGCOLOR="FFF8DC"|[[Recover: Kamihr Drifts]] |
||
|BGCOLOR="FFF8DC"|Find a [[Lost Article]] in either [[Kamihr Drifts]] or [[Woh Gates]]. |
|BGCOLOR="FFF8DC"|Find a [[Lost Article]] in either [[Kamihr Drifts]] or [[Woh Gates]]. |
||
| − | |align="Center" BGCOLOR="FFF8DC"|1: 3,500<br> |
+ | |align="Center" BGCOLOR="FFF8DC"|1: 3,500<br /> |
| − | 2: 6,300<br> |
+ | 2: 6,300<br /> |
3: 8,400 |
3: 8,400 |
||
|- |
|- |
||
|BGCOLOR="FFF8DC"|[[Research: Kamihr Drifts]] |
|BGCOLOR="FFF8DC"|[[Research: Kamihr Drifts]] |
||
|BGCOLOR="FFF8DC"|Have a [[Cicatricose Raaz]] in [[Kamihr Drifts]] use [[Sweeping Gouge]] on you. |
|BGCOLOR="FFF8DC"|Have a [[Cicatricose Raaz]] in [[Kamihr Drifts]] use [[Sweeping Gouge]] on you. |
||
| − | |align="Center" BGCOLOR="FFF8DC"|1: |
+ | |align="Center" BGCOLOR="FFF8DC"|1: 8,000<br /> |
| − | 2: |
+ | 2: 14,400<br /> |
| − | 3: |
+ | 3: 19,200 |
|} |
|} |
||
| Line 381: | Line 390: | ||
==Peacekeepers' Coalition== |
==Peacekeepers' Coalition== |
||
| − | Location: [[Eastern Adoulin]] (F-7)<br> |
+ | Location: [[Eastern Adoulin]] (F-7)<br /> |
{| border="0" width="100%" cellpadding="1" cellspacing="1" style="background-color:#DAA520" |
{| border="0" width="100%" cellpadding="1" cellspacing="1" style="background-color:#DAA520" |
||
| Line 396: | Line 405: | ||
|BGCOLOR="FFF8DC"|Complete a successful [[Lair Reive]] in [[Ceizak Battlegrounds]] |
|BGCOLOR="FFF8DC"|Complete a successful [[Lair Reive]] in [[Ceizak Battlegrounds]] |
||
|align="Center" BGCOLOR="FFF8DC"| |
|align="Center" BGCOLOR="FFF8DC"| |
||
| − | 1: 750<br> |
+ | 1: 750<br /> |
| − | 2: 1,350<br> |
+ | 2: 1,350<br /> |
3: 1,800 |
3: 1,800 |
||
|- |
|- |
||
| Line 403: | Line 412: | ||
|BGCOLOR="FFF8DC"|Complete a successful [[Lair Reive]] in [[Yahse Hunting Grounds]] |
|BGCOLOR="FFF8DC"|Complete a successful [[Lair Reive]] in [[Yahse Hunting Grounds]] |
||
|align="Center" BGCOLOR="FFF8DC"| |
|align="Center" BGCOLOR="FFF8DC"| |
||
| − | 1: 1,000<br> |
+ | 1: 1,000<br /> |
| − | 2: 1,800<br> |
+ | 2: 1,800<br /> |
3: 2,400 |
3: 2,400 |
||
|- |
|- |
||
| Line 412: | Line 421: | ||
|BGCOLOR="FFF8DC"|Defeat 5 [[Toads]] in [[Rala Waterways]] |
|BGCOLOR="FFF8DC"|Defeat 5 [[Toads]] in [[Rala Waterways]] |
||
|align="Center" BGCOLOR="FFF8DC"| |
|align="Center" BGCOLOR="FFF8DC"| |
||
| − | 1: 750<br> |
+ | 1: 750<br /> |
| − | 2: 1,350<br> |
+ | 2: 1,350<br /> |
3: 1,800 |
3: 1,800 |
||
|- |
|- |
||
| Line 419: | Line 428: | ||
|BGCOLOR="FFF8DC"|Defeat 5 [[Malodorous Twitherym]] in [[Sih Gates]] |
|BGCOLOR="FFF8DC"|Defeat 5 [[Malodorous Twitherym]] in [[Sih Gates]] |
||
|align="Center" BGCOLOR="FFF8DC"| |
|align="Center" BGCOLOR="FFF8DC"| |
||
| − | 1: 1,000<br> |
+ | 1: 1,000<br /> |
| − | 2: 1,800<br> |
+ | 2: 1,800<br /> |
3: 2,400 |
3: 2,400 |
||
|- |
|- |
||
| Line 426: | Line 435: | ||
|BGCOLOR="FFF8DC"|Defeat 5 [[Ruby Raptor]]s in [[Moh Gates]] |
|BGCOLOR="FFF8DC"|Defeat 5 [[Ruby Raptor]]s in [[Moh Gates]] |
||
|align="Center" BGCOLOR="FFF8DC"| |
|align="Center" BGCOLOR="FFF8DC"| |
||
| − | 1: 1,000<br> |
+ | 1: 1,000<br /> |
| − | 2: 1,800<br> |
+ | 2: 1,800<br /> |
3: 2,400 |
3: 2,400 |
||
|- |
|- |
||
|rowspan=2 BGCOLOR="F5DEB3"| |
|rowspan=2 BGCOLOR="F5DEB3"| |
||
Disciple |
Disciple |
||
| − | |BGCOLOR="FFF8DC"|[[Preserve: Foret |
+ | |BGCOLOR="FFF8DC"|[[Preserve: Foret de Hennetiel]] |
|BGCOLOR="FFF8DC"|Complete a successful [[Lair Reive]] in [[Foret de Hennetiel]] |
|BGCOLOR="FFF8DC"|Complete a successful [[Lair Reive]] in [[Foret de Hennetiel]] |
||
| − | |align="Center" BGCOLOR="FFF8DC"|1: 1,250<br> |
+ | |align="Center" BGCOLOR="FFF8DC"|1: 1,250<br /> |
| − | 2: 2,250<br> |
+ | 2: 2,250<br /> |
3: 3,000 |
3: 3,000 |
||
|- |
|- |
||
|BGCOLOR="FFF8DC"|[[Preserve: Morimar Basalt Fields]] |
|BGCOLOR="FFF8DC"|[[Preserve: Morimar Basalt Fields]] |
||
|BGCOLOR="FFF8DC"|Complete a successful [[Lair Reive]] in [[Morimar Basalt Fields]] |
|BGCOLOR="FFF8DC"|Complete a successful [[Lair Reive]] in [[Morimar Basalt Fields]] |
||
| − | |align="Center" BGCOLOR="FFF8DC"|1: 1,250<br> |
+ | |align="Center" BGCOLOR="FFF8DC"|1: 1,250<br /> |
| − | 2: 2,250<br> |
+ | 2: 2,250<br /> |
3: 3,000 |
3: 3,000 |
||
|- |
|- |
||
| Line 448: | Line 457: | ||
|BGCOLOR="FFF8DC"|[[Preserve: Cirdas Caverns]] |
|BGCOLOR="FFF8DC"|[[Preserve: Cirdas Caverns]] |
||
|BGCOLOR="FFF8DC"|Complete a successful [[Lair Reive]] in [[Cirdas Caverns]] |
|BGCOLOR="FFF8DC"|Complete a successful [[Lair Reive]] in [[Cirdas Caverns]] |
||
| − | |align="Center" BGCOLOR="FFF8DC"|1: 1,500<br> |
+ | |align="Center" BGCOLOR="FFF8DC"|1: 1,500<br /> |
| − | 2: 2,700<br> |
+ | 2: 2,700<br /> |
3: 3,600 |
3: 3,600 |
||
|- |
|- |
||
| Line 456: | Line 465: | ||
|BGCOLOR="FFF8DC"|[[Patrol: Cirdas Caverns]] |
|BGCOLOR="FFF8DC"|[[Patrol: Cirdas Caverns]] |
||
|BGCOLOR="FFF8DC"|Defeat 3 [[Asperous Marolith]]s in [[Cirdas Caverns]] |
|BGCOLOR="FFF8DC"|Defeat 3 [[Asperous Marolith]]s in [[Cirdas Caverns]] |
||
| − | |align="Center" BGCOLOR="FFF8DC"|1: 1,500<br> |
+ | |align="Center" BGCOLOR="FFF8DC"|1: 1,500<br /> |
| − | 2: 2,700<br> |
+ | 2: 2,700<br /> |
3: 3,600 |
3: 3,600 |
||
|- |
|- |
||
|BGCOLOR="FFF8DC"|[[Patrol: Dho Gates]] |
|BGCOLOR="FFF8DC"|[[Patrol: Dho Gates]] |
||
|BGCOLOR="FFF8DC"|Defeat 3 [[Unyielding Tarichuk]]s in [[Dho Gates]] |
|BGCOLOR="FFF8DC"|Defeat 3 [[Unyielding Tarichuk]]s in [[Dho Gates]] |
||
| − | |align="Center" BGCOLOR="FFF8DC"|1: 5,000<br> |
+ | |align="Center" BGCOLOR="FFF8DC"|1: 5,000<br /> |
| − | 2: 9,000<br> |
+ | 2: 9,000<br /> |
3: 12,000 |
3: 12,000 |
||
|- |
|- |
||
| Line 470: | Line 479: | ||
|BGCOLOR="FFF8DC"|[[Preserve: Yorcia Weald]] |
|BGCOLOR="FFF8DC"|[[Preserve: Yorcia Weald]] |
||
|BGCOLOR="FFF8DC"|Complete a successful [[Lair Reive]] in [[Yorcia Weald]] |
|BGCOLOR="FFF8DC"|Complete a successful [[Lair Reive]] in [[Yorcia Weald]] |
||
| − | |align="Center" BGCOLOR="FFF8DC"|1: 2,500<br> |
+ | |align="Center" BGCOLOR="FFF8DC"|1: 2,500<br /> |
| − | 2: 4,500<br> |
+ | 2: 4,500<br /> |
3: 6,000 |
3: 6,000 |
||
|- |
|- |
||
|BGCOLOR="FFF8DC"|[[Preserve: Marjami Ravine]] |
|BGCOLOR="FFF8DC"|[[Preserve: Marjami Ravine]] |
||
|BGCOLOR="FFF8DC"|Complete a successful [[Lair Reive]] in [[Marjami Ravine]] |
|BGCOLOR="FFF8DC"|Complete a successful [[Lair Reive]] in [[Marjami Ravine]] |
||
| − | |align="Center" BGCOLOR="FFF8DC"|1: 2,250<br> |
+ | |align="Center" BGCOLOR="FFF8DC"|1: 2,250<br /> |
| − | 2: 4,050<br> |
+ | 2: 4,050<br /> |
3: 5,400 |
3: 5,400 |
||
|- |
|- |
||
| Line 484: | Line 493: | ||
|BGCOLOR="FFF8DC"|[[Preserve: Kamihr Drifts]] |
|BGCOLOR="FFF8DC"|[[Preserve: Kamihr Drifts]] |
||
|BGCOLOR="FFF8DC"|Complete a successful [[Lair Reive]] in [[Kamihr Drifts]] |
|BGCOLOR="FFF8DC"|Complete a successful [[Lair Reive]] in [[Kamihr Drifts]] |
||
| − | |align="Center" BGCOLOR="FFF8DC"|1: 2,750<br> |
+ | |align="Center" BGCOLOR="FFF8DC"|1: 2,750<br /> |
| − | 2: 4,950<br> |
+ | 2: 4,950<br /> |
3: 6,600 |
3: 6,600 |
||
|- |
|- |
||
|BGCOLOR="FFF8DC"|[[Patrol: Woh Gates]] |
|BGCOLOR="FFF8DC"|[[Patrol: Woh Gates]] |
||
|BGCOLOR="FFF8DC"|Defeat 3 [[Acuex]]s in [[Woh Gates]] |
|BGCOLOR="FFF8DC"|Defeat 3 [[Acuex]]s in [[Woh Gates]] |
||
| − | |align="Center" BGCOLOR="FFF8DC"|1: 5,000<br> |
+ | |align="Center" BGCOLOR="FFF8DC"|1: 5,000<br /> |
| − | 2: 9,000<br> |
+ | 2: 9,000<br /> |
3: 12,000 |
3: 12,000 |
||
|- |
|- |
||
| Line 498: | Line 507: | ||
|BGCOLOR="FFF8DC"|[[Preserve: Outer Ra'Kaznar]] |
|BGCOLOR="FFF8DC"|[[Preserve: Outer Ra'Kaznar]] |
||
|BGCOLOR="FFF8DC"|Complete a successful [[Lair Reive]] in [[Outer Ra'Kaznar]] |
|BGCOLOR="FFF8DC"|Complete a successful [[Lair Reive]] in [[Outer Ra'Kaznar]] |
||
| − | |align="Center" BGCOLOR="FFF8DC"|1: 3,000<br> |
+ | |align="Center" BGCOLOR="FFF8DC"|1: 3,000<br /> |
| − | 2: 5,400<br> |
+ | 2: 5,400<br /> |
3: 7,200 |
3: 7,200 |
||
|- |
|- |
||
|BGCOLOR="FFF8DC"|[[Patrol: Outer Ra'Kaznar]] |
|BGCOLOR="FFF8DC"|[[Patrol: Outer Ra'Kaznar]] |
||
|BGCOLOR="FFF8DC"|Defeat 3 [[Ironclad]]s in [[Outer Ra'Kaznar]] |
|BGCOLOR="FFF8DC"|Defeat 3 [[Ironclad]]s in [[Outer Ra'Kaznar]] |
||
| − | |align="Center" BGCOLOR="FFF8DC"|1: 3,250<br> |
+ | |align="Center" BGCOLOR="FFF8DC"|1: 3,250<br /> |
| − | 2: 5,850<br> |
+ | 2: 5,850<br /> |
3: 7,800 |
3: 7,800 |
||
|} |
|} |
||
==Pioneers' Coalition== |
==Pioneers' Coalition== |
||
| − | Location: [[Western Adoulin]] (E-8)<br> |
+ | Location: [[Western Adoulin]] (E-8)<br /> |
{| border="0" width="100%" cellpadding="1" cellspacing="1" style="background-color:#DAA520" |
{| border="0" width="100%" cellpadding="1" cellspacing="1" style="background-color:#DAA520" |
||
| Line 524: | Line 533: | ||
|BGCOLOR="FFF8DC"| [[Procure: Ceizak Battlegrounds]] |
|BGCOLOR="FFF8DC"| [[Procure: Ceizak Battlegrounds]] |
||
|BGCOLOR="FFF8DC"|Procure 5 materials by logging in [[Ceizak Battlegrounds]] or [[Yahse Hunting Grounds]] |
|BGCOLOR="FFF8DC"|Procure 5 materials by logging in [[Ceizak Battlegrounds]] or [[Yahse Hunting Grounds]] |
||
| − | |align="Center" BGCOLOR="FFF8DC"|1: |
+ | |align="Center" BGCOLOR="FFF8DC"|1: 1,500 <br /> |
| − | 2: |
+ | 2: ? <br /> |
| − | 3: |
+ | 3: 3,600 |
|- |
|- |
||
|BGCOLOR="FFF8DC"|[[Clear: Ceizak Battlegrounds]] |
|BGCOLOR="FFF8DC"|[[Clear: Ceizak Battlegrounds]] |
||
|BGCOLOR="FFF8DC"|Complete a [[Colonization Reive]] in either [[Ceizak Battlegrounds]] or [[Yahse Hunting Grounds]] |
|BGCOLOR="FFF8DC"|Complete a [[Colonization Reive]] in either [[Ceizak Battlegrounds]] or [[Yahse Hunting Grounds]] |
||
| − | |align="Center" BGCOLOR="FFF8DC"|1: 750 <br> |
+ | |align="Center" BGCOLOR="FFF8DC"|1: 1,750 <br /> |
| − | 2: |
+ | 2: 3,150 <br /> |
| − | 3: |
+ | 3: 4,200 |
|- |
|- |
||
|rowspan=2 BGCOLOR="F5DEB3"| |
|rowspan=2 BGCOLOR="F5DEB3"| |
||
| Line 538: | Line 547: | ||
|BGCOLOR="FFF8DC"|[[Clear: Foret de Hennetiel]] |
|BGCOLOR="FFF8DC"|[[Clear: Foret de Hennetiel]] |
||
|BGCOLOR="FFF8DC"|Complete a [[Colonization Reive]] in [[Foret de Hennetiel]] |
|BGCOLOR="FFF8DC"|Complete a [[Colonization Reive]] in [[Foret de Hennetiel]] |
||
| − | |align="Center" BGCOLOR="FFF8DC"|1: 1,000<br> |
+ | |align="Center" BGCOLOR="FFF8DC"|1: 1,000<br /> |
| − | 2: 1,800<br> |
+ | 2: 1,800<br /> |
3: 2,400 |
3: 2,400 |
||
|- |
|- |
||
|BGCOLOR="FFF8DC"|[[Clear: Morimar Basalt Fields]] |
|BGCOLOR="FFF8DC"|[[Clear: Morimar Basalt Fields]] |
||
|BGCOLOR="FFF8DC"|Complete a [[Colonization Reive]] in [[Morimar Basalt Fields]] |
|BGCOLOR="FFF8DC"|Complete a [[Colonization Reive]] in [[Morimar Basalt Fields]] |
||
| − | |align="Center" BGCOLOR="FFF8DC"|1: 1,000<br> |
+ | |align="Center" BGCOLOR="FFF8DC"|1: 1,000<br /> |
| − | 2: 1,800<br> |
+ | 2: 1,800<br /> |
3: 2,400 |
3: 2,400 |
||
|- |
|- |
||
| Line 552: | Line 561: | ||
|BGCOLOR="FFF8DC"|[[Procure: Foret de Hennetiel]] |
|BGCOLOR="FFF8DC"|[[Procure: Foret de Hennetiel]] |
||
|BGCOLOR="FFF8DC"|Procure 5 materials by harvesting in [[Foret de Hennetiel]] |
|BGCOLOR="FFF8DC"|Procure 5 materials by harvesting in [[Foret de Hennetiel]] |
||
| − | |align="Center" BGCOLOR="FFF8DC"|1: 1,250<br> |
+ | |align="Center" BGCOLOR="FFF8DC"|1: 1,250<br /> |
| − | 2: 2,250<br> |
+ | 2: 2,250<br /> |
3: 3,000 |
3: 3,000 |
||
|- |
|- |
||
|BGCOLOR="FFF8DC"|[[Procure: Morimar Basalt Fields]] |
|BGCOLOR="FFF8DC"|[[Procure: Morimar Basalt Fields]] |
||
|BGCOLOR="FFF8DC"|Procure 5 materials by mining in [[Morimar Basalt Fields]] |
|BGCOLOR="FFF8DC"|Procure 5 materials by mining in [[Morimar Basalt Fields]] |
||
| − | |align="Center" BGCOLOR="FFF8DC"|1: 1,250<br> |
+ | |align="Center" BGCOLOR="FFF8DC"|1: 1,250<br /> |
| − | 2: 2,250<br> |
+ | 2: 2,250<br /> |
3: 3,000 |
3: 3,000 |
||
|- |
|- |
||
| Line 566: | Line 575: | ||
|BGCOLOR="FFF8DC"|[[Procure: Cirdas Caverns]] |
|BGCOLOR="FFF8DC"|[[Procure: Cirdas Caverns]] |
||
|BGCOLOR="FFF8DC"|Procure 5 materials by mining in [[Cirdas Caverns]] |
|BGCOLOR="FFF8DC"|Procure 5 materials by mining in [[Cirdas Caverns]] |
||
| − | |align="Center" BGCOLOR="FFF8DC"|1: 1,500<br> |
+ | |align="Center" BGCOLOR="FFF8DC"|1: 1,500<br /> |
| − | 2: 2,700<br> |
+ | 2: 2,700<br /> |
3: 3,600 |
3: 3,600 |
||
|- |
|- |
||
|BGCOLOR="FFF8DC"|[[Clear: Cirdas Caverns]] |
|BGCOLOR="FFF8DC"|[[Clear: Cirdas Caverns]] |
||
|BGCOLOR="FFF8DC"|Complete a [[Colonization Reive]] in [[Cirdas Caverns]] |
|BGCOLOR="FFF8DC"|Complete a [[Colonization Reive]] in [[Cirdas Caverns]] |
||
| − | |align="Center" BGCOLOR="FFF8DC"|1: 1,500<br> |
+ | |align="Center" BGCOLOR="FFF8DC"|1: 1,500<br /> |
| − | 2: 2,700<br> |
+ | 2: 2,700<br /> |
3: 3,600 |
3: 3,600 |
||
|- |
|- |
||
| Line 580: | Line 589: | ||
|BGCOLOR="FFF8DC"|[[Procure: Marjami Ravine]] |
|BGCOLOR="FFF8DC"|[[Procure: Marjami Ravine]] |
||
|BGCOLOR="FFF8DC"|Procure 5 materials by mining in [[Marjami Ravine]] |
|BGCOLOR="FFF8DC"|Procure 5 materials by mining in [[Marjami Ravine]] |
||
| − | |align="Center" BGCOLOR="FFF8DC"|1: 2,250<br> |
+ | |align="Center" BGCOLOR="FFF8DC"|1: 2,250<br /> |
| − | 2: 4,050<br> |
+ | 2: 4,050<br /> |
3: 5,400 |
3: 5,400 |
||
|- |
|- |
||
|BGCOLOR="FFF8DC"|[[Clear: Marjami Ravine]] |
|BGCOLOR="FFF8DC"|[[Clear: Marjami Ravine]] |
||
|BGCOLOR="FFF8DC"|Complete a [[Colonization Reive]] in [[Marjami Ravine]] |
|BGCOLOR="FFF8DC"|Complete a [[Colonization Reive]] in [[Marjami Ravine]] |
||
| − | |align="Center" BGCOLOR="FFF8DC"|1: 2,000<br> |
+ | |align="Center" BGCOLOR="FFF8DC"|1: 2,000<br /> |
| − | 2: 3,600<br> |
+ | 2: 3,600<br /> |
3: 4,800 |
3: 4,800 |
||
|- |
|- |
||
| Line 594: | Line 603: | ||
|BGCOLOR="FFF8DC"|[[Procure: Yorcia Weald]] |
|BGCOLOR="FFF8DC"|[[Procure: Yorcia Weald]] |
||
|BGCOLOR="FFF8DC"|Procure 5 materials by logging in [[Yorcia Weald]] |
|BGCOLOR="FFF8DC"|Procure 5 materials by logging in [[Yorcia Weald]] |
||
| − | |align="Center" BGCOLOR="FFF8DC"|1: 2,750<br> |
+ | |align="Center" BGCOLOR="FFF8DC"|1: 2,750<br /> |
| − | 2: 4,950<br> |
+ | 2: 4,950<br /> |
3: 6,600 |
3: 6,600 |
||
|- |
|- |
||
|BGCOLOR="FFF8DC"|[[Clear: Yorcia Weald]] |
|BGCOLOR="FFF8DC"|[[Clear: Yorcia Weald]] |
||
|BGCOLOR="FFF8DC"|Complete a [[Colonization Reive]] in [[Yorcia Weald]] |
|BGCOLOR="FFF8DC"|Complete a [[Colonization Reive]] in [[Yorcia Weald]] |
||
| − | |align="Center" BGCOLOR="FFF8DC"|1: 2,500<br> |
+ | |align="Center" BGCOLOR="FFF8DC"|1: 2,500<br /> |
| − | 2: 4,500<br> |
+ | 2: 4,500<br /> |
3: 6,000 |
3: 6,000 |
||
|- |
|- |
||
| Line 608: | Line 617: | ||
|BGCOLOR="FFF8DC"|[[Procure: Kamihr Drifts]] |
|BGCOLOR="FFF8DC"|[[Procure: Kamihr Drifts]] |
||
|BGCOLOR="FFF8DC"|Procure 5 materials by mining in [[Kamihr Drifts]] |
|BGCOLOR="FFF8DC"|Procure 5 materials by mining in [[Kamihr Drifts]] |
||
| − | |align="Center" BGCOLOR="FFF8DC"|1: 2,750<br> |
+ | |align="Center" BGCOLOR="FFF8DC"|1: 2,750<br /> |
| − | 2: 4,950<br> |
+ | 2: 4,950<br /> |
3: 6,600 |
3: 6,600 |
||
|- |
|- |
||
|BGCOLOR="FFF8DC"|[[Clear: Kamihr Drifts]] |
|BGCOLOR="FFF8DC"|[[Clear: Kamihr Drifts]] |
||
|BGCOLOR="FFF8DC"|Complete a [[Colonization Reive]] in [[Kamihr Drifts]] |
|BGCOLOR="FFF8DC"|Complete a [[Colonization Reive]] in [[Kamihr Drifts]] |
||
| − | |align="Center" BGCOLOR="FFF8DC"|1: 3,000<br> |
+ | |align="Center" BGCOLOR="FFF8DC"|1: 3,000<br /> |
| − | 2: 5,400<br> |
+ | 2: 5,400<br /> |
3: 7,200 |
3: 7,200 |
||
|- |
|- |
||
| Line 622: | Line 631: | ||
|BGCOLOR="FFF8DC"|[[Procure: Outer Ra'Kaznar]] |
|BGCOLOR="FFF8DC"|[[Procure: Outer Ra'Kaznar]] |
||
|BGCOLOR="FFF8DC"|Procure 5 materials by mining in [[Outer Ra'Kaznar]] |
|BGCOLOR="FFF8DC"|Procure 5 materials by mining in [[Outer Ra'Kaznar]] |
||
| − | |align="Center" BGCOLOR="FFF8DC"|1: 3,750<br> |
+ | |align="Center" BGCOLOR="FFF8DC"|1: 3,750<br /> |
| − | 2: 6,750<br> |
+ | 2: 6,750<br /> |
3: 9,000 |
3: 9,000 |
||
|- |
|- |
||
|BGCOLOR="FFF8DC"|[[Clear: Outer Ra'Kaznar]] |
|BGCOLOR="FFF8DC"|[[Clear: Outer Ra'Kaznar]] |
||
|BGCOLOR="FFF8DC"|Complete a [[Colonization Reive]] in [[Outer Ra'Kaznar]] |
|BGCOLOR="FFF8DC"|Complete a [[Colonization Reive]] in [[Outer Ra'Kaznar]] |
||
| − | |align="Center" BGCOLOR="FFF8DC"|1: 3,500<br> |
+ | |align="Center" BGCOLOR="FFF8DC"|1: 3,500<br /> |
| − | 2: 6,300<br> |
+ | 2: 6,300<br /> |
3: 8,400 |
3: 8,400 |
||
|} |
|} |
||
==Scouts' Coalition== |
==Scouts' Coalition== |
||
| − | Location: [[Eastern Adoulin]] (F-9)<br> |
+ | Location: [[Eastern Adoulin]] (F-9)<br /> |
{| border="0" width="100%" cellpadding="1" cellspacing="1" style="background-color:#DAA520" |
{| border="0" width="100%" cellpadding="1" cellspacing="1" style="background-color:#DAA520" |
||
| Line 648: | Line 657: | ||
|BGCOLOR="FFF8DC"|[[Survey: Ceizak Battlegrounds]] |
|BGCOLOR="FFF8DC"|[[Survey: Ceizak Battlegrounds]] |
||
|BGCOLOR="FFF8DC"|Survey an [[Ergon Locus]] in [[Ceizak Battlegrounds]] or [[Yahse Hunting Grounds]] |
|BGCOLOR="FFF8DC"|Survey an [[Ergon Locus]] in [[Ceizak Battlegrounds]] or [[Yahse Hunting Grounds]] |
||
| − | |align="Center" BGCOLOR="FFF8DC"|1: 500 ~ 750 <br> |
+ | |align="Center" BGCOLOR="FFF8DC"|1: 500 ~ 750 <br /> |
| − | 2: 900 ~ 1,350 <br> |
+ | 2: 900 ~ 1,350 <br /> |
3: 1,200 ~ 2,400 |
3: 1,200 ~ 2,400 |
||
|- |
|- |
||
| Line 656: | Line 665: | ||
|BGCOLOR="FFF8DC"|[[Survey: Sih Gates]] |
|BGCOLOR="FFF8DC"|[[Survey: Sih Gates]] |
||
|BGCOLOR="FFF8DC"|Survey an [[Ergon Locus]] in [[Sih Gates]] or [[Moh Gates]] |
|BGCOLOR="FFF8DC"|Survey an [[Ergon Locus]] in [[Sih Gates]] or [[Moh Gates]] |
||
| − | |align="Center" BGCOLOR="FFF8DC"|1: 1,000 ~ 1,500<br> |
+ | |align="Center" BGCOLOR="FFF8DC"|1: 1,000 ~ 1,500<br /> |
| − | 2: 1,800 ~ 2,250<br> |
+ | 2: 1,800 ~ 2,250<br /> |
3: 2,400 ~ 3,000 |
3: 2,400 ~ 3,000 |
||
|- |
|- |
||
| Line 664: | Line 673: | ||
|BGCOLOR="FFF8DC"|[[Survey: Foret de Hennetiel]] |
|BGCOLOR="FFF8DC"|[[Survey: Foret de Hennetiel]] |
||
|BGCOLOR="FFF8DC"|Survey an [[Ergon Locus]] in [[Foret de Hennetiel]] |
|BGCOLOR="FFF8DC"|Survey an [[Ergon Locus]] in [[Foret de Hennetiel]] |
||
| − | |align="Center" BGCOLOR="FFF8DC"|1: 1,500 ~ |
+ | |align="Center" BGCOLOR="FFF8DC"|1: 1,500 ~ 4,500<br /> |
| − | 2: 2,700 ~ |
+ | 2: 2,700 ~ 8,100 <br /> |
| − | 3: 3,600 ~ |
+ | 3: 3,600 ~ 10,800 |
|- |
|- |
||
|BGCOLOR="FFF8DC"|[[Survey: Morimar Basalt Fields]] |
|BGCOLOR="FFF8DC"|[[Survey: Morimar Basalt Fields]] |
||
|BGCOLOR="FFF8DC"|Survey an [[Ergon Locus]] in [[Morimar Basalt Fields]] |
|BGCOLOR="FFF8DC"|Survey an [[Ergon Locus]] in [[Morimar Basalt Fields]] |
||
| − | |align="Center" BGCOLOR="FFF8DC"|1: 1,500 ~ 2,100<br> |
+ | |align="Center" BGCOLOR="FFF8DC"|1: 1,500 ~ 2,100<br /> |
| − | 2: 2,700 ~ 3,780<br> |
+ | 2: 2,700 ~ 3,780<br /> |
3: 3,600 ~ 5040 |
3: 3,600 ~ 5040 |
||
|- |
|- |
||
| Line 678: | Line 687: | ||
|BGCOLOR="FFF8DC"|[[Survey: Cirdas Caverns]] |
|BGCOLOR="FFF8DC"|[[Survey: Cirdas Caverns]] |
||
|BGCOLOR="FFF8DC"|Survey an [[Ergon Locus]] in [[Cirdas Caverns]] |
|BGCOLOR="FFF8DC"|Survey an [[Ergon Locus]] in [[Cirdas Caverns]] |
||
| − | |align="Center" BGCOLOR="FFF8DC"|1: 2,000 ~ 2,600 <br> |
+ | |align="Center" BGCOLOR="FFF8DC"|1: 2,000 ~ 2,600 <br /> |
| − | 2: 3,600 ~ 4,680 <br> |
+ | 2: 3,600 ~ 4,680 <br /> |
3: 4,800 ~ 6,240 |
3: 4,800 ~ 6,240 |
||
|- |
|- |
||
|BGCOLOR="FFF8DC"|[[Analyze: Foret de Hennetiel]] |
|BGCOLOR="FFF8DC"|[[Analyze: Foret de Hennetiel]] |
||
|BGCOLOR="FFF8DC"|Obtain 1 [[Gnatbane]] |
|BGCOLOR="FFF8DC"|Obtain 1 [[Gnatbane]] |
||
| − | |align="Center" BGCOLOR="FFF8DC"|1: 1,250<br> |
+ | |align="Center" BGCOLOR="FFF8DC"|1: 1,250<br /> |
| − | 2: 2,250<br> |
+ | 2: 2,250<br /> |
3: 3,000 |
3: 3,000 |
||
|- |
|- |
||
|BGCOLOR="FFF8DC"|[[Analyze: Morimar Basalt Fields]] |
|BGCOLOR="FFF8DC"|[[Analyze: Morimar Basalt Fields]] |
||
|BGCOLOR="FFF8DC"|Obtain 1 [[Marble Nugget]] |
|BGCOLOR="FFF8DC"|Obtain 1 [[Marble Nugget]] |
||
| − | |align="Center" BGCOLOR="FFF8DC"|1: 1,250<br> |
+ | |align="Center" BGCOLOR="FFF8DC"|1: 1,250<br /> |
| − | 2: 2,250<br> |
+ | 2: 2,250<br /> |
3: 3,000 |
3: 3,000 |
||
|- |
|- |
||
| Line 698: | Line 707: | ||
|BGCOLOR="FFF8DC"|[[Survey: Dho Gates]] |
|BGCOLOR="FFF8DC"|[[Survey: Dho Gates]] |
||
|BGCOLOR="FFF8DC"|Survey an [[Ergon Locus]] in [[Dho Gates]] |
|BGCOLOR="FFF8DC"|Survey an [[Ergon Locus]] in [[Dho Gates]] |
||
| − | |align="Center" BGCOLOR="FFF8DC"|1: 2,000 ~ 2,900<br> |
+ | |align="Center" BGCOLOR="FFF8DC"|1: 2,000 ~ 2,900<br /> |
| − | 2: 3,600 ~ 5,220 <br> |
+ | 2: 3,600 ~ 5,220 <br /> |
3: 4,800 ~ 6,240 |
3: 4,800 ~ 6,240 |
||
|- |
|- |
||
|BGCOLOR="FFF8DC"|[[Analyze: Cirdas Caverns]] |
|BGCOLOR="FFF8DC"|[[Analyze: Cirdas Caverns]] |
||
|BGCOLOR="FFF8DC"|Obtain 1 [[Scholar Stone]] |
|BGCOLOR="FFF8DC"|Obtain 1 [[Scholar Stone]] |
||
| − | |align="Center" BGCOLOR="FFF8DC"|1: 1,750<br> |
+ | |align="Center" BGCOLOR="FFF8DC"|1: 1,750<br /> |
| − | 2: 3,150<br> |
+ | 2: 3,150<br /> |
3: 4,200 |
3: 4,200 |
||
|- |
|- |
||
| Line 712: | Line 721: | ||
|BGCOLOR="FFF8DC"|[[Survey: Marjami Ravine]] |
|BGCOLOR="FFF8DC"|[[Survey: Marjami Ravine]] |
||
|BGCOLOR="FFF8DC"|Survey an [[Ergon Locus]] in [[Marjami Ravine]] |
|BGCOLOR="FFF8DC"|Survey an [[Ergon Locus]] in [[Marjami Ravine]] |
||
| − | |align="Center" BGCOLOR="FFF8DC"|1: 3,000 ~ 3,800 <br> |
+ | |align="Center" BGCOLOR="FFF8DC"|1: 3,000 ~ 3,800 <br /> |
| − | 2: 5,400 ~ 6,840 <br> |
+ | 2: 5,400 ~ 6,840 <br /> |
3: 7,200 ~ 9,120 |
3: 7,200 ~ 9,120 |
||
|- |
|- |
||
|BGCOLOR="FFF8DC"|[[Survey: Yorcia Weald]] |
|BGCOLOR="FFF8DC"|[[Survey: Yorcia Weald]] |
||
|BGCOLOR="FFF8DC"|Survey an [[Ergon Locus]] in [[Yorcia Weald]] |
|BGCOLOR="FFF8DC"|Survey an [[Ergon Locus]] in [[Yorcia Weald]] |
||
| − | |align="Center" BGCOLOR="FFF8DC"|1: 3,000 ~ 3,400 <br> |
+ | |align="Center" BGCOLOR="FFF8DC"|1: 3,000 ~ 3,400 <br /> |
| − | 2: 5,400 ~ 6,120 <br> |
+ | 2: 5,400 ~ 6,120 <br /> |
3: 7,200 ~ 8,160 |
3: 7,200 ~ 8,160 |
||
|- |
|- |
||
| Line 726: | Line 735: | ||
|BGCOLOR="FFF8DC"|[[Survey: Kamihr Drifts]] |
|BGCOLOR="FFF8DC"|[[Survey: Kamihr Drifts]] |
||
|BGCOLOR="FFF8DC"|Survey an [[Ergon Locus]] in [[Kamihr Drifts]] |
|BGCOLOR="FFF8DC"|Survey an [[Ergon Locus]] in [[Kamihr Drifts]] |
||
| − | |align="Center" BGCOLOR="FFF8DC"|1: 3,250 ~ 3,750 <br> |
+ | |align="Center" BGCOLOR="FFF8DC"|1: 3,250 ~ 3,750 <br /> |
| − | 2: 5,850 ~ 6,750 <br> |
+ | 2: 5,850 ~ 6,750 <br /> |
3: 7,800 ~ 9,000 |
3: 7,800 ~ 9,000 |
||
|- |
|- |
||
|BGCOLOR="FFF8DC"|[[Analyze: Marjami Ravine]] |
|BGCOLOR="FFF8DC"|[[Analyze: Marjami Ravine]] |
||
|BGCOLOR="FFF8DC"|Obtain 1 [[Wootz Ore]] |
|BGCOLOR="FFF8DC"|Obtain 1 [[Wootz Ore]] |
||
| − | |align="Center" BGCOLOR="FFF8DC"|1: 2,000<br> |
+ | |align="Center" BGCOLOR="FFF8DC"|1: 2,000<br /> |
| − | 2: 3,600<br> |
+ | 2: 3,600<br /> |
3: 4,800 |
3: 4,800 |
||
|- |
|- |
||
|BGCOLOR="FFF8DC"|[[Analyze: Yorcia Weald]] |
|BGCOLOR="FFF8DC"|[[Analyze: Yorcia Weald]] |
||
|BGCOLOR="FFF8DC"|Obtain 1 [[Guatambu Log]] |
|BGCOLOR="FFF8DC"|Obtain 1 [[Guatambu Log]] |
||
| − | |align="Center" BGCOLOR="FFF8DC"|1: 2,000<br> |
+ | |align="Center" BGCOLOR="FFF8DC"|1: 2,000<br /> |
| − | 2: 3,600<br> |
+ | 2: 3,600<br /> |
3: 4,800 |
3: 4,800 |
||
|- |
|- |
||
| Line 746: | Line 755: | ||
|BGCOLOR="FFF8DC"|[[Analyze: Outer Ra'Kaznar]] |
|BGCOLOR="FFF8DC"|[[Analyze: Outer Ra'Kaznar]] |
||
|BGCOLOR="FFF8DC"|Obtain 1 [[Vanadium Ore]] |
|BGCOLOR="FFF8DC"|Obtain 1 [[Vanadium Ore]] |
||
| − | |align="Center" BGCOLOR="FFF8DC"|1: 2,500<br> |
+ | |align="Center" BGCOLOR="FFF8DC"|1: 2,500<br /> |
| − | 2: 4,500<br> |
+ | 2: 4,500<br /> |
3: 6,000 |
3: 6,000 |
||
|- |
|- |
||
|BGCOLOR="FFF8DC"|[[Analyze: Kamihr Drifts]] |
|BGCOLOR="FFF8DC"|[[Analyze: Kamihr Drifts]] |
||
|BGCOLOR="FFF8DC"|Obtain [[Gelid aggregate]] |
|BGCOLOR="FFF8DC"|Obtain [[Gelid aggregate]] |
||
| − | |align="Center" BGCOLOR="FFF8DC"|1: 2,500<br> |
+ | |align="Center" BGCOLOR="FFF8DC"|1: 2,500<br /> |
| − | 2: 4,500<br> |
+ | 2: 4,500<br /> |
3: 6,000 |
3: 6,000 |
||
|- |
|- |
||
|} |
|} |
||
| + | |||
| + | == Completed Quests List == |
||
| + | |||
| + | Below is the order the quests show up in the Completed Quests tab. |
||
| + | |||
| + | |||
| + | {|class=sortable border="0" width="50%" cellpadding="3" cellspacing="2" |
||
| + | |BGCOLOR="#ffdead" colspan="2"| '''Coalition Assignments: Completed Quests''' |
||
| + | |- BGCOLOR="#ffdead" |
||
| + | !width="45%"| Quest |
||
| + | !width="5%"| Complete |
||
| + | |- BGCOLOR="#e3e6ff" |
||
| + | | [[Procure: Ceizak Battlegrounds]] |
||
| + | | |
||
| + | |- BGCOLOR="#e3e6ff" |
||
| + | | [[Procure: Foret de Hennetiel]] |
||
| + | | |
||
| + | |- BGCOLOR="#e3e6ff" |
||
| + | | [[Procure: Morimar Basalt Fields]] |
||
| + | | |
||
| + | |- BGCOLOR="#e3e6ff" |
||
| + | | [[Procure: Yorcia Weald]] |
||
| + | | |
||
| + | |- BGCOLOR="#e3e6ff" |
||
| + | | [[Procure: Marjami Ravine]] |
||
| + | | |
||
| + | |- BGCOLOR="#e3e6ff" |
||
| + | | [[Procure: Kamihr Drifts]] |
||
| + | | |
||
| + | |- BGCOLOR="#e3e6ff" |
||
| + | | [[Procure: Cirdas Caverns]] |
||
| + | | |
||
| + | |- BGCOLOR="#e3e6ff" |
||
| + | | [[Procure: Outer Ra'Kaznar]] |
||
| + | | |
||
| + | |- BGCOLOR="#e3e6ff" |
||
| + | | [[Clear: Ceizak Battlegrounds]] |
||
| + | | |
||
| + | |- BGCOLOR="#e3e6ff" |
||
| + | | [[Clear: Foret de Hennetiel]] |
||
| + | | |
||
| + | |- BGCOLOR="#e3e6ff" |
||
| + | | [[Clear: Morimar Basalt Fields]] |
||
| + | | |
||
| + | |- BGCOLOR="#e3e6ff" |
||
| + | | [[Clear: Yorcia Weald]] |
||
| + | | |
||
| + | |- BGCOLOR="#e3e6ff" |
||
| + | | [[Clear: Marjami Ravine]] |
||
| + | | |
||
| + | |- BGCOLOR="#e3e6ff" |
||
| + | | [[Clear: Kamihr Drifts]] |
||
| + | | |
||
| + | |- BGCOLOR="#e3e6ff" |
||
| + | | [[Clear: Cirdas Caverns]] |
||
| + | | |
||
| + | |- BGCOLOR="#e3e6ff" |
||
| + | | [[Clear: Outer Ra'Kaznar]] |
||
| + | | |
||
| + | |- BGCOLOR="#e3e6ff" |
||
| + | | [[Preserve: Ceizak Battlegrounds]] |
||
| + | | |
||
| + | |- BGCOLOR="#e3e6ff" |
||
| + | | [[Preserve: Yahse Hunting Grounds]] |
||
| + | | |
||
| + | |- BGCOLOR="#e3e6ff" |
||
| + | | [[Preserve: Foret de Hennetiel]] |
||
| + | | |
||
| + | |- BGCOLOR="#e3e6ff" |
||
| + | | [[Preserve: Morimar Basalt Fields]] |
||
| + | | |
||
| + | |- BGCOLOR="#e3e6ff" |
||
| + | | [[Preserve: Yorcia Weald]] |
||
| + | | |
||
| + | |- BGCOLOR="#e3e6ff" |
||
| + | | [[Preserve: Marjami Ravine]] |
||
| + | | |
||
| + | |- BGCOLOR="#e3e6ff" |
||
| + | | [[Preserve: Kamihr Drifts]] |
||
| + | | |
||
| + | |- BGCOLOR="#e3e6ff" |
||
| + | | [[Preserve: Cirdas Caverns]] |
||
| + | | |
||
| + | |- BGCOLOR="#e3e6ff" |
||
| + | | [[Preserve: Outer Ra'Kaznar]] |
||
| + | | |
||
| + | |- BGCOLOR="#e3e6ff" |
||
| + | | [[Patrol: Rala Waterways]] |
||
| + | | |
||
| + | |- BGCOLOR="#e3e6ff" |
||
| + | | [[Patrol: Sih Gates]] |
||
| + | | |
||
| + | |- BGCOLOR="#e3e6ff" |
||
| + | | [[Patrol: Moh Gates]] |
||
| + | | |
||
| + | |- BGCOLOR="#e3e6ff" |
||
| + | | [[Patrol: Cirdas Caverns]] |
||
| + | | |
||
| + | |- BGCOLOR="#e3e6ff" |
||
| + | | [[Patrol: Dho Gates]] |
||
| + | | |
||
| + | |- BGCOLOR="#e3e6ff" |
||
| + | | [[Patrol: Woh Gates]] |
||
| + | | |
||
| + | |- BGCOLOR="#e3e6ff" |
||
| + | | [[Patrol: Outer Ra'Kaznar]] |
||
| + | | |
||
| + | |- BGCOLOR="#e3e6ff" |
||
| + | | [[Provide: Foret de Hennetiel]] |
||
| + | | |
||
| + | |- BGCOLOR="#e3e6ff" |
||
| + | | [[Provide: Morimar Basalt Fields]] |
||
| + | | |
||
| + | |- BGCOLOR="#e3e6ff" |
||
| + | | [[Provide: Yorcia Weald]] |
||
| + | | |
||
| + | |- BGCOLOR="#e3e6ff" |
||
| + | | [[Provide: Marjami Ravine]] |
||
| + | | |
||
| + | |- BGCOLOR="#e3e6ff" |
||
| + | | [[Provide: Kamihr Drifts]] |
||
| + | | |
||
| + | |- BGCOLOR="#e3e6ff" |
||
| + | | [[Deliver: Foret de Hennetiel]] |
||
| + | | |
||
| + | |- BGCOLOR="#e3e6ff" |
||
| + | | [[Deliver: Morimar Basalt Fields]] |
||
| + | | |
||
| + | |- BGCOLOR="#e3e6ff" |
||
| + | | [[Deliver: Yorcia Weald]] |
||
| + | | |
||
| + | |- BGCOLOR="#e3e6ff" |
||
| + | | [[Deliver: Marjami Ravine]] |
||
| + | | |
||
| + | |- BGCOLOR="#e3e6ff" |
||
| + | | [[Deliver: Kamihr Drifts]] |
||
| + | | |
||
| + | |- BGCOLOR="#e3e6ff" |
||
| + | | [[Support: Ceizak Battlegrounds]] |
||
| + | | |
||
| + | |- BGCOLOR="#e3e6ff" |
||
| + | | [[Support: Foret de Hennetiel]] |
||
| + | | |
||
| + | |- BGCOLOR="#e3e6ff" |
||
| + | | [[Support: Morimar Basalt Fields]] |
||
| + | | |
||
| + | |- BGCOLOR="#e3e6ff" |
||
| + | | [[Support: Yorcia Weald]] |
||
| + | | |
||
| + | |- BGCOLOR="#e3e6ff" |
||
| + | | [[Support: Marjami Ravine]] |
||
| + | | |
||
| + | |- BGCOLOR="#e3e6ff" |
||
| + | | [[Support: Kamihr Drifts]] |
||
| + | | |
||
| + | |- BGCOLOR="#e3e6ff" |
||
| + | | [[Survey: Ceizak Battlegrounds]] |
||
| + | | |
||
| + | |- BGCOLOR="#e3e6ff" |
||
| + | | [[Survey: Foret de Hennetiel]] |
||
| + | | |
||
| + | |- BGCOLOR="#e3e6ff" |
||
| + | | [[Survey: Morimar Basalt Fields]] |
||
| + | | |
||
| + | |- BGCOLOR="#e3e6ff" |
||
| + | | [[Survey: Yorcia Weald]] |
||
| + | | |
||
| + | |- BGCOLOR="#e3e6ff" |
||
| + | | [[Survey: Marjami Ravine]] |
||
| + | | |
||
| + | |- BGCOLOR="#e3e6ff" |
||
| + | | [[Survey: Kamihr Drifts]] |
||
| + | | |
||
| + | |- BGCOLOR="#e3e6ff" |
||
| + | | [[Survey: Sih Gates]] |
||
| + | | |
||
| + | |- BGCOLOR="#e3e6ff" |
||
| + | | [[Survey: Cirdas Caverns]] |
||
| + | | |
||
| + | |- BGCOLOR="#e3e6ff" |
||
| + | | [[Survey: Dho Gates]] |
||
| + | | |
||
| + | |- BGCOLOR="#e3e6ff" |
||
| + | | [[Analyze: Foret de Hennetiel]] |
||
| + | | |
||
| + | |- BGCOLOR="#e3e6ff" |
||
| + | | [[Analyze: Morimar Basalt Fields]] |
||
| + | | |
||
| + | |- BGCOLOR="#e3e6ff" |
||
| + | | [[Analyze: Yorcia Weald]] |
||
| + | | |
||
| + | |- BGCOLOR="#e3e6ff" |
||
| + | | [[Analyze: Marjami Ravine]] |
||
| + | | |
||
| + | |- BGCOLOR="#e3e6ff" |
||
| + | | [[Analyze: Kamihr Drifts]] |
||
| + | | |
||
| + | |- BGCOLOR="#e3e6ff" |
||
| + | | [[Analyze: Cirdas Caverns]] |
||
| + | | |
||
| + | |- BGCOLOR="#e3e6ff" |
||
| + | | [[Analyze: Outer Ra'Kaznar]] |
||
| + | | |
||
| + | |- BGCOLOR="#e3e6ff" |
||
| + | | [[Gather: Rala Waterways]] |
||
| + | | |
||
| + | |- BGCOLOR="#e3e6ff" |
||
| + | | [[Gather: Ceizak Battlegrounds]] |
||
| + | | |
||
| + | |- BGCOLOR="#e3e6ff" |
||
| + | | [[Gather: Yahse Hunting Grounds]] |
||
| + | | |
||
| + | |- BGCOLOR="#e3e6ff" |
||
| + | | [[Gather: Foret de Hennetiel]] |
||
| + | | |
||
| + | |- BGCOLOR="#e3e6ff" |
||
| + | | [[Gather: Morimar Basalt Fields]] |
||
| + | | |
||
| + | |- BGCOLOR="#e3e6ff" |
||
| + | | [[Gather: Yorcia Weald]] |
||
| + | | |
||
| + | |- BGCOLOR="#e3e6ff" |
||
| + | | [[Gather: Marjami Ravine]] |
||
| + | | |
||
| + | |- BGCOLOR="#e3e6ff" |
||
| + | | [[Gather: Kamihr Drifts]] |
||
| + | | |
||
| + | |- BGCOLOR="#e3e6ff" |
||
| + | | [[Gather: Sih Gates]] |
||
| + | | |
||
| + | |- BGCOLOR="#e3e6ff" |
||
| + | | [[Gather: Moh Gates]] |
||
| + | | |
||
| + | |- BGCOLOR="#e3e6ff" |
||
| + | | [[Gather: Cirdas Caverns]] |
||
| + | | |
||
| + | |- BGCOLOR="#e3e6ff" |
||
| + | | [[Gather: Dho Gates]] |
||
| + | | |
||
| + | |- BGCOLOR="#e3e6ff" |
||
| + | | [[Gather: Woh Gates]] |
||
| + | | |
||
| + | |- BGCOLOR="#e3e6ff" |
||
| + | | [[Gather: Outer Ra'Kaznar]] |
||
| + | | |
||
| + | |- BGCOLOR="#e3e6ff" |
||
| + | | [[Gather: Ra'Kaznar Inner Court]] |
||
| + | | |
||
| + | |- BGCOLOR="#e3e6ff" |
||
| + | | [[Recover: Ceizak Battlegrounds]] |
||
| + | | |
||
| + | |- BGCOLOR="#e3e6ff" |
||
| + | | [[Recover: Foret de Hennetiel]] |
||
| + | | |
||
| + | |- BGCOLOR="#e3e6ff" |
||
| + | | [[Recover: Morimar Basalt Fields]] |
||
| + | | |
||
| + | |- BGCOLOR="#e3e6ff" |
||
| + | | [[Recover: Yorcia Weald]] |
||
| + | | |
||
| + | |- BGCOLOR="#e3e6ff" |
||
| + | | [[Recover: Marjami Ravine]] |
||
| + | | |
||
| + | |- BGCOLOR="#e3e6ff" |
||
| + | | [[Recover: Kamihr Drifts]] |
||
| + | | |
||
| + | |- BGCOLOR="#e3e6ff" |
||
| + | | [[Research: Rala Waterways]] |
||
| + | | |
||
| + | |- BGCOLOR="#e3e6ff" |
||
| + | | [[Research: Ceizak Battlegrounds]] |
||
| + | | |
||
| + | |- BGCOLOR="#e3e6ff" |
||
| + | | [[Research: Foret de Hennetiel]] |
||
| + | | |
||
| + | |- BGCOLOR="#e3e6ff" |
||
| + | | [[Research: Morimar Basalt Fields]] |
||
| + | | |
||
| + | |- BGCOLOR="#e3e6ff" |
||
| + | | [[Research: Yorcia Weald]] |
||
| + | | |
||
| + | |- BGCOLOR="#e3e6ff" |
||
| + | | [[Research: Marjami Ravine]] |
||
| + | | |
||
| + | |- BGCOLOR="#e3e6ff" |
||
| + | | [[Research: Kamihr Drifts]] |
||
| + | | |
||
| + | |- BGCOLOR="#e3e6ff" |
||
| + | | [[Boost: Foret de Hennetiel]] |
||
| + | | |
||
| + | |- BGCOLOR="#e3e6ff" |
||
| + | | [[Boost: Marjami Ravine]] |
||
| + | | |
||
| + | |- BGCOLOR="#e3e6ff" |
||
| + | | [[Boost: Kamihr Drifts]] |
||
| + | | |
||
| + | |} |
||
| + | |||
[[Category:Quests]][[de:Category:Zunftdienste]] |
[[Category:Quests]][[de:Category:Zunftdienste]] |
||
| Line 762: | Line 1,069: | ||
---- |
---- |
||
| − | '''QUESTS: |
+ | '''QUESTS: 95 (90/5)''' |
Revision as of 16:50, 18 July 2020
Coalition Assignments are a separate category from Adoulin Quests in the in-game Quest menu.
To participate, you must first obtain a ![]() Pioneer's Badge, which grants the first coalition rank, Petitioner, in all coalitions. From that point on, to rank up in an individual coalition, continue to complete assignments at that coalition.
Pioneer's Badge, which grants the first coalition rank, Petitioner, in all coalitions. From that point on, to rank up in an individual coalition, continue to complete assignments at that coalition.
Speak to the Task Delegator at the corresponding coalition to accept an assignment for which you are eligible. For every 20 assignments you do for a coalition your personal rank in that coalition increases by 1. Each rank opens up new assignments for you in that coalition. There are currently 8 ranks:
1. Petitioner
2. Probationer
3. Disciple
4. Contributor
5. Partner
6. Advisor
7. Magnate
8. Legend
The Civil Registrar in each coalition can tell you your current rank.
Also Iyvah Halohm at G-8 Eastern Adoulin will list your current ranks in all six Coalitions.
Note: Each Imprimatur used counts as 1 one assignment. Therefore, using 2 or 3 Imprimaturs for one assignment counts as undertaking the respective number of assignments for a coalition. Using 2 Imprimaturs gives 180% of the rewards while using 3 gives 240%.
In addition to personal rank each coalition is assessed weekly to see if they gain, maintain, or lose standing in the city. How many NPCs are available in that coalition is based upon this assessment for that week. When ever you complete an assignment you are asked to vote on how to upgrade the coalition. This vote determines which NPC is gain if the coalition increases in influence. Currently there are 3 upgrades available for each coalition. They are a Flag, a Signboard, and an Emblem. If a coalition loses influence they will lose the upgrades in the opposite order.
From zero Adoulin fame 80 Imprimaturs must be spent to advance past the main Adoulin storyline Mission Life on the Frontier, which in turn allows participation in Wildskeeper Reives.
It takes 840 imprimaturs (140*6) to get all six to Legend rank and an additional 11 to finish the assignments within Legend rank for a total of 851 before you can get Idris, Epeolatry, or ![]() Golden shovel cordon. Imprimaturs by default take 360 minutes to replenish, which can be reduced to 330 with
Golden shovel cordon. Imprimaturs by default take 360 minutes to replenish, which can be reduced to 330 with ![]() Bronze shovel cordon (and 300 with
Bronze shovel cordon (and 300 with ![]() Silver shovel cordon, but you'll be fully finished by then).
Silver shovel cordon, but you'll be fully finished by then).
Depending on how many imprimaturs you start with upon unlocking this system![]() , that translates into somewhere between 5106 hours (212.75 days) and 5016 hours (209 days) if you don't get the key item at all. It takes 613 imprimaturs to get
, that translates into somewhere between 5106 hours (212.75 days) and 5016 hours (209 days) if you don't get the key item at all. It takes 613 imprimaturs to get ![]() Bronze shovel cordon, which will take between 3678 hours (153.25 days) and 3588 hours (149.5 days). This shortens the remainder to 1309 hours (54.5416 days) for a grand total between 4987.5 hours (207.8125 days) and 4897.5 hours (204.0625 days).
Bronze shovel cordon, which will take between 3678 hours (153.25 days) and 3588 hours (149.5 days). This shortens the remainder to 1309 hours (54.5416 days) for a grand total between 4987.5 hours (207.8125 days) and 4897.5 hours (204.0625 days).
Couriers' Coalition
Location: Western Adoulin (G-7)
| Rank | Assignment | Objective | Reward:
Imprimaturs: Bayld/Exp |
|---|---|---|---|
| Petitioner | Support: Ceizak Battlegrounds | Deliver |
1: 500 ~ 750 2: 900 ~ 1,350 |
|
Probationer |
Provide: Foret de Hennetiel #1 | Deliver |
1: 750 2: 1,350 |
| Provide: Morimar Basalt Fields #1 | Deliver |
1: 750 2: 1,350 | |
|
Disciple |
Support: Foret de Hennetiel | Deliver |
1: 2,500 ~ 3,000 2: 4,500 ~ 5,400 |
| Support: Morimar Basalt Fields | Deliver |
1: 2,500 ~ 3,500 2: 4,500 ~ 6,300 | |
|
Contributor |
Deliver: Foret de Hennetiel | Deliver supplies from the Station Administrator in Foret de Hennetiel to the Task Delegator. | 1: 2,000 2: 3,600 |
| Deliver: Morimar Basalt Fields | Deliver supplies from the Station Administrator in Morimar Basalt Fields to the Task Delegator. | 1: 2,000 2: 3,600 | |
|
Partner |
Provide: Marjami Ravine #1 | Deliver |
1: 1,500 2: 2,700 |
| Provide: Yorcia Weald #1 | Deliver |
1: 1,750 2: 3,150 | |
|
Advisor |
Deliver: Marjami Ravine | Deliver supplies from the Station Administrator in Marjami Ravine to the Task Delegator. | 1: 2,500 2: 4,500 |
| Deliver: Yorcia Weald | Deliver supplies from the Station Administrator in Yorcia Weald to the Task Delegator. | 1: 2,500 2: 4,500 | |
| Support: Marjami Ravine | Deliver |
1: 3,500 ~ 4,500 2: 6,300 ~ 8,100 | |
| Support: Yorcia Weald | Deliver |
1: 3,500 ~ 4,000 2: 6,300 ~ 7,200 | |
|
Magnate |
Provide: Kamihr Drifts #1 | Deliver |
1: 1,750 2: 3,150 |
| Support: Kamihr Drifts | Deliver |
1: 4,000~4,750 2: 7,200~8,550 | |
|
Legend |
Deliver: Kamihr Drifts | Deliver supplies from the Station Administrator in Kamihr Drifts to the Task Delegator. | 1: ~4750 2: ~8550 |
#1 Provide assignments are only available in zones where the frontier station IS NOT in existence. They become permanently unavailable once the station has been constructed on a server.
#2 Support and Deliver assignments are only available in zones where the frontier station IS in existence.
Inventors' Coalition
Location: Western Adoulin (J-10)
| Rank | Assignment | Objective | Reward:
Imprimaturs: Bayld/Exp |
|---|---|---|---|
|
Petitioner |
Gather: Rala Waterways | Obtain 3 Bloodthread for the Task Delegator. | 1: 1000 2: 1,800 |
| Gather: Ceizak Battlegrounds | Obtain 5 Chapuli Wings for the Task Delegator. | 1: 750 2: 1,350 | |
| Gather: Yahse Hunting Grounds | Obtain 5 Twitherym Wings for the Task Delegator. | 1: 1000 2: 1,800 | |
|
Probationer |
Gather: Sih Gates | Obtain 3 jars of Acuex Poison for the Task Delegator. | 1: 1,000 2: 1,800 |
| Gather: Moh Gates | Obtain 3 Matamata Shells for the Task Delegator. | 1: 1,000 2: 1,800 | |
|
Disciple |
Gather: Foret de Hennetiel | Obtain 3 Craklaw Pincers for the Task Delegator. | 1: 1,750 2: 3,150 |
| Gather: Morimar Basalt Fields | Obtain 3 Peiste Stingers for the Task Delegator. | 1: 1,250 2: 2,250 | |
|
Contributor |
Gather: Cirdas Caverns | Obtain 3 jars of Umbril Ooze for the Task Delegator. | 1: 1,500 2: 2,700 |
|
Partner |
Gather: Dho Gates | Obtain 3 Slug Eyes for the Task Delegator. | 1: 2,750 2: 4,950 |
| Gather: Marjami Ravine | Obtain 3 Tulfaire Feathers for the Task Delegator. | 1: 2,750 2: 4,950 | |
|
Advisor |
Gather: Yorcia Weald | Obtain 3 Snapweed Tendrils for the Task Delegator. | 1: 2,250 2: 4,050 |
|
Magnate |
Gather: Kamihr Drifts | Obtain 3 Raaz Tusks for the Task Delegator. | 1: 2,750 2: 4,950 |
| Gather: Woh Gates | Obtain 3 Snoll Arms for the Task Delegator. | 1: 1,750 2: 3,150 | |
|
Legend |
Gather: Outer Ra'Kaznar | Obtain 1 Dullahan Armor for the Task Delegator. | 1: 4750 2: 8550 |
| Gather: Ra'Kaznar Inner Court | Obtain 3 Luminicloth for the Task Delegator. | 1: 4750 2: 8550 |
Mummers' Coalition
Location: Western Adoulin (G-11)
| Rank | Assignment | Objective | Reward:
Imprimaturs: Bayld/Exp |
|---|---|---|---|
|
Petitioner |
Recover: Ceizak Battlegrounds | Find a Lost Article in either Ceizak Battlegrounds or Yahse Hunting Grounds. | 1: 1,500 2: 2,700 |
| Research: Rala Waterways | Have a Plantpassage Slug use Fuscous Ooze on you. | 1: 750 2: 1,350 | |
|
Probationer |
Research: Ceizak Battlegrounds | Have a Chapuli use Sanguinary Slash on you. | 1: 1,000 2: 1,800 |
| Boost: Foret de Hennetiel * | Cheer up a Station Worker in either Foret de Hennetiel or Morimar Basalt Fields. | 1: 500 2: 900 | |
|
Disciple |
Recover: Foret de Hennetiel | Find a Lost Article in either Foret de Hennetiel or Sih Gates. | 1: 1,500 2: 2,700 |
| Recover: Morimar Basalt Fields | Find a Lost Article in either Morimar Basalt Fields or Moh Gates. | 1: 1,500 2: 2,700 | |
|
Contributor |
Research: Foret de Hennetiel | Have a Hoary Craklaw or Cunning Craklaw use Sundering Snip on you in Foret de Hennetiel. | 1: 1,750 2: 3,150 |
| Research: Morimar Basalt Fields | Have a Sinewy Matamata or Emberflash Matamata use Tail Thwack on you in Morimar Basalt Fields. | 1: 1,750 2: 3150 | |
|
Partner |
Recover: Marjami Ravine | Find a Lost Article in either Marjami Ravine or Dho Gates. | 1: 2,250 2: 4,050 |
| Boost: Marjami Ravine * | Cheer up a Station Worker in either Marjami Ravine or Yorcia Weald. | 1: 2,000 2: 3,600 | |
|
Advisor |
Recover: Yorcia Weald | Find a Lost Article in either Yorcia Weald or Cirdas Caverns. | 1: 2,500 2: 4,500 |
| Research: Marjami Ravine | Have a Tulfaire use Molting Plumage on you. | 1: 2,750 2: 4,950 | |
|
Magnate |
Boost: Kamihr Drifts * | Cheer up a Station Worker in Kamihr Drifts. | 1: 3,000 2: 5,400 |
| Research: Yorcia Weald | Have a Snapweed in Yorcia Weald use Tickling Tendrils on you. | 1: 3,250 2: 5,850 | |
|
Legend |
Recover: Kamihr Drifts | Find a Lost Article in either Kamihr Drifts or Woh Gates. | 1: 3,500 2: 6,300 |
| Research: Kamihr Drifts | Have a Cicatricose Raaz in Kamihr Drifts use Sweeping Gouge on you. | 1: 8,000 2: 14,400 |
* Note that Boost Assignments are only available in zones where the frontier station IS in existence.
Peacekeepers' Coalition
Location: Eastern Adoulin (F-7)
| Rank | Assignment | Objective | Reward:
Imprimaturs: Bayld/Exp |
|---|---|---|---|
|
Petitioner |
Preserve: Ceizak Battlegrounds | Complete a successful Lair Reive in Ceizak Battlegrounds |
1: 750 |
| Preserve: Yahse Hunting Grounds | Complete a successful Lair Reive in Yahse Hunting Grounds |
1: 1,000 | |
|
Probationer |
Patrol: Rala Waterways | Defeat 5 Toads in Rala Waterways |
1: 750 |
| Patrol: Sih Gates | Defeat 5 Malodorous Twitherym in Sih Gates |
1: 1,000 | |
| Patrol: Moh Gates | Defeat 5 Ruby Raptors in Moh Gates |
1: 1,000 | |
|
Disciple |
Preserve: Foret de Hennetiel | Complete a successful Lair Reive in Foret de Hennetiel | 1: 1,250 2: 2,250 |
| Preserve: Morimar Basalt Fields | Complete a successful Lair Reive in Morimar Basalt Fields | 1: 1,250 2: 2,250 | |
|
Contributor |
Preserve: Cirdas Caverns | Complete a successful Lair Reive in Cirdas Caverns | 1: 1,500 2: 2,700 |
|
Partner |
Patrol: Cirdas Caverns | Defeat 3 Asperous Maroliths in Cirdas Caverns | 1: 1,500 2: 2,700 |
| Patrol: Dho Gates | Defeat 3 Unyielding Tarichuks in Dho Gates | 1: 5,000 2: 9,000 | |
|
Advisor |
Preserve: Yorcia Weald | Complete a successful Lair Reive in Yorcia Weald | 1: 2,500 2: 4,500 |
| Preserve: Marjami Ravine | Complete a successful Lair Reive in Marjami Ravine | 1: 2,250 2: 4,050 | |
|
Magnate |
Preserve: Kamihr Drifts | Complete a successful Lair Reive in Kamihr Drifts | 1: 2,750 2: 4,950 |
| Patrol: Woh Gates | Defeat 3 Acuexs in Woh Gates | 1: 5,000 2: 9,000 | |
|
Legend |
Preserve: Outer Ra'Kaznar | Complete a successful Lair Reive in Outer Ra'Kaznar | 1: 3,000 2: 5,400 |
| Patrol: Outer Ra'Kaznar | Defeat 3 Ironclads in Outer Ra'Kaznar | 1: 3,250 2: 5,850 |
Pioneers' Coalition
Location: Western Adoulin (E-8)
| Rank | Assignment | Objective | Reward:
Imprimaturs: Bayld/Exp |
|---|---|---|---|
|
Petitioner |
Procure: Ceizak Battlegrounds | Procure 5 materials by logging in Ceizak Battlegrounds or Yahse Hunting Grounds | 1: 1,500 2: ? |
| Clear: Ceizak Battlegrounds | Complete a Colonization Reive in either Ceizak Battlegrounds or Yahse Hunting Grounds | 1: 1,750 2: 3,150 | |
|
Probationer |
Clear: Foret de Hennetiel | Complete a Colonization Reive in Foret de Hennetiel | 1: 1,000 2: 1,800 |
| Clear: Morimar Basalt Fields | Complete a Colonization Reive in Morimar Basalt Fields | 1: 1,000 2: 1,800 | |
|
Disciple |
Procure: Foret de Hennetiel | Procure 5 materials by harvesting in Foret de Hennetiel | 1: 1,250 2: 2,250 |
| Procure: Morimar Basalt Fields | Procure 5 materials by mining in Morimar Basalt Fields | 1: 1,250 2: 2,250 | |
|
Contributor |
Procure: Cirdas Caverns | Procure 5 materials by mining in Cirdas Caverns | 1: 1,500 2: 2,700 |
| Clear: Cirdas Caverns | Complete a Colonization Reive in Cirdas Caverns | 1: 1,500 2: 2,700 | |
|
Partner |
Procure: Marjami Ravine | Procure 5 materials by mining in Marjami Ravine | 1: 2,250 2: 4,050 |
| Clear: Marjami Ravine | Complete a Colonization Reive in Marjami Ravine | 1: 2,000 2: 3,600 | |
|
Advisor |
Procure: Yorcia Weald | Procure 5 materials by logging in Yorcia Weald | 1: 2,750 2: 4,950 |
| Clear: Yorcia Weald | Complete a Colonization Reive in Yorcia Weald | 1: 2,500 2: 4,500 | |
|
Magnate |
Procure: Kamihr Drifts | Procure 5 materials by mining in Kamihr Drifts | 1: 2,750 2: 4,950 |
| Clear: Kamihr Drifts | Complete a Colonization Reive in Kamihr Drifts | 1: 3,000 2: 5,400 | |
|
Legend |
Procure: Outer Ra'Kaznar | Procure 5 materials by mining in Outer Ra'Kaznar | 1: 3,750 2: 6,750 |
| Clear: Outer Ra'Kaznar | Complete a Colonization Reive in Outer Ra'Kaznar | 1: 3,500 2: 6,300 |
Scouts' Coalition
Location: Eastern Adoulin (F-9)
| Rank | Assignment | Objective | Reward:
Imprimaturs: Bayld/Exp |
|---|---|---|---|
|
Petitioner |
Survey: Ceizak Battlegrounds | Survey an Ergon Locus in Ceizak Battlegrounds or Yahse Hunting Grounds | 1: 500 ~ 750 2: 900 ~ 1,350 |
|
Probationer |
Survey: Sih Gates | Survey an Ergon Locus in Sih Gates or Moh Gates | 1: 1,000 ~ 1,500 2: 1,800 ~ 2,250 |
|
Disciple |
Survey: Foret de Hennetiel | Survey an Ergon Locus in Foret de Hennetiel | 1: 1,500 ~ 4,500 2: 2,700 ~ 8,100 |
| Survey: Morimar Basalt Fields | Survey an Ergon Locus in Morimar Basalt Fields | 1: 1,500 ~ 2,100 2: 2,700 ~ 3,780 | |
|
Contributor |
Survey: Cirdas Caverns | Survey an Ergon Locus in Cirdas Caverns | 1: 2,000 ~ 2,600 2: 3,600 ~ 4,680 |
| Analyze: Foret de Hennetiel | Obtain 1 Gnatbane | 1: 1,250 2: 2,250 | |
| Analyze: Morimar Basalt Fields | Obtain 1 Marble Nugget | 1: 1,250 2: 2,250 | |
|
Partner |
Survey: Dho Gates | Survey an Ergon Locus in Dho Gates | 1: 2,000 ~ 2,900 2: 3,600 ~ 5,220 |
| Analyze: Cirdas Caverns | Obtain 1 Scholar Stone | 1: 1,750 2: 3,150 | |
|
Advisor |
Survey: Marjami Ravine | Survey an Ergon Locus in Marjami Ravine | 1: 3,000 ~ 3,800 2: 5,400 ~ 6,840 |
| Survey: Yorcia Weald | Survey an Ergon Locus in Yorcia Weald | 1: 3,000 ~ 3,400 2: 5,400 ~ 6,120 | |
|
Magnate |
Survey: Kamihr Drifts | Survey an Ergon Locus in Kamihr Drifts | 1: 3,250 ~ 3,750 2: 5,850 ~ 6,750 |
| Analyze: Marjami Ravine | Obtain 1 Wootz Ore | 1: 2,000 2: 3,600 | |
| Analyze: Yorcia Weald | Obtain 1 Guatambu Log | 1: 2,000 2: 3,600 | |
|
Legend |
Analyze: Outer Ra'Kaznar | Obtain 1 Vanadium Ore | 1: 2,500 2: 4,500 |
| Analyze: Kamihr Drifts | Obtain Gelid aggregate | 1: 2,500 2: 4,500 |
Completed Quests List
Below is the order the quests show up in the Completed Quests tab.
QUESTS: 95 (90/5)
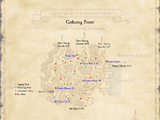
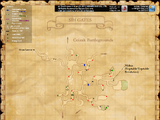
All items (95)
-
Gather: Ceizak Battlegrounds
-
Gather: Cirdas Caverns
-
Gather: Dho Gates
-
Gather: Foret de Hennetiel
-
Gather: Kamihr Drifts
-
Gather: Marjami Ravine
-
Gather: Moh Gates
-
Gather: Morimar Basalt Fields
-
Gather: Outer Ra'Kaznar
-
Gather: Ra'Kaznar Inner Court
-
Gather: Rala Waterways
-
Gather: Sih Gates
-
Gather: Woh Gates
-
Gather: Yahse Hunting Grounds
-
Gather: Yorcia Weald
-
Patrol: Cirdas Caverns
-
Patrol: Dho Gates
-
Patrol: Moh Gates
-
Patrol: Outer Ra'Kaznar
-
Patrol: Rala Waterways
-
Patrol: Sih Gates
-
Patrol: Woh Gates
-
Preserve: Ceizak Battlegrounds
-
Preserve: Cirdas Caverns
-
Preserve: Foret de Hennetiel
-
Preserve: Kamihr Drifts
-
Preserve: Marjami Ravine
-
Preserve: Morimar Basalt Fields
-
Preserve: Outer Ra'Kaznar
-
Preserve: Yahse Hunting Grounds
-
Preserve: Yorcia Weald
-
Procure: Ceizak Battlegrounds

-
Procure: Cirdas Caverns
-
Procure: Foret de Hennetiel

-
Procure: Kamihr Drifts
-
Procure: Marjami Ravine
-
Procure: Morimar Basalt Fields
-
Procure: Outer Ra'Kaznar
-
Procure: Yorcia Weald
-
Provide: Foret de Hennetiel
-
Provide: Kamihr Drifts
-
Provide: Marjami Ravine
-
Provide: Morimar Basalt Fields
-
Provide: Yorcia Weald
-
Recover: Ceizak Battlegrounds
-
Recover: Foret de Hennetiel
-
Recover: Kamihr Drifts
-
Recover: Marjami Ravine
-
Recover: Morimar Basalt Fields
-
Recover: Yorcia Weald
-
Research: Ceizak Battlegrounds
-
Research: Foret de Hennetiel
-
Research: Kamihr Drifts
-
Research: Marjami Ravine
-
Research: Morimar Basalt Fields
-
Research: Rala Waterways
-
Research: Yorcia Weald
-
Support: Ceizak Battlegrounds
-
Support: Foret de Hennetiel
-
Support: Kamihr Drifts
-
Support: Marjami Ravine
-
Support: Morimar Basalt Fields
-
Support: Yorcia Weald
-
Survey: Ceizak Battlegrounds
-
Survey: Cirdas Caverns
-
Survey: Dho Gates
-
Survey: Foret de Hennetiel
-
Survey: Kamihr Drifts
-
Survey: Marjami Ravine
-
Survey: Morimar Basalt Fields
-
Survey: Sih Gates

-
Survey: Yorcia Weald