No edit summary |
No edit summary |
||
| (35 intermediate revisions by 4 users not shown) | |||
| Line 2: | Line 2: | ||
{{tocright}} |
{{tocright}} |
||
=Getting Started= |
=Getting Started= |
||
| − | First, activate the |
+ | First, activate the Records of Eminence quest [[Tutorial#Basics|Stepping into an Ambuscade]], then talk to [[Gorpa-Masorpa]] at {{Location|Mhaura|G-9}}. To enter any Ambuscade battlefield all players in the party will need a Key Item. {{KeyItem}} [[Ambuscade Primer Volume One]] grants entry to Intense Ambuscade, a more challenging encounter. {{KeyItem}} [[Ambuscade Primer Volume Two]] grants entry to Normal Ambuscade, a step down in technical difficulty. "Intense" and "Normal" not only describe the relative challenge of the two battlefields, but alter the final rewards on completion. |
==Obtaining Key Items== |
==Obtaining Key Items== |
||
| − | You obtain the Key Items with [[:Category:Records of Eminence|Records of Eminence]] quests. There are two different quests per Key Item to activate: a non-repeatable daily quest, and a repeatable quest. The Daily objectives for both Volume 1 and Volume 2 require one experience-yielding monster be killed of the specified type. The repeatable objective for Volume 1 requires |
+ | You obtain the Key Items with [[:Category:Records of Eminence|Records of Eminence]] quests. There are two different quests per Key Item to activate: a non-repeatable daily quest, and a repeatable quest. The Daily objectives for both Volume 1 and Volume 2 require one experience-yielding monster be killed of the specified type. The repeatable objective for Volume 1 requires one kill, while Volume 2 requires ten. |
*Monsters in [[Dynamis]] and [[Abyssea]] zones are not counted for any Ambuscade objectives. |
*Monsters in [[Dynamis]] and [[Abyssea]] zones are not counted for any Ambuscade objectives. |
||
| Line 40: | Line 40: | ||
|- align = "center" |
|- align = "center" |
||
| Very<br>Easy |
| Very<br>Easy |
||
| − | | |
+ | | 200 |
| 20 ~ 100 |
| 20 ~ 100 |
||
|} |
|} |
||
| Line 57: | Line 57: | ||
|- align = "center" |
|- align = "center" |
||
| Difficult |
| Difficult |
||
| + | | 250 |
||
| ⚫ | |||
| ⚫ | |||
| ⚫ | |||
| 200 |
| 200 |
||
| 20 ~ 100 |
| 20 ~ 100 |
||
| ⚫ | |||
| ⚫ | |||
| − | | 100 |
||
| ⚫ | |||
|- align = "center" |
|- align = "center" |
||
| Easy |
| Easy |
||
| − | | |
+ | | 150 |
| − | | |
+ | | 15 ~ 75 |
|- align = "center" |
|- align = "center" |
||
| Very<br>Easy |
| Very<br>Easy |
||
| − | | |
+ | | 100 |
| − | | |
+ | | 10 ~ 50 |
|} |
|} |
||
=Redeeming Hallmarks and Gallantry= |
=Redeeming Hallmarks and Gallantry= |
||
| − | Spend your accumulated Hallmarks and Gallantry with [[Gorpa-Masorpa]], who offers a limited stock of rewards that is reset at every monthly content update, usually around the first or second Thursday of each month. |
+ | Spend your accumulated Hallmarks and Gallantry with [[Gorpa-Masorpa]], who offers a limited stock of rewards that is reset at every monthly content update, usually around the first or second Thursday of each month. Both Hallmarks and Gallantry are reset to 0 upon each monthly update. |
Ambuscade rewards are organized into materials used to reforge REMA weaponry, Skirmish Stones, JSE Capes and materials used to augment them, and Vouchers and Tokens redeemable for [[:Category:Ambuscade Armor|Ambuscade Armor]] and the materials required to upgrade it. |
Ambuscade rewards are organized into materials used to reforge REMA weaponry, Skirmish Stones, JSE Capes and materials used to augment them, and Vouchers and Tokens redeemable for [[:Category:Ambuscade Armor|Ambuscade Armor]] and the materials required to upgrade it. |
||
| Line 89: | Line 89: | ||
You can buy up to one cape per job for 500 Hallmarks each. |
You can buy up to one cape per job for 500 Hallmarks each. |
||
| − | The materials for augmenting these |
+ | The materials for augmenting these capes can be bought with either Hallmarks or Gallantry, with different prices and stock limits. |
==Ambuscade Armor== |
==Ambuscade Armor== |
||
Hallmarks can be used to purchase coupons good for 1 NQ piece of equipment, rotating between Tokens and Vouchers every month. |
Hallmarks can be used to purchase coupons good for 1 NQ piece of equipment, rotating between Tokens and Vouchers every month. |
||
| Line 124: | Line 124: | ||
*20,000: {{IIn|Abdhaljs Fiber}} |
*20,000: {{IIn|Abdhaljs Fiber}} |
||
*25,000: {{IIn|SP Gobbie Key}} |
*25,000: {{IIn|SP Gobbie Key}} |
||
| − | = |
+ | =October 2021= |
| − | ==Volume 1: |
+ | ==Volume 1: Undead== |
| − | {{:Ambuscade/Battlefield Archive/Bozzetto |
+ | {{:Ambuscade/Battlefield Archive/Bozzetto Deathsinger}} |
| − | ==Volume 2: |
+ | ==Volume 2: Undead== |
| − | {{:Ambuscade/Battlefield Archive/ |
+ | {{:Ambuscade/Battlefield Archive/Winnower Jack}} |
==References== |
==References== |
||
Revision as of 13:41, 11 October 2021
Ambuscade is a instanced dungeon battlefield in which players team up against the monster-of-the-month.
Getting Started
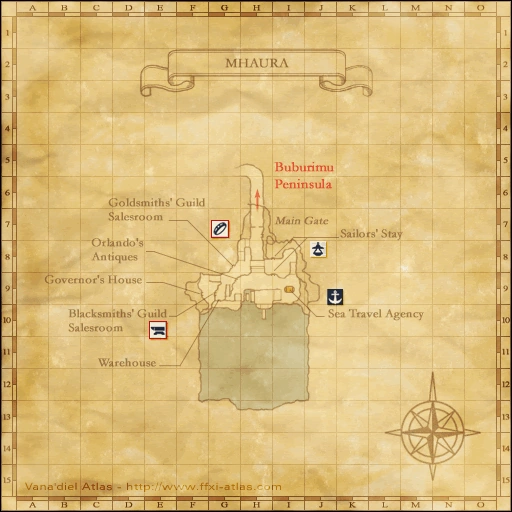
First, activate the Records of Eminence quest Stepping into an Ambuscade, then talk to Gorpa-Masorpa at Mhaura (G-9). To enter any Ambuscade battlefield all players in the party will need a Key Item. ![]() Ambuscade Primer Volume One grants entry to Intense Ambuscade, a more challenging encounter.
Ambuscade Primer Volume One grants entry to Intense Ambuscade, a more challenging encounter. ![]() Ambuscade Primer Volume Two grants entry to Normal Ambuscade, a step down in technical difficulty. "Intense" and "Normal" not only describe the relative challenge of the two battlefields, but alter the final rewards on completion.
Ambuscade Primer Volume Two grants entry to Normal Ambuscade, a step down in technical difficulty. "Intense" and "Normal" not only describe the relative challenge of the two battlefields, but alter the final rewards on completion.
Obtaining Key Items
You obtain the Key Items with Records of Eminence quests. There are two different quests per Key Item to activate: a non-repeatable daily quest, and a repeatable quest. The Daily objectives for both Volume 1 and Volume 2 require one experience-yielding monster be killed of the specified type. The repeatable objective for Volume 1 requires one kill, while Volume 2 requires ten.
The Ambuscade Tome
Once everyone in the party has the Primer key items, the party leader then registers the party at the Ambuscade Tome right next to Gorpa-Masorpa. At registration you choose the difficulty level of the selected Ambuscade type and inscribe your name into the tome, assigning you a number. Inscribing your name in the Ambuscade Tome gives you a page number. Page numbers are called in a zone-wide system message "Page ### of the tome flares up!" and the party leader can interact again with the Tome to enter the battlefield. The Tome also has an option to auto-transport your party to the battlefields as soon as your number is announced.
- Your Key Item is lost upon completion of a successful battle.
Rewards
Successful completion of an Ambuscade battlefield rewards two forms of currency: Hallmarks and Gallantry. Hallmarks earned vary with the Key Item used to enter the battlefield and the selected difficulty level. Gallantry earned is based on the Key Item, Difficulty and the total number of party members, excluding Trusts. Solo players do not earn Gallantry. Using an ![]() Abdhaljs Seal
Abdhaljs Seal ![]() will triple the currency rewards for a single win.
will triple the currency rewards for a single win.
- Hallmarks, Total Hallmarks, and Gallantry are reset to zero every monthly content update.
Ambuscade Primer Volume One
Intense Ambuscade
| Difficulty | Hallmarks Earned |
Gallantry Earned 2~6 members |
|---|---|---|
| Very Difficult | 3600 | 300 ~ 1500 |
| Difficult | 2400 | 240 ~ 1200 |
| Normal | 1200 | 180 ~ 900 |
| Easy | 600 | 80 ~ 400 |
| Very Easy |
200 | 20 ~ 100 |
Ambuscade Primer Volume Two
Regular Ambuscade
| Difficulty | Hallmarks Earned |
Gallantry Earned 2~6 members |
|---|---|---|
| Very Difficult | 300 | 30 ~ 150 |
| Difficult | 250 | 25 ~ 125 |
| Normal | 200 | 20 ~ 100 |
| Easy | 150 | 15 ~ 75 |
| Very Easy |
100 | 10 ~ 50 |
Redeeming Hallmarks and Gallantry
Spend your accumulated Hallmarks and Gallantry with Gorpa-Masorpa, who offers a limited stock of rewards that is reset at every monthly content update, usually around the first or second Thursday of each month. Both Hallmarks and Gallantry are reset to 0 upon each monthly update.
Ambuscade rewards are organized into materials used to reforge REMA weaponry, Skirmish Stones, JSE Capes and materials used to augment them, and Vouchers and Tokens redeemable for Ambuscade Armor and the materials required to upgrade it.
REMA Reforging Materials
The full list of REMA Materials purchasable with Hallmarks is always available.
REMA Materials purchased with Gallantry are available on a rotating schedule.
- Empyrean weapon materials are available January, April, July, and October.
- Relic weapon materials are available February, May, August, and November.
- Mythic/Ergon weapon materials are available March, June, September, and December.
Skirmish Stones
+2 Skirmish Stones are available every month, purchasable only with Hallmarks. Each stone costs 200 Hallmarks, up to a limit of 10 of each type.
JSE Capes
You can buy up to one cape per job for 500 Hallmarks each.
The materials for augmenting these capes can be bought with either Hallmarks or Gallantry, with different prices and stock limits.
Ambuscade Armor
Hallmarks can be used to purchase coupons good for 1 NQ piece of equipment, rotating between Tokens and Vouchers every month.
Gallantry can be used to purchase coupons good for 1 HQ piece of equipment, rotating between Tokens and Vouchers every month.
The special materials ![]() Abdhaljs Metal
Abdhaljs Metal ![]() and
and ![]() Abdhaljs Fiber
Abdhaljs Fiber ![]() are used to upgrade NQ armor to HQ, and HQ armor to HQ+2 armor. These materials are available either for Hallmarks or Gallantry.
are used to upgrade NQ armor to HQ, and HQ armor to HQ+2 armor. These materials are available either for Hallmarks or Gallantry.


Total Hallmarks
This special tally of total accumulated Hallmarks is used to obtain items and equipment from a special menu. Once an item is redeemed, it disappears. Total Hallmarks are not consumed, but represent an ever filling pool that grants access to more expensive rewards from this list:
- Total Hallmarks are the only currency accepted for Ambuscade Ring coupons. The coupons also alternate between Vouchers and Tokens every content update.
- 100:
 Abdhaljs Seal
 - 130: Monthly NQ Feet Voucher/Token
- 170: Super Reraiser
- 220: Monthly NQ Hands Voucher/Token
- 280: Remedy x 12
- 370: Monthly NQ Head Voucher/Token
- 480: Caliber Ring
- 620: Monthly NQ Legs Voucher/Token
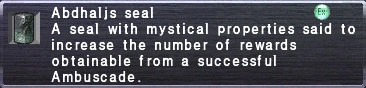
- 800: Facility Ring
- 1,050: Monthly NQ Body Voucher/Token
- 1,350: Monthly Ring Voucher/Token
- 1,800: Monthly HQ Feet Voucher/Token
- 2,300: Abdhaljs Metal
- 2,300: Abdhaljs Fiber
- 3,000: Monthly HQ Hands Voucher/Token
- 3,900: Abdhaljs Metal
- 3,900: Abdhaljs Fiber
- 5,000: Monthly HQ Head Voucher/Token
- 6,500: Abdhaljs Metal
- 6,500: Abdhaljs Fiber
- 8,500: Monthly HQ Legs Voucher/Token
- 11,000: Abdhaljs Metal
- 11,000: Abdhaljs Fiber
- 14,500: Monthly HQ Body Voucher/Token
- 20,000: Abdhaljs Metal
- 20,000: Abdhaljs Fiber
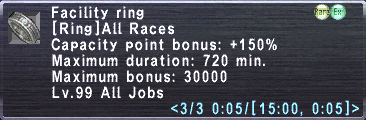
- 25,000: SP Gobbie Key


October 2021
Volume 1: Undead
Face off against the Ahriman Bozzetto Deathsinger and the Hydra Corps.
Encountered Foes
- Bozzetto Deathsinger - BLM, but with access to Chainspell
- Various Fomors - A random selection from the following 16, all named after Relic Weapons. Except for Gungnir and Guttler, each will use their job's corresponding SP ability.
- Excalibur - PLD
- Aegis - PLD
- Bravura - WAR
- Gungnir - DRG. Does not summon a pet. Does not use an SP ability.
- Apocalypse - DRK
- Amanomurakumo - SAM
- Spharai - MNK
- Mjollnir - WHM
- Gjallarhorn - BRD
- Claustrum - BLM
- Ragnarok - DRK
- Mandau - THF
- Guttler - BST. Does not summon a pet. Uses Charm instead of Familiar.
- Kikoku - NIN
- Yoichinoyumi - RNG
- Annihilator - RNG
The fight ends when all enemies are defeated.
Difficulty Settings
The Difficulty Setting determines the number of Fomors present at the start of the fight
Very Difficult: 10
Difficult: 6
Normal: 4
Easy: 3
Very Easy: 2
Battle Mechanics
Enemy evasion ranges around 1300~1400 depending on Job Traits. Unlike many other Ambuscade encounters, nothing is particularly resistant to debuffing Geomancy.
Passive Traits
Deathsinger:
- Approximately 400k health on VD.
- When all Fomor are dead, loses the ability to cast magic[1], and takes considerably increased damage.[2]
- Immune to Silence and Sleep. Susceptible to Stun. Other debuffs (including Addle/Nocture) land normally.
Fomor:
- Approximately 220k health each on VD.
- With the exception of Aegis and Gjallarhorn, all Fomor possess the hidden effect of relic weapons doing 2.5x normal damage on auto attacks.[3]
- Each Fomor named after a Relic weapon that has an Additional Effect on auto attacks possesses that effect on their auto-attacks. For example, Mandau has Additional effect: Poison and Gungnir has Additional effect: Weakens defense. Excalibur's Additional Effect: Damage varies with HP is particularly lethal on any difficulty. It is physical, slashing damage and can be absorbed by Utsusemi shadows.
- With the exception of Aegis and Gjallarhorn, all Fomor possess the ability to use their relic weapon skills, and will use them exclusively. These weapon skills can skillchain, and grant the user Relic Aftermath[4]. For Amanomurakumo in particular, this means that they won't stop using Tachi: Kaiten back to back until they're dead.
- Each Fomor will possess the passive traits of their respective job (Evasion Bonus on Mandau, for example).
- Gungnir's use of Geirskogul grants them a potent Shock Spikes effect that can induce a lengthy (~8 second) stun.
- Susceptible to Lullaby.
- For the purposes of Monster Correlation, the Fomors in this battlefield are not counted as Undead[5] and are not valid targets for Sepulcher.[6]
- Aegis has ~63% Magic Damage taken down, Excalibur has 50% Physical Damage Taken down.[7]
Abilities Used
Deathsinger:
- Chainspell - at 75%
- Airy Shield
- Magic Barrier
Fomors:
- As previously mentioned, Fomors (except Guttler and Gungnir) will use their corresponding job's SP ability.
- Guttler will use Charm instead of Familiar.
- Gjallarhorn will use Energy Drain as its Weapon Skill of choice.
- Aegis will use Shield Bash.
Spells Cast:
Deathsinger:
- Curaga - Wakes nearby Fomor
- Death - During Chainspell, only if any Fomor remain alive.
- Hastega
- Protectra V
- Shellra V
- Silencega
- Slowga
- Breakga
- Graviga
- Bindga
- Dispelga
- Sleepga II
- Drain - AOE
- Aspir - AOE
- Comet - AOE
Fomor:
- Claustrum casts Sleepga and tier VI elemental magic, which can magic burst off any skillchain damage dealt to players.
- Kikoku casts Utsusemi: Ni, Ni tier Elemental Ninjutsu, Hojo: Ni, Jubaki: Ni, etc.
- Mjollnir casts Holy II, Banish IV, etc.
- Ragnarok casts tier III elemental magic, Aspir, Stun, etc.
- Ghallarhorn casts March, Finale, Elegy, Requiem VII, etc.
- Aegis and Excalibur cast Flash
Where to get your Primer:
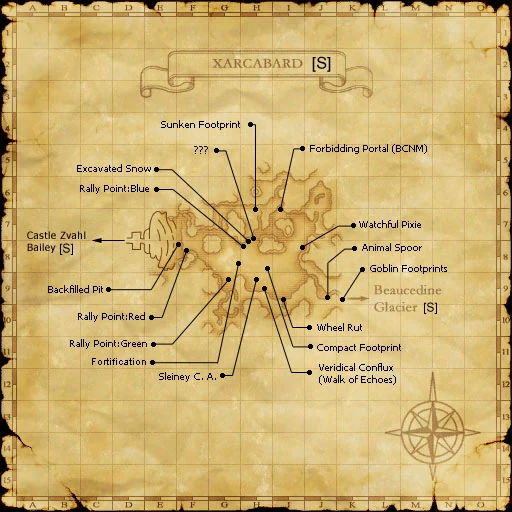
- Xarcabard (S) (G-8), Gidim, Snow Wights and Cointeaches northwest of Home Point #1
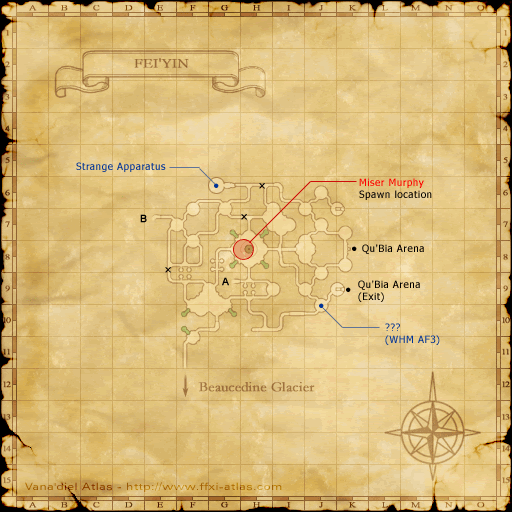
- Fei'Yin, Map 1 (J-9), Ghosts near Home Point #1, gets crowded quickly.
Volume 2: Undead

Face off against the Fomor Winnower Jack. As with previous Volume 2 encounters in October, Jack will attempt to steal buffs and disable players via Trick or Treat, thwarted only if you are under the effects of a sweet food.
Encountered Foes
- Winnower Jack.
- Spooky Chanteuse. Corpselight enemies, up to 5 depending on the difficulty setting.
The fight ends when Winnower Jack is defeated.
Difficulty Settings
The Difficulty Setting determines the stats and HP of Winnower Jack, as well as the count of Chanteuses present during the fight.
- Very Easy: 1 Chanteuse
- Easy: 2 Chanteuses
- Normal: 3 Chanteuses
- Difficult: 4 Chanteuses
- Very Difficult: 5 Chanteuses
Battle Mechanics
Passive Traits
Winnower Jack
- Strong damage taken down property until all Chanteuses have been disabled
- Potent regain effect.
Spooky Chanteuses
- Very low HP.
- Don't seem to auto-attack their targets, preferring to sing songs.
- Stop acting and moving for 60 seconds when their HP reaches 1.
Abilities Used
Winnower Jack
- Trick or Treat: AOE Amnesia, Silence, ~10 second Terror, 1 Buff drained, enmity reset on affected targets. Everything but the buff drain is resistable. If affected targets have eaten Sweets, then Trick or Treat will instead dispel that food buff and apply a Slow effect to Culler Jack instead.
- Staff weapon skills. Frequently tries to skillchain on its current target.
Chanteuse
- None
Spells Cast:
Winnower Jack
- Casts tier 2 AOE and 3-5 single Target Ice, Earth and Water aligned Elemental Magic spells
- Casts Stun
Spooky Chanteuse
- Casts Defensive bard songs on its allies: Knight's Minne V, Blade MAdrigal
- Casts enfeebling bard songs on its foes: Foe Lullaby
Where to get your Primer:
- Xarcabard (S) (G-8), Ghosts and Corpselights northwest of Home Point #1
- Fei'Yin, Map 1 (J-9), Ghosts south of Home Point #1.
References
Battlefield Archives
-

Gorpa-Masorpa -

Flamma Korazin Set -
Ayanmo Corazza Set -

Hizamaru Haramaki Set -
Mummu Jacket +2 Set -

Tali'ah Manteel Set -
Sulevia's Platemail Set -
Flamma Korazin +2 Set
All items (44)


