No edit summary |
mNo edit summary |
||
| (33 intermediate revisions by 4 users not shown) | |||
| Line 2: | Line 2: | ||
{{tocright}} |
{{tocright}} |
||
=Getting Started= |
=Getting Started= |
||
| − | First, activate the |
+ | First, activate the Records of Eminence quest [[Tutorial#Basics|Stepping into an Ambuscade]], then talk to [[Gorpa-Masorpa]] at {{Location|Mhaura|G-9}}. To enter any Ambuscade battlefield all players in the party will need a Key Item. {{KeyItem}} [[Ambuscade Primer Volume One]] grants entry to Intense Ambuscade, a more challenging encounter. {{KeyItem}} [[Ambuscade Primer Volume Two]] grants entry to Normal Ambuscade, a step down in technical difficulty. "Intense" and "Normal" not only describe the relative challenge of the two battlefields, but alter the final rewards on completion. |
==Obtaining Key Items== |
==Obtaining Key Items== |
||
| − | You obtain the Key Items with [[:Category:Records of Eminence|Records of Eminence]] quests. There are two different quests per Key Item to activate: a non-repeatable daily quest, and a repeatable quest. The Daily objectives for both Volume 1 and Volume 2 require one experience-yielding monster be killed of the specified type. The repeatable objective for Volume 1 requires |
+ | You obtain the Key Items with [[:Category:Records of Eminence|Records of Eminence]] quests. There are two different quests per Key Item to activate: a non-repeatable daily quest, and a repeatable quest. The Daily objectives for both Volume 1 and Volume 2 require one experience-yielding monster be killed of the specified type. The repeatable objective for Volume 1 requires one kill, while Volume 2 requires ten. |
*Monsters in [[Dynamis]] and [[Abyssea]] zones are not counted for any Ambuscade objectives. |
*Monsters in [[Dynamis]] and [[Abyssea]] zones are not counted for any Ambuscade objectives. |
||
| Line 40: | Line 40: | ||
|- align = "center" |
|- align = "center" |
||
| Very<br>Easy |
| Very<br>Easy |
||
| − | | |
+ | | 200 |
| 20 ~ 100 |
| 20 ~ 100 |
||
|} |
|} |
||
| Line 57: | Line 57: | ||
|- align = "center" |
|- align = "center" |
||
| Difficult |
| Difficult |
||
| + | | 250 |
||
| ⚫ | |||
| ⚫ | |||
| ⚫ | |||
| 200 |
| 200 |
||
| 20 ~ 100 |
| 20 ~ 100 |
||
| ⚫ | |||
| ⚫ | |||
| − | | 100 |
||
| ⚫ | |||
|- align = "center" |
|- align = "center" |
||
| Easy |
| Easy |
||
| − | | |
+ | | 150 |
| − | | |
+ | | 15 ~ 75 |
|- align = "center" |
|- align = "center" |
||
| Very<br>Easy |
| Very<br>Easy |
||
| − | | |
+ | | 100 |
| − | | |
+ | | 10 ~ 50 |
|} |
|} |
||
=Redeeming Hallmarks and Gallantry= |
=Redeeming Hallmarks and Gallantry= |
||
| − | Spend your accumulated Hallmarks and Gallantry with [[Gorpa-Masorpa]], who offers a limited stock of rewards that is reset at every monthly content update, usually around the first or second Thursday of each month. |
+ | Spend your accumulated Hallmarks and Gallantry with [[Gorpa-Masorpa]], who offers a limited stock of rewards that is reset at every monthly content update, usually around the first or second Thursday of each month. Both Hallmarks and Gallantry are reset to 0 upon each monthly update. |
Ambuscade rewards are organized into materials used to reforge REMA weaponry, Skirmish Stones, JSE Capes and materials used to augment them, and Vouchers and Tokens redeemable for [[:Category:Ambuscade Armor|Ambuscade Armor]] and the materials required to upgrade it. |
Ambuscade rewards are organized into materials used to reforge REMA weaponry, Skirmish Stones, JSE Capes and materials used to augment them, and Vouchers and Tokens redeemable for [[:Category:Ambuscade Armor|Ambuscade Armor]] and the materials required to upgrade it. |
||
| Line 89: | Line 89: | ||
You can buy up to one cape per job for 500 Hallmarks each. |
You can buy up to one cape per job for 500 Hallmarks each. |
||
| − | The materials for augmenting these |
+ | The materials for augmenting these capes can be bought with either Hallmarks or Gallantry, with different prices and stock limits. |
==Ambuscade Armor== |
==Ambuscade Armor== |
||
Hallmarks can be used to purchase coupons good for 1 NQ piece of equipment, rotating between Tokens and Vouchers every month. |
Hallmarks can be used to purchase coupons good for 1 NQ piece of equipment, rotating between Tokens and Vouchers every month. |
||
| Line 124: | Line 124: | ||
*20,000: {{IIn|Abdhaljs Fiber}} |
*20,000: {{IIn|Abdhaljs Fiber}} |
||
*25,000: {{IIn|SP Gobbie Key}} |
*25,000: {{IIn|SP Gobbie Key}} |
||
| + | =September 2020= |
||
| − | =June 2019= |
||
| − | ==Volume 1: |
+ | ==Volume 1: Quadav== |
| − | {{:Ambuscade/Battlefield Archive/Bozzetto |
+ | {{:Ambuscade/Battlefield Archive/Bozzetto High Vicar}} |
| − | ==Volume 2: |
+ | ==Volume 2: Lizards== |
| − | {{:Ambuscade/Battlefield Archive/ |
+ | {{:Ambuscade/Battlefield Archive/Chelone}} |
==References== |
==References== |
||
Revision as of 13:45, 28 September 2020
Ambuscade is a instanced dungeon battlefield in which players team up against the monster-of-the-month.
Getting Started
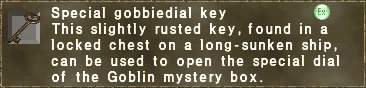
First, activate the Records of Eminence quest Stepping into an Ambuscade, then talk to Gorpa-Masorpa at Mhaura (G-9). To enter any Ambuscade battlefield all players in the party will need a Key Item. ![]() Ambuscade Primer Volume One grants entry to Intense Ambuscade, a more challenging encounter.
Ambuscade Primer Volume One grants entry to Intense Ambuscade, a more challenging encounter. ![]() Ambuscade Primer Volume Two grants entry to Normal Ambuscade, a step down in technical difficulty. "Intense" and "Normal" not only describe the relative challenge of the two battlefields, but alter the final rewards on completion.
Ambuscade Primer Volume Two grants entry to Normal Ambuscade, a step down in technical difficulty. "Intense" and "Normal" not only describe the relative challenge of the two battlefields, but alter the final rewards on completion.
Obtaining Key Items
You obtain the Key Items with Records of Eminence quests. There are two different quests per Key Item to activate: a non-repeatable daily quest, and a repeatable quest. The Daily objectives for both Volume 1 and Volume 2 require one experience-yielding monster be killed of the specified type. The repeatable objective for Volume 1 requires one kill, while Volume 2 requires ten.
The Ambuscade Tome
Once everyone in the party has the Primer key items, the party leader then registers the party at the Ambuscade Tome right next to Gorpa-Masorpa. At registration you choose the difficulty level of the selected Ambuscade type and inscribe your name into the tome, assigning you a number. Inscribing your name in the Ambuscade Tome gives you a page number. Page numbers are called in a zone-wide system message "Page ### of the tome flares up!" and the party leader can interact again with the Tome to enter the battlefield. The Tome also has an option to auto-transport your party to the battlefields as soon as your number is announced.
- Your Key Item is lost upon completion of a successful battle.
Rewards
Successful completion of an Ambuscade battlefield rewards two forms of currency: Hallmarks and Gallantry. Hallmarks earned vary with the Key Item used to enter the battlefield and the selected difficulty level. Gallantry earned is based on the Key Item, Difficulty and the total number of party members, excluding Trusts. Solo players do not earn Gallantry. Using an ![]() Abdhaljs Seal
Abdhaljs Seal ![]() will triple the currency rewards for a single win.
will triple the currency rewards for a single win.
- Hallmarks, Total Hallmarks, and Gallantry are reset to zero every monthly content update.
Ambuscade Primer Volume One
Intense Ambuscade
| Difficulty | Hallmarks Earned |
Gallantry Earned 2~6 members |
|---|---|---|
| Very Difficult | 3600 | 300 ~ 1500 |
| Difficult | 2400 | 240 ~ 1200 |
| Normal | 1200 | 180 ~ 900 |
| Easy | 600 | 80 ~ 400 |
| Very Easy |
200 | 20 ~ 100 |
Ambuscade Primer Volume Two
Regular Ambuscade
| Difficulty | Hallmarks Earned |
Gallantry Earned 2~6 members |
|---|---|---|
| Very Difficult | 300 | 30 ~ 150 |
| Difficult | 250 | 25 ~ 125 |
| Normal | 200 | 20 ~ 100 |
| Easy | 150 | 15 ~ 75 |
| Very Easy |
100 | 10 ~ 50 |
Redeeming Hallmarks and Gallantry
Spend your accumulated Hallmarks and Gallantry with Gorpa-Masorpa, who offers a limited stock of rewards that is reset at every monthly content update, usually around the first or second Thursday of each month. Both Hallmarks and Gallantry are reset to 0 upon each monthly update.
Ambuscade rewards are organized into materials used to reforge REMA weaponry, Skirmish Stones, JSE Capes and materials used to augment them, and Vouchers and Tokens redeemable for Ambuscade Armor and the materials required to upgrade it.
REMA Reforging Materials
The full list of REMA Materials purchasable with Hallmarks is always available.
REMA Materials purchased with Gallantry are available on a rotating schedule.
- Empyrean weapon materials are available January, April, July, and October.
- Relic weapon materials are available February, May, August, and November.
- Mythic/Ergon weapon materials are available March, June, September, and December.
Skirmish Stones
+2 Skirmish Stones are available every month, purchasable only with Hallmarks. Each stone costs 200 Hallmarks, up to a limit of 10 of each type.
JSE Capes
You can buy up to one cape per job for 500 Hallmarks each.
The materials for augmenting these capes can be bought with either Hallmarks or Gallantry, with different prices and stock limits.
Ambuscade Armor
Hallmarks can be used to purchase coupons good for 1 NQ piece of equipment, rotating between Tokens and Vouchers every month.
Gallantry can be used to purchase coupons good for 1 HQ piece of equipment, rotating between Tokens and Vouchers every month.
The special materials ![]() Abdhaljs Metal
Abdhaljs Metal ![]() and
and ![]() Abdhaljs Fiber
Abdhaljs Fiber ![]() are used to upgrade NQ armor to HQ, and HQ armor to HQ+2 armor. These materials are available either for Hallmarks or Gallantry.
are used to upgrade NQ armor to HQ, and HQ armor to HQ+2 armor. These materials are available either for Hallmarks or Gallantry.


Total Hallmarks
This special tally of total accumulated Hallmarks is used to obtain items and equipment from a special menu. Once an item is redeemed, it disappears. Total Hallmarks are not consumed, but represent an ever filling pool that grants access to more expensive rewards from this list:
- Total Hallmarks are the only currency accepted for Ambuscade Ring coupons. The coupons also alternate between Vouchers and Tokens every content update.
- 100:
 Abdhaljs Seal
 - 130: Monthly NQ Feet Voucher/Token
- 170: Super Reraiser
- 220: Monthly NQ Hands Voucher/Token
- 280: Remedy x 12
- 370: Monthly NQ Head Voucher/Token
- 480: Caliber Ring
- 620: Monthly NQ Legs Voucher/Token
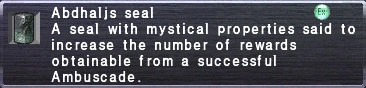
- 800: Facility Ring
- 1,050: Monthly NQ Body Voucher/Token
- 1,350: Monthly Ring Voucher/Token
- 1,800: Monthly HQ Feet Voucher/Token
- 2,300: Abdhaljs Metal
- 2,300: Abdhaljs Fiber
- 3,000: Monthly HQ Hands Voucher/Token
- 3,900: Abdhaljs Metal
- 3,900: Abdhaljs Fiber
- 5,000: Monthly HQ Head Voucher/Token
- 6,500: Abdhaljs Metal
- 6,500: Abdhaljs Fiber
- 8,500: Monthly HQ Legs Voucher/Token
- 11,000: Abdhaljs Metal
- 11,000: Abdhaljs Fiber
- 14,500: Monthly HQ Body Voucher/Token
- 20,000: Abdhaljs Metal
- 20,000: Abdhaljs Fiber
- 25,000: SP Gobbie Key


September 2020
Volume 1: Quadav
Face off against the Bozzetto High Vicar and their allies. This is a complex fight requiring an understanding of how and when to damage the various allies summoned in response to the High Vicar's ability use.
There are two key mechanics to the fight, Benediction and Imperfect Defense Shell and they interact with one another differently as the fight progresses. Benediction marks major phase transitions and alters the properties of Imperfect Defense Shell. The battle ends when all foes are defeated.
Bozzetto High Vicar (White Mage)
- Approximately 1.2M HP on VD[1]
- Permanent Enstone effect.
- SP Ability - Benediction: Will use this between phase changes. Heals HP to full, removes all status aliments, triggers fresh use of Imperfect Defense Shell, altering its properties. Battlefield difficulty selection governs the use of Benediction.
Very Difficult:
- Benediction will be used at least 3 times. (~50%, ~40%, ~33%)
- First time: The Elementalist is summoned.
- Second time: The Defiler and Disruptor are summoned.
- Third time: No new adds are summoned. The High Vicar unlocks Malice of Gu'Dha.
Difficult:
- Benediction will be used twice. (~50%, ~40%)
- First time: The Elementalist is summoned.
- Second time: The Defiler and Disruptor are summoned.
- The High Vicar will not use Benediction a third time. Wrath of Gu'Dha is unlocked at 33% health.
Very Easy to Normal:
- Benediction will be used once at 50% health. This will summon the Elementalist.
Warning: Attempting to stop the first use of Benediction in any way (e.g. by keeping the High Vicar Stunned) before it has used at least once will render the High Vicar unkillable.[2]
- Imperfect Defense Shell: Mechanics vary depending on the current phase of the fight. Creates a visible aura on the boss. Removes all debuffs from its user. Its remaining effects, and how it is removed depend on the remaining foes left alive and the current health total of the High Vicar. When the aura is removed, the High Vicar will take drastically increased damage from all sources
- Before first use of Benediction: Used at the very start. Greatly reduces all damage taken. Summons Bozzetto Devout and Bozzetto Berserker. Removed by killing the Devout and the Berserker. This will start a Difficulty-dependent internal timer (roughly 60 seconds on VD). If the High Vicar is not forced to use Benediction before it uses Imperfect Defense Shell again, it will resummon both the Berserker and the Devout. If for any reason your damage is slow on the High Vicar, be very careful not to push the boss below 50% as your approach the limit of this timer or you may have to fight all four foes after Benediction summons the Elementalist.
- After first use of Benediction: Used at start of phase. Greatly reduces all damage taken. Removed when it is casting any spell. Trigger a Cure VI by spiking damage on the Elementalist, or by keeping its health below 30%. Aura returns after a cast completes.
- After second use of Benediction: Used at start of phase and periodically afterwards, in unison with the Defiler and Disruptor. Switches the active damage vulnerability. Picks a vulnerability at random between Melee, Magic and Ranged damage types. Cannot be removed.
- After third use of Benediction: Used once at start of phase. Removal depends on remaining add.
- Defiler or Disruptor: Temporarily removed when readying TP ability or spell.
- Elementalist: Temporarily removed when casting a spell.
- <30% health remaining: Temporarily removed when casting a spell or readying a TP move.[3]
- The Sadness of Gu'Dha: Enrage mechanic. AOE Damage, Curse (-75% HP/MP), and Plague (drains 50 MP and 500 TP per tick). Will Draw In the party members with enmity if nobody is in range of its effects (~30y). Resets hate on affected targets. Uses this in retaliation to the death of the Elementalist, and only after the first use of Benediction. This triggers a special phase of the fight, where the High Vicar will no longer use Benediction or cast any spells. During this enrage phase, the High Vicar's aura will only temporarily drop while readying a TP move.
- Torment of Gu'Dha: AOE Earth elemental damage + Petrification. Resets hate. Used after Wail of Gu'Dha is used once. Will only use this TP move while enraged, and will not cast spells.
Other Abilities:
- The Revelry of Gu'Dha: Defense bonus, Haste, Multi Strikes gained. Each bonus is individually dispellable.[4]
- Malice of Gu'Dha: AOE Damage + Knockback + Weight. Only used below 30% health. The High Vicar prefers to use this move over any others or casting spells during this phase.
- Shell Bash: Physical Damage + Stun. Absorbed by 1 shadow.
- Ore Toss: Ranged TP move for physical damage. Absorbed by 1 shadow.
- Head Butt: Physical damage + Stun + Knockback. Absorbed by 1 shadow.
- Howl: Warcry.
- Galumph: AOE damage + Blindness. Unlocked after the first use of Benediction.
- Shell Charge: Physical damage + Knockback + Paralysis. Hits everyone in front of the user.
- Ore Lob: Fire elemental damage. Hits everyone in front of the user.
- Skull Smash: Physical damage + Stun. Hits everone in front of the user.
- While the Elementalist is alive, gains a potent (100 HP/tick) En-poison effect on regular melee swings. This does not appear to be resistable at all[5]
Spells Cast:
- Banish IV
- Cure VI
- Curaga IV
- Protect IV
- Aquaveil
- Stoneskin
- Dia II
- Silence
- Haste
- Blink
- Paralyna
- Silena
All adds are immune to Sleep, Bind and Petrification. Other debuffs work fine. Addle and Silence are highly recommended on the casters.
Bozzetto Berserker (Warrior)
- Has Counter as a passive trait
- SP Ability: Mighty Strikes
- Ecstasy of Gu'Dha
Bozzetto Devout (Paladin)
- SP Ability: Invincible
- Ore Toss
- Ecstasy of Gu'Dha
Spells Cast
- Banishga II. Does an inordinately high amount of damage.
- Cure IV.
- Protect IV and Protect V.
- Flash.
- Enlight II.
Bozzetto Elementalist (Black Mage)
- Has a potent (100 HP/tick) En-Poison effect on regular melee swings.
- SP Ability: Manfont
- Has a strong Regain effect.
- Sorrow of Gu'Dha: Resets JAs, including Manafont.
- Ecstasy of Gu'Dha
- Galumph
Spells Cast
- Water V and Water VI, Waterga III, Waterja
- Aspir III
- Bio III
- Poisonga II
- Curse Manafont only
- Death Manafont only
- Impact Manafont only
- Meteor Manafont only
Bozzetto Defiler (Dark Knight)
SP Ability: Blood Weapon
- Imperfect Defense Shell: Switches the active damage vulnerability (+1000% damage). Picks a vulnerability at random between Melee, Magic and Ranged damage types. Used in unison with the High Vicar. If the High Vicar is dead, no longer uses this move and keeps the last vulnerability.
- Ecstasy of Gu'Dha
- Galumph
- Shell Charge
- Ore Lob
- Skull Smash
Spells Cast:
Bozzetto Disruptor (Red Mage)
SP Ability: Chainspell
- Imperfect Defense Shell: Switches the active damage vulnerability (+1000% damage). Picks a vulnerability at random between Melee, Magic and Ranged damage types. Used in unison with the High Vicar. If the High Vicar is dead, no longer uses this move and keeps the last vulnerability.
- Ecstasy of Gu'Dha
- Galumph
- Shell Charge
- Ore Lob
- Skull Smash
Spells Cast:
Where to get your Primer:
- Pashhow Marshlands (S). Recall-Pashh or use the Survival Guide warp.
- Beadeaux (S). From the Pashhow Marshlands (S) Survival Guide warp.
Volume 2: Lizards
Face off against the Matamata Chelone. As per the monthly FFXI Digest[6], this battle cycles between Chelone assuming defensive and offensive postures, depending on it's current HP and the special abilities it uses.
Encountered Foes
- Chelone - Matamata.
The fight ends when Chelone is defeated.
Difficulty Settings
The Difficulty Settings determines only the stats and HP of your enemy.
Battle Mechanics
Chelone starts the fight in its 'defensive' posture, taking greatly reduced damage. Its use of Embalming Earth changes it to its 'offensive' posture, at this point it takes double magic damage (including skillchain damage). Any use of Tail Thwack returns Chelone to its 'defensive' posture.
Enemy Traits
As a matamata, Chelone's normal attacks have additional properties to them:
- Lunging bite: Deals physical damage, and pierces shadows.
- Head sweep: Front AOE damage + Stun.
- Full body spin: AOE damage + small Knockback. Chelone prefers this attack in its offensive posture.
Chelone is immune to Stun.
Abilities Used
- Debilitating Spout: Front AOE Water Elemental Damage + Full Dispel (except food) + small knockback.
- Cranial Thrust: Front AOE physical damage + HP Max Down (25%).
- Embalming Earth: AOE Earth Elemental damage + various status ailments including: Blindness, Paralysis, Weight, Evasion Down and Slow. Signals Chelone's offensive posture.
- Tail Thwack: AOE physical damage + moderate knockback + Defense Down (50%). Signals Chelone's defensive posture.
Spells Cast
None
Where to get your Primer:
- Morimar Basalt Fields: Matamata near Home Point #1
- Pashhow Marshlands (S): Peistes near the Recall-Pashh gate crystal.
References
Battlefield Archives
-

Gorpa-Masorpa -

Flamma Korazin Set -
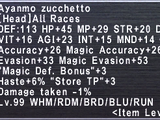
Ayanmo Corazza Set -

Hizamaru Haramaki Set -
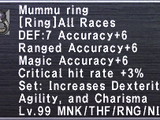
Mummu Jacket +2 Set -

Tali'ah Manteel Set -
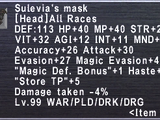
Sulevia's Platemail Set -
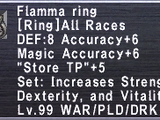
Flamma Korazin +2 Set
All items (44)


