Abyssea Areas
Visions of Abyssea Areas

How to Get Started
- Travel to Port Jeuno for the first quest A Journey Begins. Talk to Joachim in Port Jeuno (H-8).
- He'll give you a Traverser Stone. Head to Tahrongi Canyon (H-12), Konschtat Highlands] (I-12) or La Theine Plateau (D-4) and click on the Cavernous Maw.
- To obtain additional stones one must first complete The Truth Beckons before Joachim will give you another stone.
- You can obtain a new stone every 20 hours (Earth Time) and can store up to a maximum of 3 stones at one time. If you complete The Truth Beckons any time after 20hours have past since getting your first Traverser Stone, you will qualify for another. It is recommeded that you gain Visitant Status else you will have to wait 1 hour to go back in.
- Joachim will also hold onto stones after the player has 3 in their key items. Thus you can subsequently do a 90 min run, return to him and receive up 3 as long as the 20 hours per stone has passed.
- Upon entering one of the three areas you will have 5 minutes of preparation before you must gain Visitant Status from the Conflux Surveyor in the area. If you fail to gain Visitant Status before the time is up, you will be ejected from the area.
- Visitant Status carries over if you leave before your time is up.
- Gaining Visitant Status causes one of your Traverser Stones to be expended.
- Each stone used will give 30 minutes of time within the area, with a maximum of 120 minutes.
- You can only hold 3 stones, so to reach the maximum you have to trade some stones on a earlier run and have at least 30 minutes left over. It will be possible to increase the limit to 4 stones, but the method is currently unknown.
- I waited a long period before doing Abyssea, I had 0 stones on me. On a run I requested a total of 3 stones, the max I could hold. Then after 1 30min run, I went back to and received a 4th stone to carry a max of 3. I think you can only hold 3, but the NPC continues to generate more stones every 20hrs.
- Your time in the area cannot exceed 120 minutes at any given time. If you have more than 90 minutes remaining and you use a stone, you will only gain the difference between 120 minutes and your remaining time.
- Once you gain visitant Status, you are free to roam abyssea for the remaining time allowed.
- You will be given warnings at certain intervals, notifying you how much time you have left within the area.
- Once you are out of time, you will be returned to the Cavernous Maw which took you in.
- You will not be able to enter the area again for 60 minutes upon leaving the area. Examining the Cavernous Maw before the 60 minutes is up will give you the message: "Your body cannot cope with further Strain. You must rest for another X minutes.
- This only applies if you ran out of time, left the area with less than 5 minutes remaining, or never obtained visitant status.
Adventuring Inside Abyssea
Abyssea is a world parallel to Vana'diel, each of its areas are similar to their entrance areas. Upon entering abyssea you are placed inside the main encampment. This encampment is where most transactions and quests are undertaken. Monsters are not known to pass through the barrier that separates the encampment from the rest of the area. From here there are a few things you may want to know.
- Monsters with a glowing aura surrounding them (seen thus far in the Clionid and Limule families, both of which bear the name Ephemeral instead of their usual area designation) are noted to award several times the experience points given by a normal enemy when defeated.
- Normal enemies respawn at a fairly quick rate.
- Enemies may respawn at different levels depending on how fast they are killed and by what level players.

- Enemies have a decent chance to drop Treasure Chests, similar in function to brown treasure caskets
Abyssea Quests
Integrated with the battle systems of Abyssea is a series of quests. Similar to the Wings of the Goddess Missions, there are a handful of general quests intertwined with quests specific to each area.
The Encampment
Inside the encampment you will find several NPCs that will aid you on your adventures through abyssea.
Conflux Surveyor
The surveyor will tell you information about Traverser Stones and how they can be used to gain time inside abyssea. Talking to him is necessary to advance inside abyssea.
- The surveyor will grant you Visitant Status in exchange for a Traverser Stone. One stone will provide you with 30 minutes time inside the area.
- He will take more than one stone at once, up to 3 stones can be exchanged for extra time.
Cruor Prospector
The prospector deals with all manners of cruor transactions. You will be able to buy new Armor, temporary items, and other things from him.
See Cruor Prospector for more details regarding available items.
Atma Infusionist
Treasure Chests and Mechanisms
Upon defeating normal enemies within abyssea, there is a chance for a Treasure Chest to appear where the defeated enemy lay. There are various kinds of chests and all have different mechanisms to open them. Players should take care to complete the challenges and open the chests before they disappear, because they may find such valuable commodities as: Cruor, experience points, and items. The chests will appear depending on your 'light' on your body. ![]()
High/Low Mechanism
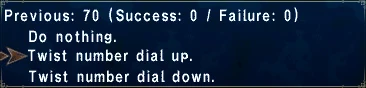
- Upon opening this particular type of chest you are given a number, two options, a required number of successes, and the amount of times you can fail before losing the chest.
- The number you are given is a randomly generated number from 0-99*. You must decide whether the next randomly generated number is going to be higher or lower than the previous one stated.
- If you think the new number will be higher, choose "Turn the dial up.". If you think the new number will be lower, choose "turn the dial down.".
- You must guess correctly for the required amount of successes before running out of attempts and before time runs out.
- Upon successfully opening the chest, you and other party members will be able to reap the rewards inside.
- Upon checking the chest you are given the option to see what is inside the chest.
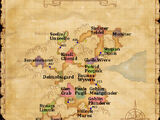
By traveling deep into abyssea you will find Veridical Confluxes scattered about the land. These confluxes serve as teleporters between one another. In order to use each one you must first activate it by paying a fee in cruor and then another small fee to use the teleport option.
- There are 8 Confluxes in each version of abyssea.
- The cruor cost to activate each conflux is equal to: 50xConflux#. For example, conflux #1 costs 50 cruor to activate and conflux #5 costs 250 cruor to activate.
- Conflux #1 is free to use after the activation fee.
Abyssea Goals
You have freedom over your actions. There is no specific objective to accomplish once inside. However, there are several suggested objectives. The objectives go as follow:
- Complete all quests in the area.
- Obtain every atma available in this area.
- Obtain every Ancient Abyssite in this area.
You can check your progress for each objective in an area with the help of a NPC at the camp site of the respective area.
Cruor
Cruor works as Abyssea's currency. You obtain Cruor by defeating monsters and you can trade them for various products and services including armors, temporary items, key items that will help you in Abyssea, temporary stat boosts, Atma infusion, activating and using Veridical Confluxes to teleport around the area and more.
Martello
The Martellos are set up around each area and serve as replenishers for adventurers. Each of them has a certain amount of energy and each of its restoration given to an adventurer will deplete its energy reserve. To replenish a martello, an adventure must agree to help a Machine Outfitter located at the camp site to participate in a replenishing errand. You will then obtain a key item. Once you check a martello, you will be given the choice to replenish its energy levels. The direction you face affects the amount replenished. ![]()
Key items providing benefits in Abyssea
You can purchase key items that will help you in Abyssea for Cruor.
- Ivory Abyssite of Sojourn grants you more time for each Traverser Stone you trade to the Abyssean Surveyor.
- Ivory Abyssite of Confluence reduces the Cruor cost for using the Veridical Conflux teleportation system.
- Ivory Abyssite of Expertise reduces the cooldown after using a Martello's service.
Abyssean Aggro
- Verification Needed
 See Discussion Page.
 - Monsters in Abyssea start out as unaggressive, but grow more and more resentful towards adventurers slaying their abyssean kin. One does not even have to kill that family to gain their resentment. One could kill a dozen lizards, and earn the ire of Efts.
- This agression might be linked to the 'lights' messages. After killing an enemy, sometimes a message tells you the player's body shines with a certain <strength> <color> light.
- feeble azure : obtained after killing Ephemeral Clionid. Causes Gulch Limule to agro.
- faint pearlescent : obtained after killing Gulch Limule. Unknown effect.
- This agression might be linked to the 'lights' messages. After killing an enemy, sometimes a message tells you the player's body shines with a certain <strength> <color> light.
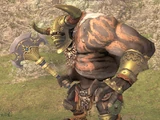
Size Matters and The Ephemeral
- Small monsters of the same family give more Cruor, but less experience points.
- Big monsters of the same family give less Cruor, but more experience points.
Ephemeral Monsters roam randomly around Abyssea inside other monster families. It is best to have Wide Scan to find them.
- Ephemeral Monsters are Ephemeral Clionid and Ephemeral Limule.
- Ephemeral Monsters show their elemental aura.
- Ephemeral Monsters give 2x-3x more Experience Points and Cruor.
- Ephemeral Monsters show their elemental aura.
-
Abyssea - Grauberg -

Abyssea - Altepa -

Abyssea - Misareaux -

Abyssea - Attohwa -

Abyssea - La Theine -
Briareus -

Abyssea - Uleguerand -
Abyssea - Vunkerl
All items (829)
-
A Beaked Blusterer
-
A Delectable Demon
-
A Fluttery Fiend
-
A Goldstruck Gigas
-
A Journey Begins

-
A Man-eating Mite
-
A Mightier Martello (Altepa)
-
A Mightier Martello (Attohwa)
-
A Mightier Martello (Grauberg)
-
A Mightier Martello (Konschtat)
-
A Mightier Martello (La Theine)
-
A Mightier Martello (Misareaux)
-
A Mightier Martello (Tahrongi)
-
A Mightier Martello (Uleguerand)
-
A Mightier Martello (Vunkerl)
-
A Moonlight Requite
-
A Sea Dog's Summons
-
A Sterling Specimen
-
A Ward to End All Wards
-
Ab'xzomit

-
Abas

-
Category talk:Abyssea
-
Abyssea - Altepa

-
Abyssea - Altepa/Maps
-
Abyssea - Attohwa

-
Abyssea - Attohwa/Maps
-
Abyssea - Empyreal Paradox

-
Abyssea - Grauberg

-
Abyssea - Grauberg/Maps
-
Abyssea - Konschtat

-
Abyssea - Konschtat/Maps
-
Abyssea - La Theine

-
Abyssea - La Theine/Maps
-
Abyssea - Misareaux

-
Abyssea - Misareaux/Maps
-
Abyssea - Tahrongi

-
Abyssea - Tahrongi/Maps
-
Abyssea - Uleguerand

-
Abyssea - Uleguerand/Maps
-
Abyssea - Vunkerl

-
Abyssea - Vunkerl/Maps
-
Abyssea Areas

-
Abyssea Main Quests
-
Category:Abyssea NPCs
-
Category:Abyssea Quests
-
Abyssea Seal Titles and Jobs
-
Category:Abyssite
-
Abyssite of Discernment

-
Abyssite of the Cosmos

-
Abyssobugard

-
Ada (A)

-
Adamastor

-
Addled Mind, Undying Dreams
-
Adze

-
Aestutaur

-
Ajido-Marujido (A)

-
Alberic

-
Alectryon

-
Alkonost

-
Amuckatrice

-
An Acrididaen Anodyne
-
An Eye for Revenge
-
An Offer You Can't Refuse
-
An Officer and a Pirate
-
An Ulcerous Uragnite
-
Ansherekh

-
Anti-Abyssean grenade 01

-
Anti-Abyssean grenade 02

-
Anti-Abyssean grenade 03

-
Apururu (A)

-
Aqua Pura
-
Aqua Puraga
-
Arimaspi

-
Asanbosam

-
Ascetic's Gambir
-
Ashtaerth the Gallvexed

-
Category:Atma
-
Atma Fabricant

-
Atma Infusionist

-
Atma of a Future Fabulous

-
Atma of a Thousand Needles

-
Atma of Allure

-
Atma of Alpha and Omega

-
Atma of Apparitions

-
Atma of Aquatic Ardor

-
Atma of Baleful Bones

-
Atma of Blighted Breath

-
Atma of Calamity

-
Atma of Cloak and Dagger

-
Atma of Dread

-
Atma of Dunes

-
Atma of Echoes

-
Atma of Entwined Serpents

-
Atma of Eternity

-
Atma of Fires and Flares

-
Atma of Gales

-
Atma of Harmony

-
Atma of Hell's Guardian
-
Atma of Illusions

-
Atma of Ingenuity

-
Atma of Luminous Wings

-
Atma of Nightmares

-
Atma of Perfect Attendance

-
Atma of Purgatory

-
Atma of Revelations
-
Atma of Roaring Laughter

-
Atma of Stormbreath

-
Atma of the Ace Angler

-
Atma of the Adamantine

-
Atma of the Apocalypse

-
Atma of the Ascending One

-
Atma of the Avaricious Ape

-
Atma of the Azure Sky

-
Atma of the Banisher

-
Atma of the Baying Moon

-
Atma of the Beast King

-
Atma of the Beyond

-
Atma of the Blinding Horn

-
Atma of the Bludgeoning Brute

-
Atma of the Brother Wolf

-
Atma of the Burning Effigy

-
Atma of the Bushin

-
Atma of the Claw

-
Atma of the Clawed Butterfly

-
Atma of the Cobra Commander

-
Atma of the Cosmos

-
Atma of the Cradle

-
Atma of the Crimson Scale

-
Atma of the Crushing Cudgel

-
Atma of the Dark Blade

-
Atma of the Dark Depths

-
Atma of the Deep Devourer

-
Atma of the Demonic Lash

-
Atma of the Demonic Skewer

-
Atma of the Desert Worm

-
Atma of the Despot

-
Atma of the Dragon Rider

-
Atma of the Drifter

-
Atma of the Ducal Guard

-
Atma of the Earth Wyrm

-
Atma of the Ebon Hoof

-
Atma of the Einherjar

-
Atma of the Endless Nightmare

-
Atma of the Fallen One
-
Atma of the Fetching Footpad

-
Atma of the Foe Flayer

-
Atma of the Frozen Fetters

-
Atma of the Full Moon

-
Atma of the Glutinous Ooze

-
Atma of the Gnarled Horn

-
Atma of the Golden Claw

-
Atma of the Griffon's Claw

-
Atma of the Harvester

-
Atma of the Hateful Stream

-
Atma of the Heavens

-
Atma of the Heir

-
Atma of the Hero

-
Atma of the Holy Mountain

-
Atma of the Horned Beast

-
Atma of the Hybrid Beast

-
Atma of the Illuminator

-
Atma of the Impaler

-
Atma of the Impenetrable

-
Atma of the Impregnable Tower

-
Atma of the Kirin

-
Atma of the Lake Lurker

-
Atma of the Lightning Beast
-
Atma of the Lion

-
Atma of the Lone Wolf

-
Atma of the Master Crafter

-
Atma of the Merciless Matriarch

-
Atma of the Minikin Monstrosity

-
Atma of the Mounted Champion

-
Atma of the Murky Miasma

-
Atma of the Noxious Bloom

-
Atma of the Noxious Fang

-
Atma of the Omnipotent

-
Atma of the Persistent Predator

-
Atma of the Plaguebringer

-
Atma of the Raised Tail

-
Atma of the Rapid Reptilian

-
Atma of the Razed Ruins

-
Atma of the Rescuer

-
Atma of the Royal Lineage

-
Atma of the Sand Emperor

-
Atma of the Sanguine Scythe

-
Atma of the Savage Tiger

-
Atma of the Savior

-
Atma of the Scarlet Wing

-
Atma of the Scorpion Queen

-
Atma of the Sea Daughter

-
Atma of the Sellsword

-
Atma of the Shattering Star

-
Atma of the Shimmering Shell
-
Atma of the Shrieking One

-
Atma of the Siren Shadow

-
Atma of the Smiting Blow

-
Atma of the Smoldering Sky

-
Atma of the Solitary One

-
Atma of the Stone God
