(→Weakness Targeting: Can Endlesspath please refrain from putting up the same information when it's been removed. Your information is anecdotal and therefore should be on the DISCUSSION PAGE) |
|||
| Line 721: | Line 721: | ||
==Weakness Targeting== |
==Weakness Targeting== |
||
| − | [[Image:Chart elements.jpg|thumb|right|Elemental Relationships]] |
||
Striking at a foe's weakness may also cause the creature to yield additional treasures in defeat, but the probability will decrease if the same strategy is applied repeatedly. |
Striking at a foe's weakness may also cause the creature to yield additional treasures in defeat, but the probability will decrease if the same strategy is applied repeatedly. |
||
Revision as of 12:31, 20 October 2010
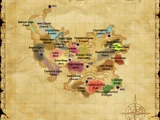
Abyssea Areas
Vision of Abyssea Areas
| Abyssea - Konschtat | Abyssea - La Theine | Abyssea - Tahrongi |

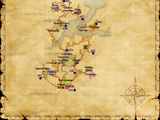
Scars of Abyssea Areas
| Abyssea - Attohwa | Abyssea - Misareaux | Abyssea - Vunkerl |
Introduction
Hushed whispers tell of the appearance of new Cavernous
Maws that serve as gateways to a heretofore uncharted frontier.
Those who dare to venture through to the vast bleakness beyond
return with harrowing tales of an unforgiving world long forsaken
by the gods--a world called Abyssea, whose sanguine sky is an
ever-present portent of looming destruction.
There, the savage baying of creatures at once surreal and dreadful
strikes a chilling counterpoint to the anguished wailing of the land
as it crumbles and falls to chasmic depths.
Far above the horizon, the moon is aglow in serene radiance, a
great jewel of hope shining against a bloody veil of death...
Power and riches beyond yer wildest dreams await ye. An' other things not quite so pleasant.
Things that aren't like t' take kindly to ye runnin' off with their spoils--or with yer life...
A crazed glint flickers across the old man's eye. Oh yes, well does he know Abyssea,
he mutters. Take him at his word, and he himself is a refugee from that sunless,
Goddess-forsaken realm. A fortunate soul--if such a phrase can be used--who escaped
the clutches of the fell hordes that tore comrades and loves ones from his grasp.
Desperately he fled across the shattered, barren landscape before stumbling into the
gaping maw of darkness that led him to this realm...
Me home...it's dyin'. And these old bones are long past their days o' playin' hero.
But ye, young one...ye might be just the salve that Abyssea needs...
Official Abyssea Site and Play Guide
EU
- Info Site: http://www.playonline.com/ff11eu/addon/index.html
- Guide: http://www.playonline.com/pcd/verup/ff11eu/detail/5589/detail.html
US
- Info Site: http://www.playonline.com/ff11eu/addon/index.html
- Guide: http://www.playonline.com/pcd/verup/ff11us/detail/5578/detail.html
How to Get Started
Users must have installed and registered FINAL FANTASY XI, PlayOnline, and the "Rise of the Zilart" and "Wings of the Goddess" expansions in order to play "Vision of Abyssea" and "Scars of Abyssea."
Due to the timed nature of all Abyssea content, it is highly recommended to complete the following simple first step as soon as possible following the registration of the appropriate expansions.
- Travel to Port Jeuno for the first quest A Journey Begins. Talk to Joachim in Port Jeuno (H-8). Following a cutscene, Joachim will give you a Traverser Stone. At this point, Joachim will start producing more Traverser Stones for you, but in order to actually receive any more, you must first complete the quest The Truth Beckons by entering Abyssea.
- Head to one of the Cavernous Maws located at: Tahrongi Canyon (H-12), Konschtat Highlands (I-12), La Theine Plateau (E-4), Buburimu Peninsula (F-7), Valkurm Dunes (I-9), Jugner Forest (J-8). Examine it for a cutscene, and examine it again to enter Abyssea. (You must be on a job with a level of 30 or higher to enter Abyssea.)
- It is not necessary to do anything once inside Abyssea to complete The Truth Beckons. However, you may wish to exchange your first Traverser Stone for 30 minutes of Visitant status before leaving. (Unused visitant time up to 120 minutes is preserved for your next visit to any Abyssea area.)
Traverser Stones and Visitant Time
- After claiming your first Traverser Stone, a hidden cumulative timer will start, and Joachim will begin producing more stones for you. After completing The Truth Beckons, you will be able to claim any subsequent stones Joachim has made up to that point (if any). The time continues to accumulate even while you are not logged into the game, in a similar manner to Imperial Army I.D. Tags for Assault.
- When the hidden timer reaches a certain increment (at first, it is 20 hours Earth time), you will be able to claim a new Traverser Stone from Joachim. Initially, taking a stone from Joachim will cost you 20 hours of your hidden "banked time". This cost can be reduced by possessing "Abyssites of Celerity" (see below for details). If sufficient time hasn't been accumulated, Joachim will not have any stones to give you, but he will tell you how much time remains until he will have another stone.
- Initially, up to a maximum of 3 stones can be on your person at one time. This amount can be increased by possessing "Abyssites of Avarice" (see below for details). There is no known limit to how much banked time you may have, and therefore, no known limit to how many stones Joachim can hold for you.
- Possessing "Abyssites of Celerity" will allow you to obtain Traverser Stones at a faster rate. Each Abyssite of Celerity possessed will reduce the time cost of a stone by 4 hours. Due to the nature of the "time bank" mechanic for obtaining more stones, this means that at the moment an Abyssite of Celerity is obtained, it will immediately take effect on any banked time you already have and it will appear that Joachim has suddenly made more stones for you. There are currently two Abyssites of Celerity obtainable, reducing the cost of a stone to a minimum of 12 hours. (A third Abyssite of Celerity will likely be introduced upon the release of the Heroes of Abyssea expansion.)
- Possessing "Abyssites of Avarice" will allow you to carry more Traverser Stones. Each Abyssite of Avarice possessed enables you to carry one additional stone. There are currently two Abyssites of Avarice obtainable, allowing a maximum of 5 stones to be carried. (A third Abyssite of Avarice will likely be introduced upon the release of the Heroes of Abyssea expansion.)
- Upon entering any Abyssea area, you will have 5 minutes of preparation time before you must obtain Visitant status from the nearby Conflux Surveyor in the area. If you fail to gain Visitant status before the 5 minutes is up, you will be ejected from Abyssea.
- Visitant is a separate time bank for all Abyssea areas that controls how much longer you can stay in Abyssea on any particular visit. The status is required in order to journey anywhere in Abyssea past the Searing Wards (large glowing barriers at the end of the encampment area), and several NPCs will not acknowledge you if you do not have the status. Upon exiting Abyssea, any Visitant time that was not used is preserved and can be used on your next visit. Visitant status may be obtained with a starting maximum value of 120 minutes, which can be reached by exchanging Traverser Stones, retaining Visitant time from a previous visit, or some combination of the two. If Visitant time is allowed to completely expire, you will be ejected from Abyssea.
- When requesting Visitant status, you are given the option of expending Traverser Stones to obtain more Visitant time on top of any time retained from your last visit to Abyssea (if any). Each stone used will initially grant 30 minutes of Visitant time.
- Possessing "Abyssites of Sojourn" will increase the time granted by each Traverser Stone exchanged. Each Abyssite of Sojourn possessed increase the time granted from one stone by 3 minutes. There are currently four Abyssites of Sojourn obtainable, which increases time granted by one stone to a maximum of 42 minutes. (More Abyssites of Sojourn will likely be introduced upon the release of the Heroes of Abyssea expansion.)
- It is also possible to receive additional Visitant time by opening time extension chests. These can be randomly discovered in high-leveled blue Sturdy Pyxides dropped by enemies (see below for details).
- Provided you are able to continuously obtain sufficient time extensions, there is no known limit to how much Visitant time can be accumulated for a single visit.
- If you leave an Abyssea area with more than 120 minutes of Visitant time accrued, the excess time over 120 minutes is essentially lost, as it is not possible to reobtain Visitant status with a starting value of more than 120 minutes.
- The game makes a record of the total of how much Visitant time you have started an Abyssea run with, plus how much time you have received from time extension chests on your current visit. If this total is less than 120 minutes, you will be able to return to the Conflux Surveyor and extend your current Visitant status by exchanging more Traverser Stones.
- Warning: Any time granted by additional stones is added to the above total, which still may not exceed the initial starting value of 120 minutes. If adding a stone exceeds the 120 minute limit, any "overflow" time is lost. (Example: You start an Abyssea run with 80 minutes of Visitant time, get three 10-minute time extension chests which increases the total to 110 minutes, and decide to exchange another stone -- this stone will only grant you 10 minutes of Visitant time, regardless of how much time you had remaining.)
- The chat log will display notices on remaining Visitant time at specific intervals, as well as whenever the time is extended. In addition, resting will display your remaining Visitant duration at any time.
- Your Visitant time bank is shared among all Abyssea areas, allowing you to move between them as you see fit without the need of additional Traverser Stones for each visit (if time permits)
- If you exit Abyssea with fewer than 5 minutes of Visitant time remaining (or if it completely expires), or exit without ever obtaining Visitant status, a 60-minute restriction is imposed, during which time you will not be able to enter any Abyssea area. The time remaining on this restriction can be viewed by examining any Cavernous Maw that leads to an Abyssea area. ("Your body cannot cope with further strain. You must rest for another X minutes.")
- Note that unlike other status effects, Visitant duration cannot be "frozen" in place by logging out, or by conversing with or examining an NPC/object. Remaining Visitant time can only be halted (and preserved for a future visit) by exiting the area entirely.
- Attempting to leave the primary encampment without obtaining Visitant status will cause you to be warped back into the encampment after approximately 10 seconds. The Searing Ward marks the dividing line between the encampment and the rest of the area; crossing this line will start the countdown if you do not possess Visitant status.
- Although enemies do not passively wander into the encampment, aggressive enemies will continue to pursue players past the Searing Ward into the encampment if taken there. As such, it cannot be used like a zone for easy escape.
Adventuring Inside Abyssea
Abyssea is an alternate world parallel to Vana'diel. Each Abyssea areas is notably similar to a counterpart area in Vana'diel. Upon entering Abyssea you are placed inside the main encampment. This encampment is where most transactions and quests are undertaken, and it is also the place to locate the Conflux Surveyor that grants Visitant status. The boundary of the encampment is marked by glowing Searing Wards, noting the point where relative safety ends. From here there are a few basic things you may want to know. Some aspects of Abyssea are covered in further detail underneath their own headings below.
- Experience Points gain works under slightly different mechanics inside Abyssea:
- Status effects that increase EXP gain, such as Dedication and Corsair's Roll, have no effect.
- The maximum base EXP/kill, which is 300 for level 61+ players, increases to 600 inside Abyssea. Some enemy types can exceed 600 slightly, whereas Notorious Monsters can greatly exceed it.
- EXP chains do not occur inside Abyssea. Instead, two hidden EXP bonuses can be built up in their place. A hidden "enemy chain" accumulates as the same type of enemy is killed in succession, and EXP gain gradually increases along with this chain. It must be the exact same type -- for instance, a Veld Clionid and a Ephemeral Clionid are not the same. Additionally, a second EXP bonus can be earned by building up "golden lights" from red Sturdy Pyxides. (see below for details)
- Enemies in Abyssea generally respawn very quickly, including Notorious Monsters.
- Enemies in Abyssea are capable of respawning at higher and lower levels than they were previously.
The system which determines the level they spawn at is closely tied to the speed at which they are slain.
If an enemy is slain quickly, it will tend to respawn at a higher level (and vice versa for slower kills).
In this way, enemies acclimate their levels to suit the strength of the party fighting them.
Only Notorious Monsters are exempt from this system.- It should be noted that the same rules for exp apply regardless of the enemy's level. As such it is technically possible to build a large chain without fighting enemies any stronger than a decent challenge. Similarly, light bonuses (specifically gold) can cause a decent challenge to award several hundred experience even without a chain bonus.
- The base level for all enemies in Abyssea seems to coincide with a decent challenge (as gauged by a level 85 player).
- Enemies may drop treasure chests, known as Sturdy Pyxides in Abyssea. These come in red, blue, and gold varieties, and contain a wide variety of contents. (See below for more details)
- Monsters with a glowing aura surrounding them (seen thus far in the Clionid, Limule, Murex, and Amoeban families, all of which bear the name Ephemeral instead of their usual area designation) are noted to award several times the experience points given by a normal enemy when defeated.
- If you are killed in Abyssea, accepting Tractor will place you back at the starting encampment and you will lose your visitant status, and will be kicked out of Abyssea in 5 minutes time. (Accepting Tractor is considered zoning.)
- If you disconnect while in Abyssea, you do not lose visitant status and retain all light and experience progress made since you entered.(however your time will still continue to tick down)
- All monsters are unable to be charmed.
Abyssea Quests
Integrated with the battle systems of Abyssea is a series of quests. Similar to the Wings of the Goddess Missions, there are a handful of general quests intertwined with quests specific to each area.
Abyssea Voidwalker Notorious Monsters
Inside Abyssea you can obtain Clear Demilune Abyssite for 300 cruor from the Cruor Prospector. This will allow you to contact unique Abyssea VNMs.
Abyssea Force Spawn Monsters
- Items marked with a * can be bought on the Auction House - Items in italics are key items that can drop from the NM.
- Abyssea - Tahrongi:
| Common Enemies | Notorious Monsters | |||
|---|---|---|---|---|
Artifact Armor Seals
The Encampment
Inside the encampment you will find several NPCs that will aid you on your adventures through abyssea.
Conflux Surveyor
The surveyor will tell you information about Traverser Stones and how they can be used to gain time inside Abyssea. Talking to him is necessary to advance inside Abyssea.
- The surveyor will grant you Visitant Status in exchange for a Traverser Stone. One stone will provide you with 30 minutes time inside the area.
- He will take more than one stone at once, up to 3 stones can be exchanged for extra time, plus additional stones for each abyssite of avarice in your possession.
- If you have time remaining from a previous visit to Abyssea, you will have the option of using that time without spending any stones. If you want to retain your previous visit's time you MUST do this before spending any stones.
Cruor Prospector
The prospector deals with all manners of cruor transactions. You will be able to buy new Armor, temporary items, and other things from him.
See Cruor Prospector for more details regarding available items.
Atma Infusionist
Will augment you if you are in possession of a Lunar Abyssite key item, have any Atma key item, and pay a small Cruor fee.
- Atma can be obtained from savage monsters in Abyssea
- When battling a NM, you must exploit its weakness (specifically Red) to have a good chance at obtaining an Atma.
(There is a very small chance of obtaining an Atma even if one does not trigger the NM weakness) - A monster's weakness may change in future battles (see next section below).
- You can have only one Atma active at a time, for each Lunar Abyssite in your possession.
- One may not use the same Atma more than once in order to multiply its effect; however, different Atma which grant similiar effects will stack.
- Atma can be infused or purged and replaced if desired, each Atma infusion carries the same Cruor fee.
- Unlike cruor prospector enhancement effects, atma effects won't wear off if you log out or disconnect while in abyssea.
- For a list of all Atmas - see the Atma (Status Effect) page.
- When battling a NM, you must exploit its weakness (specifically Red) to have a good chance at obtaining an Atma.
Weakness Targeting
Striking at a foe's weakness may also cause the creature to yield additional treasures in defeat, but the probability will decrease if the same strategy is applied repeatedly.
NMs can have multiple weaknesses, and they will shift to a random new one on each battle, this includes if it goes unclaimed and de-aggros. In order to solve whether the possible weakness is one of any possible weaponskill/spell or selected from a pool of potential moves, data is being collected in the forms below.
When one hits on the monster's weakness, a pair of exclamation marks(![]() ) appears over its name. The effects of triggering a weakness can vary widely and are explained below. According to NPC dialog, exploiting the weakness once will grant larger treasure rewards, potentially even ones normally unavailable, but hitting the same weakness repeatedly can negate the effect and remove the treasure bonus. However, exploiting each of the three types of weakness once can grant the expected results.
) appears over its name. The effects of triggering a weakness can vary widely and are explained below. According to NPC dialog, exploiting the weakness once will grant larger treasure rewards, potentially even ones normally unavailable, but hitting the same weakness repeatedly can negate the effect and remove the treasure bonus. However, exploiting each of the three types of weakness once can grant the expected results.
Those weaknesses will not be triggered if the enemy is in the middle of a TP move or casting a spell.
Red  Weakness
- - gained by using a specific elemental Weapon Skill on the mob
| Red | |
|---|---|
| Weapon Type | Weapon Skills |
| Club | Seraph Strike |
| Dagger | Cyclone, Energy Drain |
| Great Katana | Tachi: Jinpu, Tachi: Koki |
| Great Sword | Freezebite |
| Katana | Blade: Ei |
| Polearm | Raiden Thrust |
| Scythe | Shadow of Death |
| Staff | Sunburst, Earth Crusher |
| Sword | Red Lotus Blade, Seraph Blade |
Yellow Weakness
- - gained by casting a random magic spell on the monster, whose element matches the same element as the current day,
the previous day, or tomorrow. The current day should be with respect to when the monster was claimed (aggroed).- Greatly enhances drop rate for synthesis items and AF3 items (allows for multiple drops of seals/cards/stones/jewels).
- Inflicts Silence on the mob.
Blue Weakness
- - gained by using random physical Weapon Skill on the mob.
- Greatly enhances drop rate for equipment and weapon(s).
- Inflicts Amnesia on the mob.
- Essentially any weapon skill learned from 75-289 skill level that is not a red trigger is a possible blue trigger.
- There is a strong possibility of blue triggers being composed of a specific and narrow list of weapon skills.
This assumption follows the pattern already seen in red weakness triggers, yet more information is needed.
| Blue | |
|---|---|
| Weapon Type | Weapon Skills |
| Club | |
| Dagger | Dancing Edge |
| Great Katana | Tachi: Gekko |
| Great Sword | |
| Katana | |
| Polearm | |
| Scythe | |
| Staff | |
| Sword | Savage Blade, Swift Blade |
See the discussion page for more information about specific mobs and potential triggers.
Fame
Each area in Abyssea has its own fame progression, with an NPC in each main encampment to list your current fame level.
- In Abyssea - Konschtat, the fame NPC is Flaco (A).
- In Abyssea - La Theine, the fame NPC is Namonutice (A).
- In Abyssea - Tahrongi, the fame NPC is Zabirego-Hajigo (A).
- In Abyssea - Attohwa, the fame NPC is Mendi (A).
- In Abyssea - Misareaux, the fame NPC is Izabele (A).
- In Abyssea - Vunkerl, the fame NPC is Gulemont (A).
* Note: See the Quick Reputation Guide for details on building fame posthaste in a particular area.
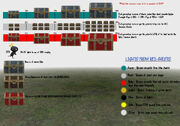
Sturdy Pyxis Mechanisms
Upon defeating normal enemies within Abyssea, there is a chance for a treasure chest called a Sturdy Pyxis to appear where the defeated enemy lay. There are various kinds of pyxides and all have different mechanisms to open them. Players should take care to complete the challenges and open the chests before they disappear, because they may find such valuable commodities as cruor, experience points, and items. The type and contents of the pyxides that appear depend on the color(s) of your body's feeble aura.
- Upon checking the chest you are given the option to see what is inside the chest.
- Blue Chests will give general statements of their contents and quantity of contents. Red Chests will describe the light within them and its intensity. Gold Chests will provide a list of the exact items within the chest.
- Be aware that if you are dead when a chest with experience/cruor is opened, you will receive NO experience/cruor, so be careful!
- The lock puzzles on each chests can be avoided by using Forbidden Keys to open the chests directly. Forbidden Keys may be used at any point, meaning that you may attempt the puzzle and still use the key if you are at risk of failing the puzzle.
Blue Pyxis: Dial Twisting
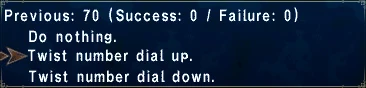
- Upon opening this particular type of chest you are given a number, two options, a required number of successes, and the amount of times you can fail before losing the chest.
- The number you are given is a randomly generated number from 1 to 99. You must decide whether the next randomly generated number is going to be higher or lower than the previous one stated.
- If you think the new number is higher, choose "Turn the dial up.". If you think the new number is lower, choose "turn the dial down.".
- To maximize your chances of making a correct guess, consider the number of possibilities above and below the given number. For example, if the random number is 75, there are 74 lower numbers and only 24 higher numbers.
- You must guess correctly for the required amount of successes before running out of attempts and before time runs out.
- Upon successfully opening the chest, you and other party members will be able to reap the rewards inside.
Red Pyxis: Pressure Adjustment
- Upon opening this particular type of chest you are given the target air pressure necessary to unlock the chest. You must land within a specified range of pressure for the chest to open.
- You are given options to either increase or decrease your current air pressure, your options are presented to you in three tier strengths for either increasing or decreasing your current air pressure.
- The actual increase or decrease in air pressure is dependent on the number of notches the lever is pushed, as well as the current description of the chest mechanism.
- You are given only a limited number of attempts to adjust the air pressure, and a limited time to make such adjustments before the chest will disappear.
- Upon landing in the correct air pressure range, the chest will open and yield its reward.
- The current description of the strength are The sound of air escaping is faintly audible, The mechanism appears to be in good nick, The mechanism's adjuster lever rattles fitfully, The mechanism is silent to the point of eeriness.
- When it appears to be in good nick, reducing the pressure 3 times will make the pressure go down between 31~35 units.
- When it is silent to the point of eeriness, reducing the pressure 3 times will make the pressure go down between 44~49 units.
- When it is silent to the point of eeriness, increasing the pressure 1 time will make the pressure go up around 15 units.
- When its adjuster lever rattles fitfully, reducing the pressure 3 times will make the pressure go down between 14~47 units.
- When the sound of air escaping is faintly audible, reducing the pressure 2 times will make the pressure go down around 21 units.
- When the sound of air escaping is faintly audible, reducing the pressure 3 times will make the pressure go down around 36 units.
Gold Pyxis: Guessing Game
- These chests operate on a principle similar to the Treasure Caskets in original and Zilart zones.
- The unlock code number is between 11 and 33, 11 and 44, 11 and 55, 11 and 77, or 11 and 99 (large gold crates only), depending on the difficulty of the crate. If an incorrect number is input, the pyxis states whether the secret number is higher or lower than the guess, and gives a hint regarding one, or both, of the digits (for example, one of the digits is 3 or the second digit is 6, 7 or 8 or the first digit is odd or the sum of the two digits is 11; the secret number would be 38).
- A helpful strategy to employ is to use the median number of the range as your first guess, thereby eliminating half the possibilities (thanks to to always receiving a greater-than or less-than clue), then continue using the clues offered to find the correct number.
- The chest disappears if five incorrect guesses are made or time runs out.
- See the Gold Sturdy Pyxis page for more information regarding items obtainable.
Pyxis Contents
Blue pyxides
Contains:
- assorted single temporary items or temporary item sets, distributed directly to all party/alliance members
- experience points (250 EXP to 1250 EXP)
- cruor (200 cruor to 1000 cruor)
- restoration (effect depends on quality of pyxis; strongest possible restoration is full HP/MP recovery, 300% TP and abilities reset)
- a "strangely familiar stone" (10 additional minutes of Visitant status)
Building Azure Light will increase the frequency and the quality of Blue chests.
Except for restorations and assorted temporary items, all contents are distributed directly to the members of the party/alliance and are not divided among them. Restorations are granted to the player who opens the pyxis. Individual temporary items can be taken by anyone in the party/alliance after the pyxis has been unlocked.
Higher tiers result in more temporary item sets over assorted singles, greater quantities of experience points or cruor, better restorations, and more frequent time extensions.
The level/quality of a Blue Pyxis can easily be determined by the number of successful guesses that are required to open it. The more guesses that are required, the higher the quality, and the better the rewards.
Red pyxides
Contains:
- Ruby light
- Azure light
- Pearlescent light
- Amber light
- Silvery light
- Golden light
- Ebon light
Building Ruby Light will increase the frequency and the quality of Red chests.
All people in your party/alliance will have the light added/enhanced upon opening the chest.
Higher tiers result in higher potency, and higher quality lights. Ebon, Silvery, and Golden lights are higher quality than Ruby, Azure, Pearlescent and Amber.
Gold pyxides
Contents vary by size.
- Small chests contain Augmented Items, powerful Temporary Items, equipment, crafting materials, and Notorious Monster forced spawn items.
- Large chests contain spell scrolls, rare crafting materials, rare NM forced spawn items and key items.
Building Amber Light will increase the frequency and quality of Gold chests.
Items within the chest can be obtained directly from the chest. After the Sep. 2010 update, non-augmented items may be placed into the treasure pool after the chest has been successfully opened.
See Gold Sturdy Pyxis for more information.
By traveling deep into Abyssea you will find Veridical Confluxes scattered about the land. These confluxes serve as teleporters between one another. In order to use each one you must first activate it by paying a fee in cruor and then another small fee to use the teleport option.
- There are 8 Confluxes in each area of Abyssea.
- The cruor cost to activate each conflux is equal to: 50*Conflux#. For example, conflux #1 costs 50 cruor to activate and conflux #5 costs 250 cruor to activate.
- Conflux #1 is free to teleport to after the activation fee.
- In Scars of Abyssea areas, the cost to activate a conflux is 200*conflux#. Conflux #00 is automatically activated by default.
Abyssea Goals
You have freedom over your actions. There is no specific objective to accomplish once inside. However, there are several suggested objectives. The objectives go as follow:
- Complete all quests in the area.
- Reward: 8,000 Cruor
- Obtain every Ancient Abyssite in this area.
- Reward: 10,000 Cruor
- Obtain every Atma available in this area.
- Reward: 12,000 Cruor
Players can complete each of these objectives in all three areas, all three abyssean areas possess different quests, atmas, and abyssite. The only exception to this involves the abyssite objective, which requires five area specific abyssite to be obtained, yet also designates the three purchasable ivory abyssite as part of the objective; therefore, one can obtain the three ivory abyssite and have three of the eight abyssite necessary to complete the objective for all three abyssean areas.
There is no reward for completing all three objectives for any particular abyssean area.
Cruor
Cruor works as Abyssea's currency. You obtain Cruor by defeating monsters and you can trade them for various products and services including armors, temporary items, key items that will help you in Abyssea, temporary stat boosts, Atma infusion, activating and using Veridical Confluxes to teleport around the area and more.
Martello
The Martellos are set up around each area and serve as replenishers for adventurers. Each of them has a certain amount of energy and each of its restoration given to an adventurer will deplete its energy reserve. To replenish a martello, an adventure must agree to help a Machine Outfitter located at the camp site to participate in a replenishing errand. You will then obtain a key item. Once you check a martello, you will be given the choice to replenish its energy levels. The direction you face affects the amount replenished. ![]()
Using a martello will fully restore whatever option was chosen, but can only be used once every 30 minutes. The amount of energy used is listed after each option. Restoring HP after weakness wears or MP during a boss fight (if near a Martello) can prove to be useful to maximize time spent in Abyssea.
If you have acquired the Ivory Abyssite of Expertise and Jade Abyssite of Expertise, it will reduce the cool-down time on Martello use by 5 minutes each.
Temporary Items
Players may make use of a wide variety of Temporary Items while adventuring in Abyssea. Temporary items can be purchased from Cruor Prospectors, obtained from Blue and Gold Pyxides, and dropped randomly from Notorious Monsters and/or Ephemeral enemies. Temporary items vary greatly in potency and effect (some items have similar names/effects yet grant a far stronger bonus than their low tier counterparts); low tier items can be obtained from Blue Pyxides or bought from Cruor Prospectors, but high tier items must be obtained from Notorious Monsters and Gold/Giant Pyxides. Once a player acquires a particular temporary item, that item will remain with the player until it is used or discarded. Players may only hold one of each type of temporary item at a time (multiple of similar types provided they are of different tier strength), and players may only hold up to 50 temporary items total.
Abyssea Lights
Lights or Auras are obtained randomly when defeating an enemy in Abyssea. Players will gain a message telling them that their body is radiating with a light of a certain strength and color, these messages only inform the player as to how much additional light is being added to their existing aura. Four of the seven light colors have significant effects upon the chests which may drop upon defeating an enemy in Abyssea, and are obtained upon finishing an enemy via a particular damage type. The remaining three lights are obtainable only through opening Red chests; two of the lights serve to enhance the experience and cruor rewards granted by defeating enemies by raising their floor value; the final light enhances the strength of all six other lights by a minor amount. Players can possess multiple light colors at different strengths without losing the effect or potency of previous lights. Each player possesses their own individual aura strength level for each color light, and only the player who lands the finishing blow upon the enemy will have their aura contribute to the possible chest drop; thus alliances should be aware of newer members with weaker auras landing a finishing blow accidentally, which can cause the chests to drop at a lower tier or potentially not drop at all. Furthermore, lights may lose potency over time, however this has proven difficult to verify or measure. Certain Abyssite are thought to cause particular light colors to increase at a faster rate than normal, such Abyssite are said to increase a player's "fortune" with a particular chest type. All light bonuses are lost when players leaves the area, and thus must be built back up again upon their next visit.

Abyssea Chest and Light Chart
Physical Lights
- Pearlescent: All sturdy pyxides will appear with greater frequency.
- Obtained by defeating a Mob using Physical Melee, Ranged attacks, any Blood Pact: Rage (including magical ones), or from a Red Pyxides at any time.
- Maximum Light Determined by a 95% chests spawn ratio.
- Obtained by defeating a Mob using Physical Melee, Ranged attacks, any Blood Pact: Rage (including magical ones), or from a Red Pyxides at any time.
- Ruby: Red pyxides will appear with greater frequency and yield superior spoils.
- Obtained by defeating a Mob using using Physical Weaponskills, or from a Red Pyxides.
- Maximum Light Determined by Red pyxides Yielding almost exclusively Golden and Silvery Light.
- Note: Some mobs such as Blood Bats, Caoineag and Pachypodium do not build Ruby light from Weaponskills and it must be built from Red Chest drops.
- Obtained by defeating a Mob using using Physical Weaponskills, or from a Red Pyxides.
Magical Lights
| Weaponskills that Activate Amber Light | Monsters that give Amber Light |
|---|---|
| Aeolian Edge | Ypotryll |
| Blade: Ei | |
| Blade: Yu | |
| Cyclone |
|
| Gust Slash |
|
| Herculean Slash | |
| Infernal Scythe | Abyssobugard |
| Raiden Thrust | |
| Leaden Salute | |
| Primal Rend | |
| Raiden Thrust | |
| Red Lotus Blade | Crapaudy |
| Sanguine Blade | Ignis Eruca |
| Shockwave | |
| Tachi: Jinpu | |
| Tachi: Koki | |
| Trueflight |
- Azure: Blue pyxides will appear with greater frequency and yield superior spoils.
- Obtained by defeating a Mob using Magical attacks, including but not limited to Blue Magic Physical and Magical, Black Magic, White Magic, and Skillchain Damage, or from a Red Pyxides at any time.
- Maximum Light determined by a Blue Sturdy Pyxide Yielding 1250 XP, 1000 Cruor, Multiple Temporary Items, or Time Extensions.
- Obtained by defeating a Mob using Magical attacks, including but not limited to Blue Magic Physical and Magical, Black Magic, White Magic, and Skillchain Damage, or from a Red Pyxides at any time.
- Amber: Gold pyxides will appear with greater frequency and yield superior spoils.
- Obtained by defeating a Mob with an Elemental Weaponskill, or from a Red Pyxides.
- Maximum Light Determined by Giant Gold pyxides spawning.
- Obtained by defeating a Mob with an Elemental Weaponskill, or from a Red Pyxides.
Red Chest Exclusive Light
- Golden: The adventurer will gain experience at an increased rate, Faint light increases Experience by 10XP and Strong light increases EXP by 15.
- Obtained from a Red Pyxides after a set amount of Ruby Light is Accumulated (Roughly 50% of maximum).
- Maximum Light Determined when player's Experience points per kill cap at 600.(specific monsters may break this, up to 650. NMs ignore the cap completely and can give 5000+ depending on the NM even without Golden light)
- Obtained from a Red Pyxides after a set amount of Ruby Light is Accumulated (Roughly 50% of maximum).
- Silvery: The adventurer will obtain cruor at an increased rate of 5.
- Obtained from a Red Pyxides after a set amount of Ruby Light is Accumulated (Roughly 50% of maximum).
- Maximum Light Determined when player's Cruor per kill cap at 100.
- Obtained from a Red Pyxides after a set amount of Ruby Light is Accumulated (Roughly 50% of maximum).
- Ebon: A small bonus will be granted to all colored light effects.
- Obtained from a Red Pyxides after a set amount of Ruby Light is Accumulated (Roughly 25% of maximum).
- Maximum Light Determined when all previously listed Lights are Capped.
- Obtained from a Red Pyxides after a set amount of Ruby Light is Accumulated (Roughly 25% of maximum).
Size Matters and The Ephemeral
- Small monsters of the same family give more Cruor, but less experience points.
- Medium monsters of the same family give a normal amount of Cruor and experience points.
- Big monsters of the same family give less Cruor, but more experience points.
Ephemeral Monsters roam randomly around Abyssea inside other monster families, one per group.
- Ephemeral Monsters are Ephemeral Clionid, Ephemeral Limule, Ephemeral Murex and Ephemeral Amoeban.
- Ephemeral Monsters show their elemental aura.
- Ephemeral Monsters (and Abyssean Notorious Monsters) give 2x-5.25x more Experience Points and Cruor.
- Ephemeral Monsters show their elemental aura.
Experience Points
The rules for gaining experience points are altered in Abyssea:
- There are no experience points chains. However, this is compensated for in other ways as detailed below.
- Experience rings, such as the Emperor Band and other special abilities such as Corsair's Roll have no effect.
- Members of an alliance gain experience based on ordinary alliance experience calculations. Defeating an IT enemy in an alliance yields far less experience per person than in a party of six, due to the much larger number of members involved.
- Killing monsters of the same family will initially grant experience in accordance with ordinary experience calculations (based on party's level, monster's level, number of members, presence of alliance(s), and member(s) level differences). However, with each kill of a monster from the same family, the experience floor will gradually increase over time to much higher values. This invisible chain caps at 300XP per kill normally, and with the assistance of Gold and Ebon Light is increased to 600XP (in Vision of Abyssea areas) or up to 660XP (in Scars of Abyssea areas). Although called an experience chain, it is not specially influenced (beyond ordinary kill rates) by the number of mobs killed over a specific period of time (ie. no chain 1, 2, 3, etc), and it will not break if one fails to defeat a monster within a specific time frame.
- However, the invisible chain will reset if you kill a monster from a different family
or a Notorious Monster of the same family, but your bonus from Golden light is retained as long as you remain in Abyssea. To avoid losing your chain, if for some reason you fight a monster from another family (e.g. a mimic), simply Call for Help on the mob, and your chain will not be broken. - Certain mobs can reward higher experience than 600XP a kill, such as the Tonberries.
- However, the invisible chain will reset if you kill a monster from a different family
- The rules above also apply to limit points.
- Special advice for capping Time Extension's lights for the purpose of seal farming:
- Set your seal farming team to a max of 4 people, have at least 2 jobs that can do azure light kills (e.g. Blm/Sch/Rdm elemental magic, Bst>Primal Rend, Blu>physical/magic attks, etc). << Reason for # cap of 4 is that repops stay no higher then t (fast kills), vt+ take too long to kill.
- Use the Ephemeral Monsters as your primary targets due to the Azure light bonus (up to 10x ).
- Enjoy your time to do some seal farming presuming you've a competent mix of jobs appropriate for the type nms you are seal farming!
Ancient Abyssite
Scattered throughout the lands of Abyssea are ancient stones of great power, known as Ancient Abyssite. Each abyssite is known to grant favorable bonuses to its possessor while they travel through Abyssea, and thus can be a valuable asset for adventurers to seek and aquire. Five unique ancient abyssite stones can be found in each abyssean area. However, there are also six abyssite (three each for Visions and Scars) which can be bought from Cruor Prospectors for varying amounts of Cruor. Finally, there are six additional abyssite which are obtained through the completion of one or more special abyssea mission quests, yet do not count as abyssite required by the goal tracking NPC.
| Abyssites purchased from Cruor Prospector | ||
|---|---|---|
| Abyssite Name | Effect | Purchased for |
| Ivory Abyssite of Confluence | Reduces the cruor cost of using veridical confluxes in Abyssea. (Reduces cruor cost of using Veridical Conflux by 20%.) | 4800 Cruor in Vision of Abyssea areas. |
| Ivory Abyssite of Expertise | The bearer will be able to activate martellos more frequently. (Reduces the cool-down time on Martello use by 5 minutes.) | 4800 Cruor in Vision of Abyssea areas. |
| Ivory Abyssite of Sojourn | Enhances the potency of a traverser stone, allowing the bearer to abide in Abyssea for extended durations. (Will add 3 additional minutes for each stone you turn in.) | 6000 Cruor in Vision of Abyssea areas. |
| Ivory Abyssite of Avarice | Increases the quantity of traverser stones the bearer may possess by one. (Will increase the amount of stones you may hold by 1.) | 8000 Cruor in Scars of Abyssea areas. |
| Ivory Abyssite of Kismet | The bearer will experience greater fortune with blue treasure caskets in Abyssea. | 5000 Cruor in Scars of Abyssea areas. |
| Lunar Abyssite | Allows the bearer to be infused with the power of a single atma. | 100,000 Cruor in Scars of Abyssea areas. |
| Abyssites obtained from Abyssea mission quests* | ||
|---|---|---|
| Abyssite Name | Effect | Obtained from |
| Lunar Abyssite | Allows the bearer to be infused with the power of a single atma. | Obtained by completing the 1st different Abyssea mission quest. |
| Ivory Abyssite of Fortune | The bearer will come upon treasure caskets more frequently in Abyssea. | Obtained by completing the 2nd different Abyssea mission quest. |
| Ivory Abyssite of Acumen | Bestows the bearer with knowledge of Abyssean treasure casket locks. (Reduces successful attempts required to open a chest by 1.) | Obtained by completing the 3rd different Abyssea mission quest. |
| Ivory Abyssite of the Reaper | Enemies in Abyssea will yield cruor in greater quantities. (Increases an enemy's cruor yield by 10% for those with the key item.) | Obtained by completing the 4th different Abyssea mission quest. |
| Ivory Abyssite of Perspicacity | The bearer will gain experience more readily in Abyssea. | Obtained by completing the 5th different Abyssea mission quest. |
| Ivory Abyssite of Guerdon | The bearer will be granted temporary items upon receiving visitant status. (Grants a Catholicon and a Dusty Elixir upon obtaining Visitant Status). | Obtained by completing the 6th different Abyssea mission quest. |
* Abyssea mission quests include: A Goldstruck Gigas, To Paste a Peiste, Megadrile Menace, The Beast of Bastore, A Delectable Demon, and A Fluttery Fiend.
| Abyssites found in Abyssea - Konschtat | ||
|---|---|---|
| Abyssite Name | Effect | Obtained from |
| Azure Abyssite of Celerity | Renders the bearer's traverser stone more rapidly replenished. (Will decrease the time between each stone by 4 hours.) | Drops from Tonberry Bedevilers and Cryptonberry Occultists in Abyssea - Konschtat. Only initial attacker may obtain. |
| Azure Abyssite of Lenity | Reduces the experience penalty suffered by the bearer when incapacitated by the Abyssean hordes. (10% EXP loss reduction) | Drops from Pavan, Ephemeral Limule and Sods Limule in Abyssea - Konschtat. Only initial attacker may obtain. |
| Azure Abyssite of Merit | Increases in maximum HP and MP and other beneficial effects will gain greater potency. (Grants and increase of 10% HP and 5% MP respectively.) | Obtained by completing the Abyssea - Konschtat quest Playing Paparazzi. |
| Azure Abyssite of Prosperity | The bearer will experience greater fortune with red treasure caskets in Abyssea. | Obtained by completing the Abyssea - Konschtat quest Addled Mind, Undying Dreams. |
| Azure Abyssite of the Reaper | Enemies in Abyssea will yield cruor in greater quantities. (Increases an enemy's cruor yield by 10% for those with the key item.) | Drops from Fear Gorta in Abyssea - Konschtat. Drops to entire alliance. |
| Abyssites found in Abyssea - La Theine | ||
|---|---|---|
| Abyssite Name | Effect | Obtained from |
| Scarlet Abyssite of Furtherance | Attribute bonuses and other beneficial effects will gain greater potency. (Adds an additional +10 to attribute bonuses.) | Obtained by completing the Abyssea - La Theine quest An Eye for Revenge. |
| Scarlet Abyssite of Kismet | The bearer will experience greater fortune with blue treasure caskets in Abyssea. | Obtained by completing the Abyssea - La Theine quest Out of Touch. |
| Scarlet Abyssite of Lenity | Reduces the experience penalty suffered by the bearer when incapacitated by the Abyssean hordes. (10% EXP loss reduction) | Drops from Mangy-tailed Marvin in Abyssea - La Theine. Only initial attacker may obtain. |
| Scarlet Abyssite of Sojourn | Enhances the potency of a traverser stone, allowing the bearer to abide in Abyssea for extended durations. (Will add 3 additional minutes for each stone you turn in.) | Drops from Ovni in Abyssea - La Theine. Drops to entire alliance. |
| Scarlet Abyssite of Perspicacity | The bearer will gain experience more readily in Abyssea. | Drops from Chasmic Hornet in Abyssea - La Theine. Only initial attacker may obtain. |
| Abyssites found in Abyssea - Tahrongi | ||
|---|---|---|
| Abyssite Name | Effect | Obtained from |
| Viridian Abyssite of Avarice | Increases the quantity of traverser stones the bearer may possess by one. (Will increase the amount of stones you may hold by 1.) | Drops from Ephemeral Clionid, Manananggal and Quetzalli in Abyssea - Tahrongi. Only initial attacker may obtain. |
| Viridian Abyssite of Destiny | The bearer will experience greater fortune with golden treasure caskets in Abyssea. | Drops from Ephemeral Limule, Cuelebre, Manananggal, and Mictlantecuhtli in Abyssea - Tahrongi. Only initial attacker may obtain. |
| Viridian Abyssite of Guerdon | The bearer will be granted temporary items upon receiving visitant status. (Grants a Lucid Potion I and a Lucid Ether I upon obtaining Visitant Status.) | Obtained by completing the Abyssea - Tahrongi quest When Good Cardians Go Bad. |
| Viridian Abyssite of Lenity | Reduces the experience penalty suffered by the bearer when incapacitated by the Abyssean hordes. (10% EXP loss reduction) |
Obtained by completing the Abyssea - Tahrongi quest For Love of a Daughter 5 times. |
| Viridian Abyssite of Merit | Increases in maximum HP and MP and other beneficial effects will gain greater potency. (Grants an increase of 10% HP and 5% MP respectively.) | Drops from Manananggal, Bhumi and Mictlantecuhtli in Abyssea - Tahrongi. Only initial attacker may obtain. |
| Abyssites found in Abyssea - Vunkerl | ||
|---|---|---|
| Abyssite Name | Effect | Obtained from |
| Crimson Abyssite of Acumen | Bestows the bearer with knowledge of Abyssean treasure casket locks. (Reduces successful attempts required to open a chest by 1.) | Drops from Armillaria in Abyssea - Vunkerl. Drops to entire alliance. |
| Crimson Abyssite of Celerity | Renders the bearer's traverser stone more rapidly replenished. (Will decrease the time between each stone by 4 hours.) | Obtained by completing the Abyssea - Vunkerl quest Whither the Whisker. |
| Crimson Abyssite of Confluence | Reduces the cruor cost of using veridical confluxes in Abyssea. (Reduces cruor cost of using Veridical Conflux by 20%.) | Drops from Pascerpot in Abyssea - Vunkerl. Drops to entire alliance. |
| Crimson Abyssite of Destiny | The bearer will experience greater fortune with golden treasure caskets in Abyssea. | Drops from Iktomi in Abyssea - Vunkerl. Drops to entire alliance. |
| Crimson Abyssite of Lenity | Reduces the experience penalty suffered by the bearer when incapacitated by the Abyssean hordes. (10% EXP loss reduction) | Obtained by completing the Abyssea - Vunkerl quest His Bridge, His Beloved. |
| Abyssites found in Abyssea - Attohwa | ||
|---|---|---|
| Abyssite Name | Effect | Obtained from |
| Jade Abyssite of Expertise | The bearer will be able to activate martellos more frequently. (Reduces the cool-down time on Martello use by 5 minutes.) | Drops from Wherwetrice in Abyssea - Attohwa. Drops to entire alliance. |
| Jade Abyssite of Lenity | Reduces the experience penalty suffered by the bearer when incapacitated by the Abyssean hordes. (10% EXP loss reduction) | Obtained by completing the Abyssea - Attohwa quest Hazy Prospects. |
| Jade Abyssite of Merit | Increases in maximum HP and MP and other beneficial effects will gain greater potency. (Grants and increase of 10% HP and 5% MP respectively.) | Drops from Warbler in Abyssea - Attohwa. Drops to entire alliance. |
| Jade Abyssite of Prosperity | The bearer will experience greater fortune with red treasure caskets in Abyssea. | Obtained by completing the Abyssea - Attohwa quest Flown the Coop. |
| Jade Abyssite of Sojourn | Enhances the potency of a traverser stone, allowing the bearer to abide in Abyssea for extended durations. (Will add 3 additional minutes for each stone you turn in.) | Drops from Mielikki in Abyssea - Attohwa. Drops to entire alliance. |
| Abyssites found in Abyssea - Misareaux | ||
|---|---|---|
| Abyssite Name | Effect | Obtained from |
| Sapphire Abyssite of Fortune | The bearer will come upon treasure caskets more frequently in Abyssea. | Drops from Npfundlwa in Abyssea - Misareaux. Drops to entire alliance. |
| Sapphire Abyssite of Furtherance | Attribute bonuses and other beneficial effects will gain greater potency. (Adds an additional +10 to attribute bonuses.) | Drops from Flame Skimmer in Abyssea - Misareaux. Drops to entire alliance. |
| Sapphire Abyssite of Lenity | Reduces the experience penalty suffered by the bearer when incapacitated by the Abyssean hordes. (10% EXP loss reduction). | Drops from Tuskertrap in Abyssea - Misareaux. Drops to entire alliance. |
| Sapphire Abyssite of Merit | Increases in maximum HP and MP and other beneficial effects will gain greater potency. (Grants and increase of 10% HP and 5% MP respectively.) | Obtained by completing the Abyssea - Misareaux quest Wanted: Medical Supplies. |
| Sapphire Abyssite of Sojourn | Enhances the potency of a traverser stone, allowing the bearer to abide in Abyssea for extended durations. (Will add 3 additional minutes for each stone you turn in.) | Obtained by completing the Abyssea - Misareaux quest Destiny Odyssey. |
| Contents: | Top 0-9 A B C D E F G H I J K L M N O P Q R S T U V W X Y Z |
|---|
-
Abyssea - Grauberg -

Abyssea - Altepa -

Abyssea - Misareaux -

Abyssea - Attohwa -
Abyssea - La Theine -
Briareus -

Abyssea - Uleguerand -
Abyssea - Vunkerl
All items (829)
-
A Beaked Blusterer
-
A Delectable Demon
-
A Fluttery Fiend
-
A Goldstruck Gigas
-
A Journey Begins

-
A Man-eating Mite
-
A Mightier Martello (Altepa)
-
A Mightier Martello (Attohwa)
-
A Mightier Martello (Grauberg)
-
A Mightier Martello (Konschtat)
-
A Mightier Martello (La Theine)
-
A Mightier Martello (Misareaux)
-
A Mightier Martello (Tahrongi)
-
A Mightier Martello (Uleguerand)
-
A Mightier Martello (Vunkerl)
-
A Moonlight Requite
-
A Sea Dog's Summons
-
A Sterling Specimen
-
A Ward to End All Wards
-
Ab'xzomit

-
Abas

-
Category talk:Abyssea
-
Abyssea - Altepa

-
Abyssea - Altepa/Maps
-
Abyssea - Attohwa

-
Abyssea - Attohwa/Maps
-
Abyssea - Empyreal Paradox

-
Abyssea - Grauberg

-
Abyssea - Grauberg/Maps
-
Abyssea - Konschtat

-
Abyssea - Konschtat/Maps
-
Abyssea - La Theine

-
Abyssea - La Theine/Maps
-
Abyssea - Misareaux

-
Abyssea - Misareaux/Maps
-
Abyssea - Tahrongi

-
Abyssea - Tahrongi/Maps
-
Abyssea - Uleguerand

-
Abyssea - Uleguerand/Maps
-
Abyssea - Vunkerl

-
Abyssea - Vunkerl/Maps
-
Abyssea Areas

-
Abyssea Main Quests
-
Category:Abyssea NPCs
-
Category:Abyssea Quests
-
Abyssea Seal Titles and Jobs
-
Category:Abyssite
-
Abyssite of Discernment

-
Abyssite of the Cosmos

-
Abyssobugard

-
Ada (A)

-
Adamastor

-
Addled Mind, Undying Dreams
-
Adze

-
Aestutaur

-
Ajido-Marujido (A)

-
Alberic

-
Alectryon

-
Alkonost

-
Amuckatrice

-
An Acrididaen Anodyne
-
An Eye for Revenge
-
An Offer You Can't Refuse
-
An Officer and a Pirate
-
An Ulcerous Uragnite
-
Ansherekh

-
Anti-Abyssean grenade 01

-
Anti-Abyssean grenade 02

-
Anti-Abyssean grenade 03

-
Apururu (A)

-
Aqua Pura
-
Aqua Puraga
-
Arimaspi

-
Asanbosam

-
Ascetic's Gambir
-
Ashtaerth the Gallvexed

-
Category:Atma
-
Atma Fabricant

-
Atma Infusionist

-
Atma of a Future Fabulous

-
Atma of a Thousand Needles

-
Atma of Allure

-
Atma of Alpha and Omega

-
Atma of Apparitions

-
Atma of Aquatic Ardor

-
Atma of Baleful Bones

-
Atma of Blighted Breath

-
Atma of Calamity

-
Atma of Cloak and Dagger

-
Atma of Dread

-
Atma of Dunes

-
Atma of Echoes

-
Atma of Entwined Serpents

-
Atma of Eternity

-
Atma of Fires and Flares

-
Atma of Gales

-
Atma of Harmony

-
Atma of Hell's Guardian
-
Atma of Illusions

-
Atma of Ingenuity

-
Atma of Luminous Wings

-
Atma of Nightmares

-
Atma of Perfect Attendance

-
Atma of Purgatory

-
Atma of Revelations
-
Atma of Roaring Laughter

-
Atma of Stormbreath

-
Atma of the Ace Angler

-
Atma of the Adamantine

-
Atma of the Apocalypse

-
Atma of the Ascending One

-
Atma of the Avaricious Ape

-
Atma of the Azure Sky

-
Atma of the Banisher

-
Atma of the Baying Moon

-
Atma of the Beast King

-
Atma of the Beyond

-
Atma of the Blinding Horn

-
Atma of the Bludgeoning Brute

-
Atma of the Brother Wolf

-
Atma of the Burning Effigy

-
Atma of the Bushin

-
Atma of the Claw

-
Atma of the Clawed Butterfly

-
Atma of the Cobra Commander

-
Atma of the Cosmos

-
Atma of the Cradle

-
Atma of the Crimson Scale

-
Atma of the Crushing Cudgel

-
Atma of the Dark Blade

-
Atma of the Dark Depths

-
Atma of the Deep Devourer

-
Atma of the Demonic Lash

-
Atma of the Demonic Skewer

-
Atma of the Desert Worm

-
Atma of the Despot

-
Atma of the Dragon Rider

-
Atma of the Drifter

-
Atma of the Ducal Guard

-
Atma of the Earth Wyrm

-
Atma of the Ebon Hoof

-
Atma of the Einherjar

-
Atma of the Endless Nightmare

-
Atma of the Fallen One
-
Atma of the Fetching Footpad

-
Atma of the Foe Flayer

-
Atma of the Frozen Fetters

-
Atma of the Full Moon

-
Atma of the Glutinous Ooze

-
Atma of the Gnarled Horn

-
Atma of the Golden Claw

-
Atma of the Griffon's Claw

-
Atma of the Harvester

-
Atma of the Hateful Stream

-
Atma of the Heavens

-
Atma of the Heir

-
Atma of the Hero

-
Atma of the Holy Mountain

-
Atma of the Horned Beast

-
Atma of the Hybrid Beast

-
Atma of the Illuminator

-
Atma of the Impaler

-
Atma of the Impenetrable

-
Atma of the Impregnable Tower

-
Atma of the Kirin

-
Atma of the Lake Lurker

-
Atma of the Lightning Beast
-
Atma of the Lion

-
Atma of the Lone Wolf

-
Atma of the Master Crafter

-
Atma of the Merciless Matriarch

-
Atma of the Minikin Monstrosity

-
Atma of the Mounted Champion

-
Atma of the Murky Miasma

-
Atma of the Noxious Bloom

-
Atma of the Noxious Fang

-
Atma of the Omnipotent

-
Atma of the Persistent Predator

-
Atma of the Plaguebringer

-
Atma of the Raised Tail

-
Atma of the Rapid Reptilian

-
Atma of the Razed Ruins

-
Atma of the Rescuer

-
Atma of the Royal Lineage

-
Atma of the Sand Emperor

-
Atma of the Sanguine Scythe

-
Atma of the Savage Tiger

-
Atma of the Savior

-
Atma of the Scarlet Wing

-
Atma of the Scorpion Queen

-
Atma of the Sea Daughter

-
Atma of the Sellsword

-
Atma of the Shattering Star

-
Atma of the Shimmering Shell
-
Atma of the Shrieking One

-
Atma of the Siren Shadow

-
Atma of the Smiting Blow

-
Atma of the Smoldering Sky

-
Atma of the Solitary One

-
Atma of the Stone God
