m (Added recipe.) |
|||
| (13 intermediate revisions by 6 users not shown) | |||
| Line 1: | Line 1: | ||
| − | [[ja:ボムのうで |
+ | {{Item Sections}}[[ja:ボムのうで]] |
| + | <section begin="Item Image"/>{{Item Image|BombArm.JPG|Bomb Arm}}<section end="Item Image"/> |
||
| − | __NOTOC__ |
||
| − | [[File:BombArm.JPG|Bomb Arm]] |
||
| − | {|cellpadding="5" width="100%" |
||
| − | |width="50%" valign="top"| |
||
==Statistics== |
==Statistics== |
||
| + | {{Item Statistics |
||
| − | '''Bomb arm'''<br> |
||
| + | | type = Weapon |
||
| − | '''([[:Category:Throwing|Throwing]]) All Races'''<br> |
||
| + | | icon id = 17316 |
||
| − | '''DMG:''' 6 '''Delay:''' 300<br> |
||
| + | | name = Bomb arm |
||
| ⚫ | |||
| + | | weapon type = Throwing |
||
| ⚫ | |||
| + | | damage = 6 |
||
| − | <br><br>'''Damage Per Second:''' 1.2<br> |
||
| + | | delay = 300 |
||
| − | '''TP Per Hit:''' 7.8%<br><br> |
||
| ⚫ | |||
| − | '''Stackable:''' 12 |
||
| + | | level = 5 |
||
| ⚫ | |||
| + | | stackable = 12 |
||
| ⚫ | |||
| − | |width="50%" valign="top"| |
||
==Other Uses== |
==Other Uses== |
||
| + | {{Used In |
||
| − | '''[[:Category:Quests|Used in Quest]]:''' [[Curses, Foiled...Again!?]] |
||
| + | | quest = Curses, Foiled...Again!? |
||
| − | <br><br> |
||
| − | + | | resale price = {{Resale Price|145|153}} |
|
| + | }} |
||
| ⚫ | |||
| + | |||
| − | |width="50%" valign="top"| |
||
| − | ==Synthesis Recipes== |
+ | ==Synthesis Recipes== |
| + | {{Synthesis Recipe|None}} |
||
| − | ''None'' |
||
| − | |width="50%" valign="top"| |
||
==Used in Recipes== |
==Used in Recipes== |
||
| − | + | {{rl|Cannon Shell|Alchemy|94|Smithing|34|Goldsmithing|18}} |
|
| − | + | {{rl|Shell Lamp|Bonecraft|94|Alchemy|42}} |
|
| − | + | {{rl|Lik Kabob|Cooking|19}} |
|
| + | {{rl|Kotatsu Table|Woodworking|50|Clothcraft|24?}} |
||
| ⚫ | |||
| + | {{Synthesis Recipe|None}} |
||
| ⚫ | |||
| ⚫ | |||
| + | {{rl|None}} |
||
| − | |width="50%" valign="top"| |
||
| − | |||
| ⚫ | |||
| − | ''None'' |
||
| − | |||
| − | |width="50%" valign="top"| |
||
| ⚫ | |||
| − | *''None'' |
||
| ⚫ | |||
==How to Obtain== |
==How to Obtain== |
||
{{AH|Weapons|Ammo & Misc.|Ammunition}} |
{{AH|Weapons|Ammo & Misc.|Ammunition}} |
||
===Merchants=== |
===Merchants=== |
||
| + | {|class="ffxi-table wide-table" |
||
| − | :{| width="60%" cellpadding="2" cellspacing="2" |
||
| + | |- class="ffxi-header" |
||
| − | | |
+ | |colspan="3"|'''Price:''' ~780 gil |
| − | |- BGCOLOR="#ffdead" |
||
| ⚫ | |||
!width="30%"| Name |
!width="30%"| Name |
||
!width="35%"| Location |
!width="35%"| Location |
||
!width="35%"| Type |
!width="35%"| Type |
||
| ⚫ | |||
| − | |- BGCOLOR="#e3e6ff" |
||
| − | | [[ |
+ | | [[Nogga]] |
| − | | |
+ | | {{Location|Metalworks|G-7}} |
| − | | |
+ | | {{Merchant|Standard}} |
|} |
|} |
||
| + | ===Green Thumb Moogle=== |
||
| − | |||
| + | {{Green Thumb Moogle|800|Bomb memento}} |
||
===Mining=== |
===Mining=== |
||
| + | {|class="ffxi-table wide-table" |
||
| − | :{| width="40%" cellpadding="3" cellspacing="2" |
||
| + | |- |
||
| − | |- style="background:#ffdead;" |
||
!width="60%"| Zone |
!width="60%"| Zone |
||
!width="40%"| Rarity |
!width="40%"| Rarity |
||
| − | |- |
+ | |- valign="top" |
| [[Ifrit's Cauldron]] |
| [[Ifrit's Cauldron]] |
||
| Rare |
| Rare |
||
|} |
|} |
||
| − | ===Dropped |
+ | ===Dropped By=== |
| + | {|class="ffxi-table wide-table" |
||
| − | :{| width="60%" cellpadding="2" cellspacing="2" |
||
| + | |- |
||
| − | |- style="background:#ffdead;" |
||
!width="35%"| Name |
!width="35%"| Name |
||
!width="15%"| Level |
!width="15%"| Level |
||
!width="60%"| Zone |
!width="60%"| Zone |
||
| − | |- |
+ | |- valign="top" |
|rowspan="4"| [[Balloon]] |
|rowspan="4"| [[Balloon]] |
||
|align="center"| 8-10 |
|align="center"| 8-10 |
||
| [[East Sarutabaruta]] |
| [[East Sarutabaruta]] |
||
| + | |- |
||
| − | |- style="background:#e3e6ff;" |
||
|align="center"| 8-10 |
|align="center"| 8-10 |
||
| [[West Sarutabaruta]] |
| [[West Sarutabaruta]] |
||
| + | |- |
||
| − | |- style="background:#e3e6ff;" |
||
|align="center"| 8-10 |
|align="center"| 8-10 |
||
| [[Inner Horutoto Ruins]] |
| [[Inner Horutoto Ruins]] |
||
| + | |- |
||
| − | |- style="background:#e3e6ff;" |
||
|align="center"| 8-10 |
|align="center"| 8-10 |
||
| [[Outer Horutoto Ruins]] |
| [[Outer Horutoto Ruins]] |
||
| − | |- |
+ | |- valign="top" |
|rowspan="2"| [[Bomb]] |
|rowspan="2"| [[Bomb]] |
||
|align="center"| 8-10 |
|align="center"| 8-10 |
||
| [[East Ronfaure]] |
| [[East Ronfaure]] |
||
| + | |- |
||
| − | |- style="background:#e3e6ff;" |
||
|align="center"| 8-10 |
|align="center"| 8-10 |
||
| [[West Ronfaure]] |
| [[West Ronfaure]] |
||
| − | |- |
+ | |- valign="top" |
|rowspan="2"| [[Shrapnel]] |
|rowspan="2"| [[Shrapnel]] |
||
|align="center"| 8-10 |
|align="center"| 8-10 |
||
| [[North Gustaberg]] |
| [[North Gustaberg]] |
||
| + | |- |
||
| − | |- style="background:#e3e6ff;" |
||
|align="center"| 8-10 |
|align="center"| 8-10 |
||
| [[South Gustaberg]] |
| [[South Gustaberg]] |
||
| − | |- |
+ | |- valign="top" |
|rowspan="3"| [[Grenade (Monster)|Grenade]] |
|rowspan="3"| [[Grenade (Monster)|Grenade]] |
||
|align="center"| 15-17 |
|align="center"| 15-17 |
||
| [[Tahrongi Canyon]] |
| [[Tahrongi Canyon]] |
||
| + | |- |
||
| − | |- style="background:#e3e6ff;" |
||
|align="center"| 15-17 |
|align="center"| 15-17 |
||
| [[La Theine Plateau]] |
| [[La Theine Plateau]] |
||
| + | |- |
||
| − | |- style="background:#e3e6ff;" |
||
|align="center"| 15-17 |
|align="center"| 15-17 |
||
| [[Konschtat Highlands]] |
| [[Konschtat Highlands]] |
||
| − | |- |
+ | |- class="bg-nm" valign="top" |
| '''[[Bomb King]] ([[NM]])''' |
| '''[[Bomb King]] ([[NM]])''' |
||
|align="center"| 16-18 |
|align="center"| 16-18 |
||
| [[Outer Horutoto Ruins]] |
| [[Outer Horutoto Ruins]] |
||
| − | |- |
+ | |- valign="top" |
| [[Glide Bomb]] |
| [[Glide Bomb]] |
||
|align="center"| 20-21 |
|align="center"| 20-21 |
||
| [[Carpenters' Landing]] |
| [[Carpenters' Landing]] |
||
| − | |- |
+ | |- valign="top" |
|rowspan="7"| [[Will-o'-the-Wisp]] |
|rowspan="7"| [[Will-o'-the-Wisp]] |
||
|align="center"| 22-25 |
|align="center"| 22-25 |
||
| [[Inner Horutoto Ruins]] |
| [[Inner Horutoto Ruins]] |
||
| + | |- |
||
| − | |- style="background:#e3e6ff;" |
||
|align="center"| 23-25 |
|align="center"| 23-25 |
||
| [[Ordelle's Caves]] |
| [[Ordelle's Caves]] |
||
| + | |- |
||
| − | |- style="background:#e3e6ff;" |
||
|align="center"| 24-25 |
|align="center"| 24-25 |
||
| [[Meriphataud Mountains]] |
| [[Meriphataud Mountains]] |
||
| + | |- |
||
| − | |- style="background:#e3e6ff;" |
||
|align="center"| 24-25 |
|align="center"| 24-25 |
||
| [[Jugner Forest]] |
| [[Jugner Forest]] |
||
| + | |- |
||
| − | |- style="background:#e3e6ff;" |
||
|align="center"| 25-26 |
|align="center"| 25-26 |
||
| [[Carpenters' Landing]] |
| [[Carpenters' Landing]] |
||
| + | |- |
||
| − | |- style="background:#e3e6ff;" |
||
|align="center"| 25-27 |
|align="center"| 25-27 |
||
| [[Buburimu Peninsula]] |
| [[Buburimu Peninsula]] |
||
| + | |- |
||
| − | |- style="background:#e3e6ff;" |
||
|align="center"| 25-27 |
|align="center"| 25-27 |
||
| [[Valkurm Dunes]] |
| [[Valkurm Dunes]] |
||
| − | |- |
+ | |- valign="top" |
| [[Fox Fire]] |
| [[Fox Fire]] |
||
|align="center"| 24-25 |
|align="center"| 24-25 |
||
| [[Pashhow Marshlands]] |
| [[Pashhow Marshlands]] |
||
| − | |- |
+ | |- valign="top" |
|rowspan="2"| [[Spunkie]] |
|rowspan="2"| [[Spunkie]] |
||
|align="center"| 28-30 |
|align="center"| 28-30 |
||
| [[Gusgen Mines]] |
| [[Gusgen Mines]] |
||
| + | |- |
||
| − | |- style="background:#e3e6ff;" |
||
|align="center"| 32 |
|align="center"| 32 |
||
| [[Carpenters' Landing]] |
| [[Carpenters' Landing]] |
||
| − | |- |
+ | |- valign="top" |
| [[Napalm]] |
| [[Napalm]] |
||
|align="center"| 31-33 |
|align="center"| 31-33 |
||
| [[Ordelle's Caves]] |
| [[Ordelle's Caves]] |
||
| − | |- |
+ | |- valign="top" |
|rowspan="5"| [[Ignis Fatuus]] |
|rowspan="5"| [[Ignis Fatuus]] |
||
|align="center"| 34-36 |
|align="center"| 34-36 |
||
| [[Rolanberry Fields]] |
| [[Rolanberry Fields]] |
||
| + | |- |
||
| − | |- style="background:#e3e6ff;" |
||
|align="center"| 34-36 |
|align="center"| 34-36 |
||
| [[Sauromugue Champaign]] |
| [[Sauromugue Champaign]] |
||
| + | |- |
||
| − | |- style="background:#e3e6ff;" |
||
|align="center"| 34-36 |
|align="center"| 34-36 |
||
| [[Batallia Downs]] |
| [[Batallia Downs]] |
||
| + | |- |
||
| − | |- style="background:#e3e6ff;" |
||
|align="center"| 35-37 |
|align="center"| 35-37 |
||
| [[Bibiki Bay]] |
| [[Bibiki Bay]] |
||
| + | |- |
||
| − | |- style="background:#e3e6ff;" |
||
|align="center"| 35-37 |
|align="center"| 35-37 |
||
| [[Bibiki Bay - Purgonorgo Isle]] |
| [[Bibiki Bay - Purgonorgo Isle]] |
||
| − | |- |
+ | |- valign="top" |
| [[Feu Follet]] |
| [[Feu Follet]] |
||
|align="center"| 35-38 |
|align="center"| 35-38 |
||
| [[Gusgen Mines]] |
| [[Gusgen Mines]] |
||
| − | |- |
+ | |- valign="top" |
| [[Will-o'-the-Wykes]] |
| [[Will-o'-the-Wykes]] |
||
|align="center"| 41 |
|align="center"| 41 |
||
| [[Attohwa Chasm]] |
| [[Attohwa Chasm]] |
||
| − | |- |
+ | |- valign="top" |
|rowspan="5"| [[Puroboros]] |
|rowspan="5"| [[Puroboros]] |
||
|align="center"| 42-44 |
|align="center"| 42-44 |
||
| [[Eldieme Necropolis]] |
| [[Eldieme Necropolis]] |
||
| + | |- |
||
| − | |- style="background:#e3e6ff;" |
||
|align="center"| 43-45 |
|align="center"| 43-45 |
||
| [[Garlaige Citadel]] |
| [[Garlaige Citadel]] |
||
| + | |- |
||
| − | |- style="background:#e3e6ff;" |
||
|align="center"| 45 |
|align="center"| 45 |
||
| [[Crawlers' Nest]] |
| [[Crawlers' Nest]] |
||
| + | |- |
||
| − | |- style="background:#e3e6ff;" |
||
|align="center"| 47-49 |
|align="center"| 47-49 |
||
| [[Sanctuary of Zi'Tah]] |
| [[Sanctuary of Zi'Tah]] |
||
| + | |- |
||
| − | |- style="background:#e3e6ff;" |
||
|align="center"| 51-54 |
|align="center"| 51-54 |
||
| [[Yhoator Jungle]] |
| [[Yhoator Jungle]] |
||
| − | |- |
+ | |- valign="top" |
| [[Lava Bomb]] |
| [[Lava Bomb]] |
||
|align="center"| 47-49 |
|align="center"| 47-49 |
||
| [[Yuhtunga Jungle]] |
| [[Yuhtunga Jungle]] |
||
| − | |- |
+ | |- valign="top" |
| [[Azer]] |
| [[Azer]] |
||
|align="center"| 51-53 |
|align="center"| 51-53 |
||
| [[Eldieme Necropolis]] |
| [[Eldieme Necropolis]] |
||
| − | |- |
+ | |- valign="top" |
| [[Explosure]] |
| [[Explosure]] |
||
|align="center"| 52-53 |
|align="center"| 52-53 |
||
| [[Garlaige Citadel]] |
| [[Garlaige Citadel]] |
||
| − | |- |
+ | |- class="bg-nm" valign="top" |
| '''[[Dark Spark]] ([[NM]])''' |
| '''[[Dark Spark]] ([[NM]])''' |
||
|align="center"| 55 |
|align="center"| 55 |
||
| [[Castle Zvahl Baileys]] |
| [[Castle Zvahl Baileys]] |
||
| − | |- |
+ | |- valign="top" |
| [[Hellmine]] |
| [[Hellmine]] |
||
|align="center"| 59-62 |
|align="center"| 59-62 |
||
| [[Garlaige Citadel]] |
| [[Garlaige Citadel]] |
||
| − | |- |
+ | |- valign="top" |
| [[Volcanic Gas]] |
| [[Volcanic Gas]] |
||
|align="center"| 62-68 |
|align="center"| 62-68 |
||
| [[Ifrit's Cauldron]] |
| [[Ifrit's Cauldron]] |
||
| − | |- |
+ | |- valign="top" |
| [[Enna-enna]] |
| [[Enna-enna]] |
||
|align="center"| 65-69 |
|align="center"| 65-69 |
||
| [[Cape Teriggan]] |
| [[Cape Teriggan]] |
||
| − | |- |
+ | |- valign="top" |
| [[Cannonball]] |
| [[Cannonball]] |
||
|align="center"| 67-68 |
|align="center"| 67-68 |
||
| [[Ro'Maeve]] |
| [[Ro'Maeve]] |
||
| − | |- |
+ | |- valign="top" |
|rowspan="2"| [[Bifrons]] |
|rowspan="2"| [[Bifrons]] |
||
|align="center"| 68-70 |
|align="center"| 68-70 |
||
| [[Den of Rancor]] |
| [[Den of Rancor]] |
||
| + | |- |
||
| − | |- style="background:#e3e6ff;" |
||
|align="center"| 74-76 |
|align="center"| 74-76 |
||
| [[Attohwa Chasm]] |
| [[Attohwa Chasm]] |
||
| − | |- |
+ | |- valign="top" |
| − | + | | [[Friar Rush]] |
|
|align="center"| 70 |
|align="center"| 70 |
||
| [[Den of Rancor]] |
| [[Den of Rancor]] |
||
| − | |- |
+ | |- valign="top" |
| [[Volcanic Bomb]] |
| [[Volcanic Bomb]] |
||
|align="center"| 71-78 |
|align="center"| 71-78 |
||
| [[Ifrit's Cauldron]] |
| [[Ifrit's Cauldron]] |
||
| − | |- |
+ | |- valign="top" |
| [[Teine Sith]] |
| [[Teine Sith]] |
||
|align="center"| 75-77 |
|align="center"| 75-77 |
||
| [[Bibiki Bay]] |
| [[Bibiki Bay]] |
||
| − | |- |
+ | |- class="bg-nm" valign="top" |
| '''[[Bomb Queen]] ([[NM]])''' |
| '''[[Bomb Queen]] ([[NM]])''' |
||
|align="center"| 80-81 |
|align="center"| 80-81 |
||
| [[Ifrit's Cauldron]] |
| [[Ifrit's Cauldron]] |
||
|} |
|} |
||
| − | |||
===[[Treasure Casket]]=== |
===[[Treasure Casket]]=== |
||
:*[[Konschtat Highlands]] |
:*[[Konschtat Highlands]] |
||
Latest revision as of 02:04, 18 January 2020
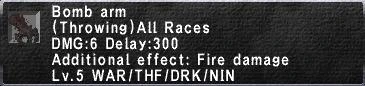
Statistics
Bomb arm
(Throwing) All Races
Damage Per Second: 1.2
TP Per Hit: 78
Stackable: 12
Other Uses
Resale Price: 145~153 gil
Synthesis Recipes
None
Used in Recipes
 94 34 18 Cannon Shell
- 94 42 Shell Lamp
- 19 Lik Kabob
- 50 24? Kotatsu Table
Desynthesis Recipes
None
Obtained from Desynthesis
- None
How to Obtain
Auction House Category: Weapons > Ammo & Misc. > Ammunition ![]()
Can be obtained as a random reward from the Gobbie Mystery Box Special Dial and similar sources.
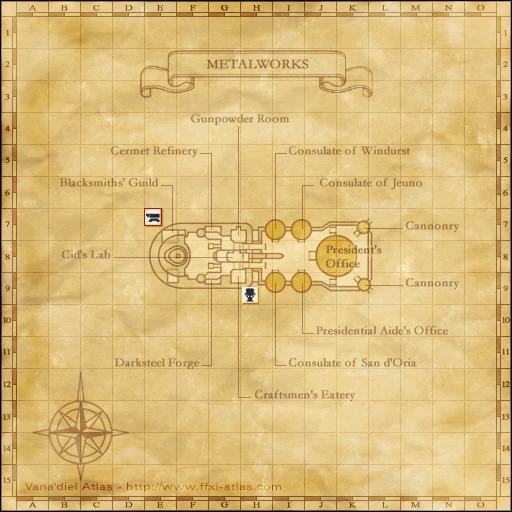
Merchants
| Price: ~780 gil | ||
| Name | Location | Type |
|---|---|---|
| Nogga | Metalworks (G-7) | Standard Merchant |
Green Thumb Moogle
| Price: 800 gil | ||
| Name | Location | Key Item |
|---|---|---|
| Green Thumb Moogle | Mog Garden | |
Mining
| Zone | Rarity |
|---|---|
| Ifrit's Cauldron | Rare |