No edit summary |
(→[[Harvesting]]: reordered from most common to least common, and added in Abundance template info) |
||
| Line 181: | Line 181: | ||
|align="center" width="5%" rowspan="2"| |
|align="center" width="5%" rowspan="2"| |
||
|align="center" rowspan="2"| |
|align="center" rowspan="2"| |
||
| ⚫ | |||
| ⚫ | |||
| ⚫ | |||
| ⚫ | |||
| ⚫ | |||
| ⚫ | |||
|- style="background:#d5d9ff;" |
|- style="background:#d5d9ff;" |
||
|style="padding-left:1em;" |[[Fresh Marjoram]] |
|style="padding-left:1em;" |[[Fresh Marjoram]] |
||
| − | |style="padding-left:1em;" | |
+ | |style="padding-left:1em;" |{{Abundance|111|634}} |
|- style="background:#d5d9ff;" |
|- style="background:#d5d9ff;" |
||
|style="padding-left:1em;" |[[Mohbwa Grass]] |
|style="padding-left:1em;" |[[Mohbwa Grass]] |
||
| − | |style="padding-left:1em;" | |
+ | |style="padding-left:1em;" |{{Abundance|94|634}} |
|- style="background:#d5d9ff;" |
|- style="background:#d5d9ff;" |
||
|style="padding-left:1em;" |[[Pephredo Hive Chip]] |
|style="padding-left:1em;" |[[Pephredo Hive Chip]] |
||
| − | |style="padding-left:1em;" | |
+ | |style="padding-left:1em;" |{{Abundance|94|634}} |
|- style="background:#d5d9ff;" |
|- style="background:#d5d9ff;" |
||
| − | |style="padding-left:1em;" |[[ |
+ | |style="padding-left:1em;" |[[Imperial Tea Leaves]] |
| − | |style="padding-left:1em;" | |
+ | |style="padding-left:1em;" |{{Abundance|71|634}} |
|- style="background:#d5d9ff;" |
|- style="background:#d5d9ff;" |
||
| − | |style="padding-left:1em;" |[[ |
+ | |style="padding-left:1em;" |[[Coffee Cherries]] |
| − | |style="padding-left:1em;" | |
+ | |style="padding-left:1em;" |{{Abundance|70|634}} |
| ⚫ | |||
| ⚫ | |||
| ⚫ | |||
|- style="background:#d5d9ff;" |
|- style="background:#d5d9ff;" |
||
|style="padding-left:1em;" |[[Simsim]] |
|style="padding-left:1em;" |[[Simsim]] |
||
| − | |style="padding-left:1em;" | |
+ | |style="padding-left:1em;" |{{Abundance|65|634}} |
|- style="background:#d5d9ff;" |
|- style="background:#d5d9ff;" |
||
|style="padding-left:1em;" |[[Red Moko Grass]] |
|style="padding-left:1em;" |[[Red Moko Grass]] |
||
| − | |style="padding-left:1em;" | |
+ | |style="padding-left:1em;" |{{Abundance|40|634}} |
| ⚫ | |||
| ⚫ | |||
| ⚫ | |||
| ⚫ | |||
| ⚫ | |||
| ⚫ | |||
| ⚫ | |||
| ⚫ | |||
| ⚫ | |||
|- style="background:#d5d9ff;" |
|- style="background:#d5d9ff;" |
||
|- |
|- |
||
Revision as of 21:48, 22 November 2007
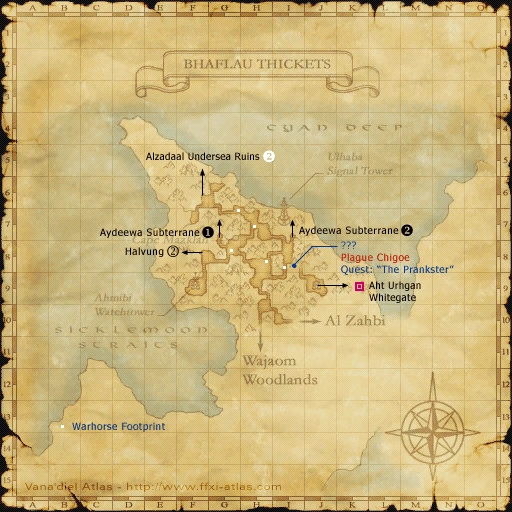
Bhaflau Thickets 1
Map Acquisition
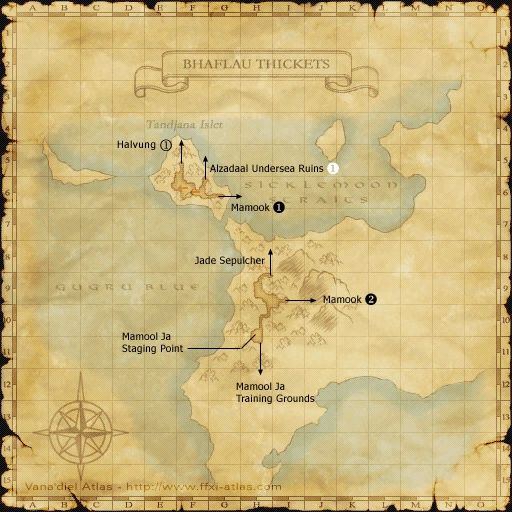
Bhaflau Thickets 2
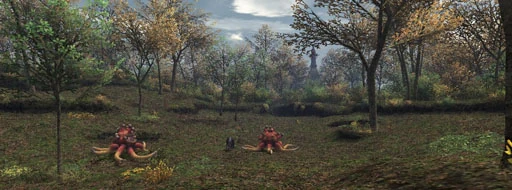
The Bhaflau Thickets is a lush wooded area caught between the waters of the Cyan Deep and Sicklemoon Straits. Lying just outside the teeming city of Al Zahbi, adventurers are often spotted sneaking through the thickets on their way to the beastmen strongholds of Mamook and Halvung. Those not cautious enough will face a wide array of unfriendly beasts, from the gigantic Marids to tiny Chigoes, from the slow Treants to darting Puks. Be prepared, the thickets can claim even the most well-seasoned adventurer. Connecting AreasMap 1
Map 2
|
Involved in Quests/Missions
|
Quest |
Type |
Starter |
Location |
| Promotion: Superior Private | General | Naja Salaheem | Aht Urhgan Whitegate (I-10) |
| The Prankster | Map | Ahaadah | Aht Urhgan Whitegate (G-6) |
| Mission | Country | Starter | Location |
| Aht Urhgan Mission 2: Immortal Sentries | Aht Urhgan | Naja Salaheem | Aht Urhgan Whitegate (I-10) |
Notorious Monsters Found Here
Template:TableMobHeader |- |BGCOLOR="#FFD9D9"|Berried Chigoe
|align="center" BGCOLOR="#FFD9D9"|Unknown |align="center" BGCOLOR="#FFD9D9"| |align="center" BGCOLOR="#FFD9D9"| |align="center" BGCOLOR="#FFD9D9"|Chigoes |align="center" BGCOLOR="#FFD9D9"| |align="center" BGCOLOR="#FFD9D9"| |- |BGCOLOR="#FFD9D9"|Chigoe's Nit
|align="center" BGCOLOR="#FFD9D9"| |align="center" BGCOLOR="#FFD9D9"| |align="center" BGCOLOR="#FFD9D9"| |align="center" BGCOLOR="#FFD9D9"|Chigoes |align="center" BGCOLOR="#FFD9D9"|1 |align="center" BGCOLOR="#FFD9D9"| |- |BGCOLOR="#FFD9D9"|Emergent Elm
|align="center" BGCOLOR="#FFD9D9"|Unknown
|align="center" BGCOLOR="#FFD9D9"|Arborist Nails
Gloom Claymore
|align="center" BGCOLOR="#FFD9D9"|
|align="center" BGCOLOR="#FFD9D9"|Treants
|align="center" BGCOLOR="#FFD9D9"|1
|align="center" BGCOLOR="#FFD9D9"|
|-
|BGCOLOR="#FFD9D9"|Plague Chigoe
|align="center" BGCOLOR="#FFD9D9"| |align="center" BGCOLOR="#FFD9D9"| |align="center" BGCOLOR="#FFD9D9"| |align="center" BGCOLOR="#FFD9D9"|Chigoes |align="center" BGCOLOR="#FFD9D9"|1 |align="center" BGCOLOR="#FFD9D9"| |- |align="center" colspan="5" BGCOLOR="#ffdead"|
HP = Detects Low HP; M = Detects Magic; Sc = Follows by Scent; T(S) = True-sight; T(H) = True-hearing
JA = Detects job abilities; WS = Detects weaponskills; Z(D) = Asleep in Daytime; Z(N) = Asleep at Nighttime; A(R) = Aggressive to Reive participants
|}
Mobs Found Here
Template:TableMobHeader |- |BGCOLOR="#D5D9FF"|Aht Urhgan Attercop
|align="center" BGCOLOR="#D5D9FF"|63 - 65 |align="center" BGCOLOR="#D5D9FF"| |align="center" BGCOLOR="#D5D9FF"| |align="center" BGCOLOR="#D5D9FF"|Spiders |align="center" BGCOLOR="#D5D9FF"| |align="center" BGCOLOR="#D5D9FF"|L, H |- |BGCOLOR="#D5D9FF"|Air Elemental
|align="center" BGCOLOR="#D5D9FF"|75 |align="center" BGCOLOR="#D5D9FF"| |align="center" BGCOLOR="#D5D9FF"| |align="center" BGCOLOR="#D5D9FF"|Elementals |align="center" BGCOLOR="#D5D9FF"| |align="center" BGCOLOR="#D5D9FF"|A, M |- |BGCOLOR="#D5D9FF"|Ameretat
|align="center" BGCOLOR="#D5D9FF"|65 - 66 |align="center" BGCOLOR="#D5D9FF"| |align="center" BGCOLOR="#D5D9FF"| |align="center" BGCOLOR="#D5D9FF"|Morbols |align="center" BGCOLOR="#D5D9FF"| |align="center" BGCOLOR="#D5D9FF"|A, H |- |BGCOLOR="#D5D9FF"|Azoth Apsaras
|align="center" BGCOLOR="#D5D9FF"|Unknown |align="center" BGCOLOR="#D5D9FF"| |align="center" BGCOLOR="#D5D9FF"| |align="center" BGCOLOR="#D5D9FF"|Pugils |align="center" BGCOLOR="#D5D9FF"| |align="center" BGCOLOR="#D5D9FF"| |- |BGCOLOR="#D5D9FF"|Battle Bugard
|align="center" BGCOLOR="#D5D9FF"|82 |align="center" BGCOLOR="#D5D9FF"| |align="center" BGCOLOR="#D5D9FF"| |align="center" BGCOLOR="#D5D9FF"|Bugards |align="center" BGCOLOR="#D5D9FF"|8 - Tandjana Islet only |align="center" BGCOLOR="#D5D9FF"|A, H, L |- |BGCOLOR="#D5D9FF"|Chigoe
|align="center" BGCOLOR="#D5D9FF"|71 - 73 |align="center" BGCOLOR="#D5D9FF"|Chimera Blood |align="center" BGCOLOR="#D5D9FF"| |align="center" BGCOLOR="#D5D9FF"|Chigoes |align="center" BGCOLOR="#D5D9FF"|from Marid and Grand Marid |align="center" BGCOLOR="#D5D9FF"|A, H, S, L |- |BGCOLOR="#D5D9FF"|Colibri
|align="center" BGCOLOR="#D5D9FF"|71 - 73
|align="center" BGCOLOR="#D5D9FF"|Colibri Beak
Colibri Feather
|align="center" BGCOLOR="#D5D9FF"|
|align="center" BGCOLOR="#D5D9FF"|Colibri
|align="center" BGCOLOR="#D5D9FF"|
|align="center" BGCOLOR="#D5D9FF"|S
|-
|BGCOLOR="#D5D9FF"|Colorful Treant
|align="center" BGCOLOR="#D5D9FF"|75 - 76 |align="center" BGCOLOR="#D5D9FF"| |align="center" BGCOLOR="#D5D9FF"| |align="center" BGCOLOR="#D5D9FF"|Treants |align="center" BGCOLOR="#D5D9FF"| |align="center" BGCOLOR="#D5D9FF"|A, H |- |BGCOLOR="#D5D9FF"|Date Eruca
|align="center" BGCOLOR="#D5D9FF"|72 - 74
|align="center" BGCOLOR="#D5D9FF"|Crawler Egg
Crawler Cocoon
Silk Thread
|align="center" BGCOLOR="#D5D9FF"|
|align="center" BGCOLOR="#D5D9FF"|Crawlers
|align="center" BGCOLOR="#D5D9FF"|
|align="center" BGCOLOR="#D5D9FF"|A, H, Z(N)
|-
|BGCOLOR="#D5D9FF"|Fomor Bard
|align="center" BGCOLOR="#D5D9FF"|63 - 65 |align="center" BGCOLOR="#D5D9FF"| |align="center" BGCOLOR="#D5D9FF"| |align="center" BGCOLOR="#D5D9FF"|Fomors |align="center" BGCOLOR="#D5D9FF"| |align="center" BGCOLOR="#D5D9FF"|A, H, HP, JA |- |BGCOLOR="#D5D9FF"|Fomor Beastmaster
|align="center" BGCOLOR="#D5D9FF"|63 - 65 |align="center" BGCOLOR="#D5D9FF"| |align="center" BGCOLOR="#D5D9FF"| |align="center" BGCOLOR="#D5D9FF"|Fomors |align="center" BGCOLOR="#D5D9FF"| |align="center" BGCOLOR="#D5D9FF"|A, H, HP, JA |- |BGCOLOR="#D5D9FF"|Fomor Paladin
|align="center" BGCOLOR="#D5D9FF"|63 - 65 |align="center" BGCOLOR="#D5D9FF"| |align="center" BGCOLOR="#D5D9FF"| |align="center" BGCOLOR="#D5D9FF"|Fomors |align="center" BGCOLOR="#D5D9FF"| |align="center" BGCOLOR="#D5D9FF"|A, H, HP, JA |- |BGCOLOR="#D5D9FF"|Fomor Thief
|align="center" BGCOLOR="#D5D9FF"|63 - 65 |align="center" BGCOLOR="#D5D9FF"| |align="center" BGCOLOR="#D5D9FF"| |align="center" BGCOLOR="#D5D9FF"|Fomors |align="center" BGCOLOR="#D5D9FF"| |align="center" BGCOLOR="#D5D9FF"|A, H, HP, JA |- |BGCOLOR="#D5D9FF"|Fomor's Bats
|align="center" BGCOLOR="#D5D9FF"|58 - 58 |align="center" BGCOLOR="#D5D9FF"| |align="center" BGCOLOR="#D5D9FF"| |align="center" BGCOLOR="#D5D9FF"|Bat Trios |align="center" BGCOLOR="#D5D9FF"| |align="center" BGCOLOR="#D5D9FF"| |- |BGCOLOR="#D5D9FF"|Grand Marid
|align="center" BGCOLOR="#D5D9FF"|80 - 80 |align="center" BGCOLOR="#D5D9FF"| |align="center" BGCOLOR="#D5D9FF"| |align="center" BGCOLOR="#D5D9FF"|Marids |align="center" BGCOLOR="#D5D9FF"| |align="center" BGCOLOR="#D5D9FF"| |- |BGCOLOR="#D5D9FF"|Greater Colibri
|align="center" BGCOLOR="#D5D9FF"|81-82 |align="center" BGCOLOR="#D5D9FF"| |align="center" BGCOLOR="#D5D9FF"| |align="center" BGCOLOR="#D5D9FF"|Colibri |align="center" BGCOLOR="#D5D9FF"|21 - Tandjana Islet only |align="center" BGCOLOR="#D5D9FF"|S, L |- |BGCOLOR="#D5D9FF"|Haunt
|align="center" BGCOLOR="#D5D9FF"|Unknown |align="center" BGCOLOR="#D5D9FF"| |align="center" BGCOLOR="#D5D9FF"| |align="center" BGCOLOR="#D5D9FF"|Ghosts |align="center" BGCOLOR="#D5D9FF"| |align="center" BGCOLOR="#D5D9FF"|A, H, HP |- |BGCOLOR="#D5D9FF"|Incubus Bats
|align="center" BGCOLOR="#D5D9FF"|64-67 |align="center" BGCOLOR="#D5D9FF"| |align="center" BGCOLOR="#D5D9FF"| |align="center" BGCOLOR="#D5D9FF"|Giant Bats |align="center" BGCOLOR="#D5D9FF"|Northwest-most area of main map. Night only. |align="center" BGCOLOR="#D5D9FF"|A, L, H |- |BGCOLOR="#D5D9FF"|Kissing Leech
|align="center" BGCOLOR="#D5D9FF"|Unknown |align="center" BGCOLOR="#D5D9FF"| |align="center" BGCOLOR="#D5D9FF"| |align="center" BGCOLOR="#D5D9FF"|Leeches |align="center" BGCOLOR="#D5D9FF"| |align="center" BGCOLOR="#D5D9FF"| |- |BGCOLOR="#D5D9FF"|Lesser Colibri
|align="center" BGCOLOR="#D5D9FF"|63 - 65
|align="center" BGCOLOR="#D5D9FF"|Colibri Beak
Colibri Feather
|align="center" BGCOLOR="#D5D9FF"|
|align="center" BGCOLOR="#D5D9FF"|Colibri
|align="center" BGCOLOR="#D5D9FF"|
|align="center" BGCOLOR="#D5D9FF"|S
|-
|BGCOLOR="#D5D9FF"|Mamool Ja Blusterer
|align="center" BGCOLOR="#D5D9FF"|81-83 |align="center" BGCOLOR="#D5D9FF"| |align="center" BGCOLOR="#D5D9FF"| |align="center" BGCOLOR="#D5D9FF"|Mamool Ja |align="center" BGCOLOR="#D5D9FF"| |align="center" BGCOLOR="#D5D9FF"|A, L, S |- |BGCOLOR="#D5D9FF"|Mamool Ja Infiltrator
|align="center" BGCOLOR="#D5D9FF"|81 - 83 |align="center" BGCOLOR="#D5D9FF"| |align="center" BGCOLOR="#D5D9FF"| |align="center" BGCOLOR="#D5D9FF"|Mamool Ja |align="center" BGCOLOR="#D5D9FF"| |align="center" BGCOLOR="#D5D9FF"|A, L, S |- |BGCOLOR="#D5D9FF"|Mamool Ja Lurker
|align="center" BGCOLOR="#D5D9FF"|81 - 83 |align="center" BGCOLOR="#D5D9FF"| |align="center" BGCOLOR="#D5D9FF"| |align="center" BGCOLOR="#D5D9FF"|Mamool Ja |align="center" BGCOLOR="#D5D9FF"| |align="center" BGCOLOR="#D5D9FF"|A, L, S |- |BGCOLOR="#D5D9FF"|Mamool Ja Mimer
|align="center" BGCOLOR="#D5D9FF"|81 - 83 |align="center" BGCOLOR="#D5D9FF"| |align="center" BGCOLOR="#D5D9FF"| |align="center" BGCOLOR="#D5D9FF"|Mamool Ja |align="center" BGCOLOR="#D5D9FF"| |align="center" BGCOLOR="#D5D9FF"|A, L, S |- |BGCOLOR="#D5D9FF"|Mamool Ja Philosopher
|align="center" BGCOLOR="#D5D9FF"|81 - 83 |align="center" BGCOLOR="#D5D9FF"| |align="center" BGCOLOR="#D5D9FF"| |align="center" BGCOLOR="#D5D9FF"|Mamool Ja |align="center" BGCOLOR="#D5D9FF"| |align="center" BGCOLOR="#D5D9FF"|A, L, S |- |BGCOLOR="#D5D9FF"|Mamool Ja Pikeman
|align="center" BGCOLOR="#D5D9FF"|81 - 83 |align="center" BGCOLOR="#D5D9FF"| |align="center" BGCOLOR="#D5D9FF"| |align="center" BGCOLOR="#D5D9FF"|Mamool Ja |align="center" BGCOLOR="#D5D9FF"| |align="center" BGCOLOR="#D5D9FF"|A, L, S |- |BGCOLOR="#D5D9FF"|Mamool Ja Stabler
|align="center" BGCOLOR="#D5D9FF"|81 - 83 |align="center" BGCOLOR="#D5D9FF"| |align="center" BGCOLOR="#D5D9FF"| |align="center" BGCOLOR="#D5D9FF"|Mamool Ja |align="center" BGCOLOR="#D5D9FF"| |align="center" BGCOLOR="#D5D9FF"|A, L, S |- |BGCOLOR="#D5D9FF"|Mamool Ja's Raptor
|align="center" BGCOLOR="#D5D9FF"|77 - 77 |align="center" BGCOLOR="#D5D9FF"| |align="center" BGCOLOR="#D5D9FF"| |align="center" BGCOLOR="#D5D9FF"|Raptors |align="center" BGCOLOR="#D5D9FF"| |align="center" BGCOLOR="#D5D9FF"|A, L, S |- |BGCOLOR="#D5D9FF"|Mamool Ja's Wyvern
|align="center" BGCOLOR="#D5D9FF"|77 - 77 |align="center" BGCOLOR="#D5D9FF"| |align="center" BGCOLOR="#D5D9FF"| |align="center" BGCOLOR="#D5D9FF"|Wyverns |align="center" BGCOLOR="#D5D9FF"| |align="center" BGCOLOR="#D5D9FF"|A, L, S |- |BGCOLOR="#D5D9FF"|Marid
|align="center" BGCOLOR="#D5D9FF"|78 - 79 |align="center" BGCOLOR="#D5D9FF"| |align="center" BGCOLOR="#D5D9FF"| |align="center" BGCOLOR="#D5D9FF"|Marids |align="center" BGCOLOR="#D5D9FF"| |align="center" BGCOLOR="#D5D9FF"| |- |BGCOLOR="#D5D9FF"|Olden Treant
|align="center" BGCOLOR="#D5D9FF"|72 - 74 |align="center" BGCOLOR="#D5D9FF"| |align="center" BGCOLOR="#D5D9FF"| |align="center" BGCOLOR="#D5D9FF"|Treants |align="center" BGCOLOR="#D5D9FF"| |align="center" BGCOLOR="#D5D9FF"|A, H |- |BGCOLOR="#D5D9FF"|Red Kisser
|align="center" BGCOLOR="#D5D9FF"|67 - 69 |align="center" BGCOLOR="#D5D9FF"| |align="center" BGCOLOR="#D5D9FF"| |align="center" BGCOLOR="#D5D9FF"|Leeches |align="center" BGCOLOR="#D5D9FF"| |align="center" BGCOLOR="#D5D9FF"|L, Sc |- |BGCOLOR="#D5D9FF"|Red Smoocher
|align="center" BGCOLOR="#D5D9FF"|Unknown |align="center" BGCOLOR="#D5D9FF"| |align="center" BGCOLOR="#D5D9FF"| |align="center" BGCOLOR="#D5D9FF"|Leeches |align="center" BGCOLOR="#D5D9FF"| |align="center" BGCOLOR="#D5D9FF"| |- |BGCOLOR="#D5D9FF"|Sea Puk
|align="center" BGCOLOR="#D5D9FF"|77 - 78 |align="center" BGCOLOR="#D5D9FF"| |align="center" BGCOLOR="#D5D9FF"| |align="center" BGCOLOR="#D5D9FF"|Puks |align="center" BGCOLOR="#D5D9FF"| |align="center" BGCOLOR="#D5D9FF"|A, L, S, H |- |BGCOLOR="#D5D9FF"|Skoffin
|align="center" BGCOLOR="#D5D9FF"|82 - 83 |align="center" BGCOLOR="#D5D9FF"| |align="center" BGCOLOR="#D5D9FF"| |align="center" BGCOLOR="#D5D9FF"|Wyverns |align="center" BGCOLOR="#D5D9FF"| |align="center" BGCOLOR="#D5D9FF"|A, S |- |BGCOLOR="#D5D9FF"|Treant Sapling
|align="center" BGCOLOR="#D5D9FF"|65 - 68
|align="center" BGCOLOR="#D5D9FF"|
|align="center" BGCOLOR="#D5D9FF"|
|align="center" BGCOLOR="#D5D9FF"|Saplings
|align="center" BGCOLOR="#D5D9FF"|
|align="center" BGCOLOR="#D5D9FF"|L, H
link with Olden Treant
|-
|BGCOLOR="#D5D9FF"|Troll Sabreur
|align="center" BGCOLOR="#D5D9FF"|71 - 73 |align="center" BGCOLOR="#D5D9FF"| |align="center" BGCOLOR="#D5D9FF"| |align="center" BGCOLOR="#D5D9FF"|Trolls |align="center" BGCOLOR="#D5D9FF"| |align="center" BGCOLOR="#D5D9FF"|A, L, S |- |BGCOLOR="#D5D9FF"|Troll Shieldbearer
|align="center" BGCOLOR="#D5D9FF"|71 - 73 |align="center" BGCOLOR="#D5D9FF"| |align="center" BGCOLOR="#D5D9FF"| |align="center" BGCOLOR="#D5D9FF"|Trolls |align="center" BGCOLOR="#D5D9FF"| |align="center" BGCOLOR="#D5D9FF"|A, L, S |- |BGCOLOR="#D5D9FF"|Troll Surveillant
|align="center" BGCOLOR="#D5D9FF"|71 - 73
|align="center" BGCOLOR="#D5D9FF"|Puppetmaster's Testimony
Halvung Brass Key
|align="center" BGCOLOR="#D5D9FF"|
|align="center" BGCOLOR="#D5D9FF"|Trolls
|align="center" BGCOLOR="#D5D9FF"|
|align="center" BGCOLOR="#D5D9FF"|A, L, S
|-
|BGCOLOR="#D5D9FF"|Troll's Automaton
|align="center" BGCOLOR="#D5D9FF"|70 - 71 |align="center" BGCOLOR="#D5D9FF"| |align="center" BGCOLOR="#D5D9FF"| |align="center" BGCOLOR="#D5D9FF"|Automatons |align="center" BGCOLOR="#D5D9FF"| |align="center" BGCOLOR="#D5D9FF"| |- |BGCOLOR="#D5D9FF"|Wajaom Tiger
|align="center" BGCOLOR="#D5D9FF"|65 - 68 |align="center" BGCOLOR="#D5D9FF"| |align="center" BGCOLOR="#D5D9FF"| |align="center" BGCOLOR="#D5D9FF"|Tigers |align="center" BGCOLOR="#D5D9FF"| |align="center" BGCOLOR="#D5D9FF"|A, S, Sc |- |BGCOLOR="#D5D9FF"|Wivre
|align="center" BGCOLOR="#D5D9FF"|78-80
|align="center" BGCOLOR="#D5D9FF"|Wivre Hide
Wivre Horn
Wivre Maul
|align="center" BGCOLOR="#D5D9FF"|
|align="center" BGCOLOR="#D5D9FF"|Wivre
|align="center" BGCOLOR="#D5D9FF"|8 - Tandjana Islet only
|align="center" BGCOLOR="#D5D9FF"|
|-
|align="center" colspan="5" BGCOLOR="#ffdead"|
HP = Detects Low HP; M = Detects Magic; Sc = Follows by Scent; T(S) = True-sight; T(H) = True-hearing
JA = Detects job abilities; WS = Detects weaponskills; Z(D) = Asleep in Daytime; Z(N) = Asleep at Nighttime; A(R) = Aggressive to Reive participants
|}