Byrd (Message Wall | contribs) (→Drops) |
m (→Drops) Tags: Visual edit apiedit |
||
| (27 intermediate revisions by 7 users not shown) | |||
| Line 1: | Line 1: | ||
| − | [[Category:Missions]][[Category:Assault Missions]][[Category:Sergeant Major Missions]][[Category:Leujaoam Sanctum Missions]] |
+ | [[Category:Missions]][[Category:Assault Missions]][[Category:Sergeant Major Missions]][[Category:Leujaoam Sanctum Missions]][[de:Versuchskaninchen]] |
{|cellpadding="5" width="100%" |
{|cellpadding="5" width="100%" |
||
|width="70%" valign="top"| |
|width="70%" valign="top"| |
||
| Line 99: | Line 99: | ||
== Drops == |
== Drops == |
||
| − | {| width=100% |
+ | {| width="100%" |
| − | |- valign=top |
+ | |- valign="top" |
<!-- Remember to update ALL items --> |
<!-- Remember to update ALL items --> |
||
| Line 110: | Line 110: | ||
|[[Hi-Potion +3]] {{Drop Rate|100%}} |
|[[Hi-Potion +3]] {{Drop Rate|100%}} |
||
|- BGCOLOR=#e3e6ff align=center |
|- BGCOLOR=#e3e6ff align=center |
||
| − | |[[Hi-Ether Tank]] {{Drop Rate| |
+ | |[[Hi-Ether Tank]] {{Drop Rate|24|87}} |
|- BGCOLOR=#e3e6ff align=center |
|- BGCOLOR=#e3e6ff align=center |
||
| − | |[[Hi-Potion Tank]] {{Drop Rate| |
+ | |[[Hi-Potion Tank]] {{Drop Rate|17|87}} |
|- BGCOLOR=#e3e6ff align=center |
|- BGCOLOR=#e3e6ff align=center |
||
| − | |[[Hi-Reraiser]] {{Drop Rate| |
+ | |[[Hi-Reraiser]] {{Drop Rate|24|87}} |
|} |
|} |
||
| − | |width=20%| |
+ | | width="20%" | |
| − | {| width=100% |
+ | {| width="100%" |
| − | |- |
+ | |- bgcolor="#ffdead" |
| − | ! [[??? Footwear]] {{Drop Rate| |
+ | ! [[??? Footwear]] {{Drop Rate|24|89}} |
| − | |- |
+ | |- align="center" bgcolor="#e3e6ff" |
| − | |[[Ataractic Solea]] {{Drop Rate| |
+ | |[[Ataractic Solea]] {{Drop Rate|01|24}} |
| − | |- |
+ | |- align="center" bgcolor="#e3e6ff" |
| − | |[[Ash Clogs]] {{Drop Rate| |
+ | |[[Ash Clogs]] {{Drop Rate|05|24}} |
| − | |- |
+ | |- align="center" bgcolor="#e3e6ff" |
| − | |[[Bronze Leggings +1]] {{Drop Rate| |
+ | |[[Bronze Leggings +1]] {{Drop Rate|06|24}} |
| − | |- |
+ | |- align="center" bgcolor="#e3e6ff" |
| − | |[[Leather Highboots]] {{Drop Rate| |
+ | |[[Leather Highboots]] {{Drop Rate|08|24}} |
| − | |- |
+ | |- align="center" bgcolor="#e3e6ff" |
| − | |[[Evoker's Boots]] {{Drop Rate| |
+ | |[[Evoker's Boots]] {{Drop Rate|02|24}} |
| − | |- |
+ | |- align="center" bgcolor="#e3e6ff" |
| − | |[[Solea]] {{Drop Rate| |
+ | |[[Solea]] {{Drop Rate|02|24}} |
|} |
|} |
||
| ⚫ | |||
| − | |||
| − | |width= |
+ | {| width="100%" |
| ⚫ | |||
| ⚫ | |||
| ⚫ | |||
| ⚫ | |||
| + | |- align="center" bgcolor="#e3e6ff" |
||
| ⚫ | |||
| ⚫ | |||
| − | |- BGCOLOR=#e3e6ff align=center |
||
| + | |- align="center" bgcolor="#e3e6ff" |
||
| ⚫ | |||
| ⚫ | |||
| − | |- BGCOLOR=#e3e6ff align=center |
||
| + | |- align="center" bgcolor="#e3e6ff" |
||
| ⚫ | |||
| ⚫ | |||
| − | |- BGCOLOR=#e3e6ff align=center |
||
| + | |- align="center" bgcolor="#e3e6ff" |
||
| ⚫ | |||
| ⚫ | |||
| − | |- BGCOLOR=#e3e6ff align=center |
||
| ⚫ | |||
|} |
|} |
||
| − | |width=20%| |
+ | | width="20%" | |
| − | {| width=100% |
+ | {| width="100%" |
| − | |- |
+ | |- bgcolor="#ffdead" |
| − | ! [[??? Sword]] {{Drop Rate| |
+ | ! [[??? Sword]] {{Drop Rate|02|89}} |
| − | |- |
+ | |- align="center" bgcolor="#e3e6ff" |
| − | |[[Macuahuitl -1]] {{Drop Rate| |
+ | |[[Macuahuitl -1]] {{Drop Rate|02|02}} |
|} |
|} |
||
| − | |width=20%| |
+ | | width="20%" | |
| − | {| width=100% |
+ | {| width="100%" |
| − | |- |
+ | |- bgcolor="#ffdead" |
| − | ! [[??? Box]] {{Drop Rate| |
+ | ! [[??? Box]] {{Drop Rate|35|89}} |
| − | |- |
+ | |- align="center" bgcolor="#e3e6ff" |
| − | |[[Bullet Pouch]] {{Drop Rate|1| |
+ | |[[Bullet Pouch]] {{Drop Rate|1|35}} |
| − | |- |
+ | |- align="center" bgcolor="#e3e6ff" |
| − | |[[Darksteel Bolt Quiver]] {{Drop Rate|1| |
+ | |[[Darksteel Bolt Quiver]] {{Drop Rate|1|35}} |
| − | |- |
+ | |- align="center" bgcolor="#e3e6ff" |
| − | |[[Blind Bolt Quiver]] {{Drop Rate|1| |
+ | |[[Blind Bolt Quiver]] {{Drop Rate|1|35}} |
| − | |- |
+ | |- align="center" bgcolor="#e3e6ff" |
| − | |[[ |
+ | |[[Bronze Bolt Quiver]] {{Drop Rate|1|35}} |
| − | |- |
+ | |- align="center" bgcolor="#e3e6ff" |
| − | |[[ |
+ | |[[Date]] {{Drop Rate|0|35}} |
| − | |- |
+ | |- align="center" bgcolor="#e3e6ff" |
| − | |[[ |
+ | |[[Gardenia Seed]] {{Drop Rate|6|35}} |
| − | |- |
+ | |- align="center" bgcolor="#e3e6ff" |
| − | |[[ |
+ | |[[Glass Sheet]] {{Drop Rate|1|35}} |
| − | |- |
+ | |- align="center" bgcolor="#e3e6ff" |
| − | |[[ |
+ | |[[Horn Quiver]] {{Drop Rate|1|35}} |
| − | |- |
+ | |- align="center" bgcolor="#e3e6ff" |
| − | |[[ |
+ | |[[Ice Crystal]] {{Drop Rate|0|35}} |
| − | |- |
+ | |- align="center" bgcolor="#e3e6ff" |
| − | |[[ |
+ | |[[Iron Bullet Pouch]] {{Drop Rate|1|35}} |
| − | |- |
+ | |- align="center" bgcolor="#e3e6ff" |
| − | |[[ |
+ | |[[Iron Quiver]] {{Drop Rate|2|35}} |
| − | |- |
+ | |- align="center" bgcolor="#e3e6ff" |
| − | |[[ |
+ | |[[Merrow Scale]] {{Drop Rate|11|35}} |
| − | |- |
+ | |- align="center" bgcolor="#e3e6ff" |
| − | |[[ |
+ | |[[Phalaenopsis]] {{Drop Rate|0|35}} |
| − | |- |
+ | |- align="center" bgcolor="#e3e6ff" |
| − | |[[ |
+ | |[[Silver Quiver]] {{Drop Rate|1|35}} |
| − | |- |
+ | |- align="center" bgcolor="#e3e6ff" |
| − | |[[ |
+ | |[[Soulflayer Staff]] {{Drop Rate|6|35}} |
| − | |- |
+ | |- align="center" bgcolor="#e3e6ff" |
| − | |[[Toolbag ( |
+ | |[[Toolbag (Kawa)|Toolbag (Kawahori-Ogi)]] {{Drop Rate|1|35}} |
| − | |- |
+ | |- align="center" bgcolor="#e3e6ff" |
| − | |[[Toolbag ( |
+ | |[[Toolbag (Mizu)|Toolbag (Mizu-Deppo)]] {{Drop Rate|0|35}} |
| − | |- |
+ | |- align="center" bgcolor="#e3e6ff" |
| − | |[[ |
+ | |[[Toolbag (Shino)|Toolbag (Shinobi-Tabi)]] {{Drop Rate|0|35}} |
| − | |- |
+ | |- align="center" bgcolor="#e3e6ff" |
| − | |[[ |
+ | |[[Toolbag (Shihei)]] {{Drop Rate|1|35}} |
| − | |- |
+ | |- align="center" bgcolor="#e3e6ff" |
| − | |[[ |
+ | |[[Tsurara]] {{Drop Rate|0|35}} |
| + | |- align="center" bgcolor="#e3e6ff" |
||
| + | |[[Venom Bolt Quiver]] {{Drop Rate|1|35}} |
||
| + | |- align="center" bgcolor="#e3e6ff" |
||
| + | |[[White Rock]] {{Drop Rate|0|35}} |
||
|} |
|} |
||
|} |
|} |
||
Revision as of 00:36, 22 June 2015
|
Enemies
| Monster | Level | Strengths | Weaknesses | Spawns |
Notes |
|---|---|---|---|---|---|
|
75 |
|
A, S, L | |||
|
75 |
|
A, S, L | |||
|
75 |
|
A, S, L | |||
|
HP = Detects Low HP; M = Detects Magic; Sc = Follows by Scent; T(S) = True-sight; T(H) = True-hearing JA = Detects job abilities; WS = Detects weaponskills; Z(D) = Asleep in Daytime; Z(N) = Asleep at Nighttime; A(R) = Aggressive to Reive participants | |||||
Drops
|
|
|
|
Walkthrough
Talk to the NPC to receive tissue grafts, then eliminate a group of lamiae enemies. Repeat three more times.
- When you talk to the NPC, she grafts random tissue to you giving you different bonuses/penalties which do not stack.
- Opo-opo Cerebral Tissue: Max MP-50%, +Fast Cast
 , +7HMP
 - Goobbue Tissue: +ATK(100% attack boost), +Slow (100% timer increase)
- Dragonfly Tissue: +Accuracy, +Ranged Accuracy, -Attack, -Ranged Attack
- Raptor Tissue: Max HP-50%, Movement Speed+50% (flee speed)
- Opo-opo Cerebral Tissue: Max MP-50%, +Fast Cast
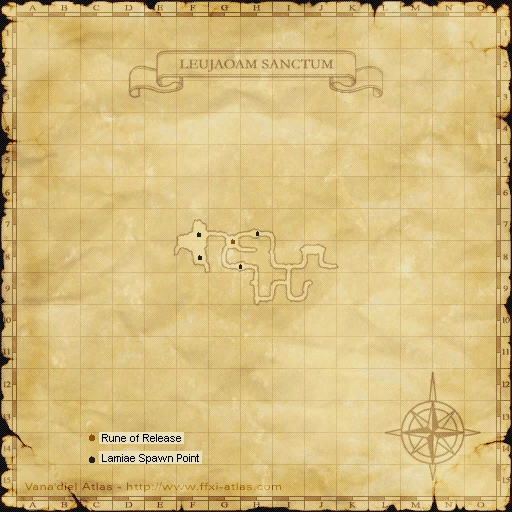
- Each time you get a tissue graft, one of the four groups of Lamia will appear. These include the following groups:
- Northeast tunnel (appear down a one-way cliff, but can be pulled back up): BLM and RNG
- Southeast tunnel: BLM, RNG, COR.
- West (north side of cavern): BLM, RNG, COR
- West (south side of cavern): BLM, COR
- The Lamia have high evasion.
- The Lamia Prosector (BLM) will have buffed itself with Ice Spikes. It cannot be slept or silenced.
- The other Lamiae can be slept, but have high resist rates.
- They have a very large visual aggro/link range but it is possible to pull them individually if your puller is good.
- They do not hit very hard (which is good since you may have 50% HP cap from raptor tissue), but the -aga 3's from the BLM's will still hit for full damage.
- Once the group of Lamia is dead, talk to the NPC again. Another random tissue will be grafted to your body and one of the other Lamia groups will appear.
- Once you kill a Lamia group, that group will not reappear for the rest of the assault.
- Go through 4 sets of tissue grafts/mobs to unlock the Rune of Release at the start point.
- This assault can be easily completed in about 20 minutes by most healer + 2 DD combos, with the best healer for it being RDM and the best DDs being BLUs.
- If you speak with the NPC at the end of the assault, there is a dialogue with four options. The most positive response seems to be garnered from answering "Great!" though the effect of this has yet to be determined.
Notes
- The Lamia Sharper is a Corsair, and can use Dukkeripen.
Strategy
See Strategies.
Map
| Assault | |
|---|---|
| Leujaoam Missions | |
| Mamool Ja Missions | |
| Lebros Missions | |
| Periqia Missions | |
| Ilrusi Missions | |
| Nyzul Isle Missions | |
| Assault Point Rewards | |
| Nyzul Isle Rewards | |