No edit summary |
m (fix spelling of "recommended", and a couple other minor fixes) |
||
| Line 51: | Line 51: | ||
*Enter the zone from [[Wajaom Woodlands]] at (D-12), which will put you at (J-7). |
*Enter the zone from [[Wajaom Woodlands]] at (D-12), which will put you at (J-7). |
||
*You will need both the [[Red Bell]] and [[Blue Bell]] key items to enter the Burning Circle. When said key items drop, everyone in the alliance will receive them. |
*You will need both the [[Red Bell]] and [[Blue Bell]] key items to enter the Burning Circle. When said key items drop, everyone in the alliance will receive them. |
||
| − | *While fighting |
+ | *While fighting Mamool Ja, collect the [[Mamook Tanscale Key|tanscale keys]] that drop. You need these to open gates later down the road. Alternatively, a [[Thief]] can pick the locks. |
*'''TO AVOID WASTING TIME''': In the lower part, past the gate that asks for the red bell, you will need three tanscale keys to go through the doors ''if you take the SE path''. Farm before you go past the red bell door! |
*'''TO AVOID WASTING TIME''': In the lower part, past the gate that asks for the red bell, you will need three tanscale keys to go through the doors ''if you take the SE path''. Farm before you go past the red bell door! |
||
*From (J-7) in Mamook, hug the right wall until you get to (G-7). Enter the passage just south of the one you exited, and hug the right wall until you get to (F-8). Drop down and cross the clearing, walking back up the ramp at (E-9). Enter and follow the north passage at (E-8). Hug the right wall until you arrive at (F-6), at which point you can follow the left wall all the way to the Mahogany Door. |
*From (J-7) in Mamook, hug the right wall until you get to (G-7). Enter the passage just south of the one you exited, and hug the right wall until you get to (F-8). Drop down and cross the clearing, walking back up the ramp at (E-9). Enter and follow the north passage at (E-8). Hug the right wall until you arrive at (F-6), at which point you can follow the left wall all the way to the Mahogany Door. |
||
| Line 67: | Line 67: | ||
: Bring at least 1 [[Poison Potion]], as [[Sagelord Molaal Ja]] will spam [[Sleepga II]]. |
: Bring at least 1 [[Poison Potion]], as [[Sagelord Molaal Ja]] will spam [[Sleepga II]]. |
||
: Sagelord is immune to [[stun]] |
: Sagelord is immune to [[stun]] |
||
| − | : [[Sleep]] and [[Sleepga II]] will get resisted by the Thief and Ninja A LOT, [[Elemental Seal]] |
+ | : [[Sleep]] and [[Sleepga II]] will get resisted by the Thief and Ninja A LOT, [[Elemental Seal]] recommended. |
:Sagelord begins using [[Ground burst]] below 40%. |
:Sagelord begins using [[Ground burst]] below 40%. |
||
: mobs regain 8% hp per run. |
: mobs regain 8% hp per run. |
||
| − | * If you lose the battle you can send someone outside of the Mahogany |
+ | * If you lose the battle you can send someone outside of the Mahogany Door to pull a new mob for the bells and open the door from the inside, both bells can be farmed off of all the mobs outside of the BCNM. |
*The fastest the AC been recovered here was approximately less than 4 hours. |
*The fastest the AC been recovered here was approximately less than 4 hours. |
||
''See also: [[Mamook Incursion]]'' |
''See also: [[Mamook Incursion]]'' |
||
| Line 95: | Line 95: | ||
===[[Arrapago Reef]]=== |
===[[Arrapago Reef]]=== |
||
''Trip to BC'' |
''Trip to BC'' |
||
| − | *Zone into Arrapago from Caedarva as you would for the PUP or COR quest. |
+ | * Zone into Arrapago from Caedarva as you would for the PUP or COR quest. |
* While in Arrapago, you will need to kill Merrow-type beastmen until everyone in your party or alliance obtains a [[Merrow Homunculus]], and Lamia-type beastmen until everyone in your party or alliance obtains a [[Lamia Homunculus]]. Note that zoning, logging, disconnecting, or accepting [[Tractor]] will cause a player to lose these key items. |
* While in Arrapago, you will need to kill Merrow-type beastmen until everyone in your party or alliance obtains a [[Merrow Homunculus]], and Lamia-type beastmen until everyone in your party or alliance obtains a [[Lamia Homunculus]]. Note that zoning, logging, disconnecting, or accepting [[Tractor]] will cause a player to lose these key items. |
||
* Pass the first boat and head through the Iron Gate at (J-9). A Lamian Fang Key or THF with tools is necessary |
* Pass the first boat and head through the Iron Gate at (J-9). A Lamian Fang Key or THF with tools is necessary |
||
Revision as of 18:39, 28 April 2010
The Astral Candescence is an object of sheer mystery (at this point in time). Rumors have it that it is an ethereal instrument that produces a magical "Astral Wind", which enhances the lives of whoever has it. It is locked in the Hall of Binding of Al Zahbi to prevent beastmen from stealing it. The Astral Candescence is the source of the entire Besieged conflict in Aht Urhgan.

The Astral Candescence resting atop the Astral Plinth within the Hall of Binding
If the beastmen have breached the Hall of Binding and obtained the Astral Candescence this will need to be recovered by entering an uncapped BCNM in the stronghold of the beastmen who obtained it. The BCNM requires farming 2 Key Items from the beastmen within that stronghold to enter it.
If Al Zahbi has the Astral Candescence
- Defeating mobs while under Sanction yields a 5-15% XP bonus, depending on Al Zahbi's defense rating.
- Sanction lasts from 3 to 8 hours, depending on the player's Assault Mercenary Rank.
- You can purchase Runic Portal Use Permits to use the Runic Portals without an Assault Order. This costs 200 Imperial Standing.
- You may opt to receive one of three beneficial status effects for 100 Imperial Standing. which will last as long as Sanction remains in effect: Regen, Refresh, or Increased Meal Duration, upon getting Sanction.
- Shihu-Danhu, located in Al Zahbi, will warp you as close to Jeuno as he can, and he will occasionally get you directly to Ru'Lude Gardens.
- Mobs defeated in areas subject to Besieged while under the effect of Sanction may drop crystals.
If Beastmen have the Astral Candescence
- Sanction only lasts from 1 to 3 hours depending on your rank.
- You can't apply the Regen/Refresh/Increased Meal Duration effects upon getting Sanction. However, any effects that you applied before the loss of the Astral Candescence will still work.
- You can't gain crystals upon defeating enemies.
- In the region that has the Astral Candescence, the effectiveness of Sneak and Invisible is reduced. In some cases, this effectiveness is reduced by 100%, essentially giving enemies either True Sight and/or True Hearing status depending on the type of enemy.
- You will get an increased number of Imperial Standing points for defeating enemies within the region that has the Astral Candescence while Sanction is in effect.
- Sharin-Garin will refuse to sell Runic Portal Use Permits in order to conserve the power of the Runic Portals. Permits issued before the Astral Candescence was taken may still be used, however. Usage of the Runic Portal for Assault and for returning to the Chamber of Passage from a Staging Point remains unaffected.
- In the region that has the Astral Candescence, beastmen are approximately 5-6 levels higher than what they con. For example, a mob that cons even match may actually fight like a Tough to Very Tough mob.
- Shihu-Danhu will warp you further away from Jeuno but still occasionally sends you to Ru'Lude Gardens. You may only use this service once per Vana'diel day.
- You will not receive the Experience Points bonus from Sanction for defeating enemies.
- Some vendors in Aht Urhgan Whitegate and Al Zahbi have reduced stock.
- If an Archaic Mirror is destroyed inside the stronghold that has the Astral Candescence, that mirror will not respawn until Al Zahbi recovers the candescence.
- There is no music in Al Zahbi. However, people who were there when the Astral Candescence was taken will still hear the music until they move to a different area and come back.
Recovering the Astral Candescence
- Head to the region that has the Astral Candescence, either by walking there or by using the Runic Portal, if you still have a Runic Portal Use Permit in your inventory.
- Bring a party and be prepared to fight. Beastmen tend to have enhanced hearing/sight if the Astral Candescence is in that region and certain enemies may possess True Sight or True Hearing when they did not have them before. You may instead elect to bring an alliance, but note that only one party may enter the final BCNM at a time. It is recommended that each party in the alliance be well-balanced and able to function on their own.
- Any Archaic Mirrors destroyed in that region do not respawn until the Astral Candescence has been recovered. Eliminate the mirrors first to ease travel throughout the stronghold.
- The 2 temporary key items required to enter the BCNM in the zone vary by region. Zoning or logging out will result in the loss of the key items, along with accepting the black magic spell Tractor. When a monster drops a key item, each person in the party or alliance will obtain the key item as long as they are somewhere within the zone.
- BCNM fight is uncapped, with 30 minute time limit. You fight 3 NMs of the appropriate beastmen race.
- As of the 10/18/06 patch, being KO'd in the BCNM results in no loss of experience points.
- Only 6 members in the party may enter the BCNM fight at a time. All party members must possess both key items to enter.
- Buffs and TP carry into BCNM.
- Tractor is disabled inside the BCNM
- Monsters in the BCNM will share hate and aggro all members inside BCNM when any member approaches or acts upon the NMs.
- Boss NM is immune to sleep and silence. The 2 lesser NMs can be slept, however.
- The NMs are very powerful and difficult to defeat if you are the first party attempting the fight; however, they do not recover HP in the event of a wipe. When the next party enters the BCNM, the NMs will be at the same level of HP that the previous party left them at, allowing them to be gradually weakened until one party manages to successfully defeat them all.
- If a party defeats or heavily damages any of the NMs but still wipes, the ones that were damaged below 33% or killed will recover to 33% HP for the next party that enters.

Mamook Map 1

Mamook Map 2
Mamook
- Enter the zone from Wajaom Woodlands at (D-12), which will put you at (J-7).
- You will need both the Red Bell and Blue Bell key items to enter the Burning Circle. When said key items drop, everyone in the alliance will receive them.
- While fighting Mamool Ja, collect the tanscale keys that drop. You need these to open gates later down the road. Alternatively, a Thief can pick the locks.
- TO AVOID WASTING TIME: In the lower part, past the gate that asks for the red bell, you will need three tanscale keys to go through the doors if you take the SE path. Farm before you go past the red bell door!
- From (J-7) in Mamook, hug the right wall until you get to (G-7). Enter the passage just south of the one you exited, and hug the right wall until you get to (F-8). Drop down and cross the clearing, walking back up the ramp at (E-9). Enter and follow the north passage at (E-8). Hug the right wall until you arrive at (F-6), at which point you can follow the left wall all the way to the Mahogany Door.
- To enter the Mahogany Door, everyone who wishes to pass will need a Red Bell key item. It's fine if your party/alliance is missing one, you will have plenty of time to farm it on the way to the Burning Circle.
- Past the Mahogany Door, Mamool Ja check Very tough to Incredibly tough. Mamools are True Sight, Hunting Raptors are aggressive to sight and sound, and Spinners are not aggressive.
- Note: If you get tractored, you will lose your key items and will not be given access to the Burning Circle. After you enter the BC, your bell key items are gone. If you wish to re-enter, you must farm more.
- Head in a SSW pattern, until you find the BCNM area at (G-11). Both a Blue Bell and a Red Bell are required to enter the BCNM. There will be gates that can be opened by the keys that drop in the zone.
- Before you get to the last Mahogany Gate, there is a door that needs to be opened with a bunch of true sight Mamool nearby, so you cannot run through without fighting them.
- The final Mahogany door requires both a Red Bell and Blue Bell. It is recommended to fight the mobs before the first Mahogany bell before passing the first door, since the mobs are higher level.
- The 3 NM are Mamool Ja.
- Sagelord Molaal Ja (BLM) (Boss)
- Forbidding Koheel Ja (THF)
- Shadelurking Zolool Ja (NIN)
- It is recommended to go in the order of BLM > THF > NIN. The NIN will use Mijin Gakure that can do upwards of 4000 damage in a large AoE. The NIN will NOT die as a result of the move, unlike the adventurer skill. You will need a way of doing damage to the NIN after the move by someone outside the AoE of the Mijin Gakure.
- Bring at least 1 Poison Potion, as Sagelord Molaal Ja will spam Sleepga II.
- Sagelord is immune to stun
- Sleep and Sleepga II will get resisted by the Thief and Ninja A LOT, Elemental Seal recommended.
- Sagelord begins using Ground burst below 40%.
- mobs regain 8% hp per run.
- If you lose the battle you can send someone outside of the Mahogany Door to pull a new mob for the bells and open the door from the inside, both bells can be farmed off of all the mobs outside of the BCNM.
- The fastest the AC been recovered here was approximately less than 4 hours.
See also: Mamook Incursion

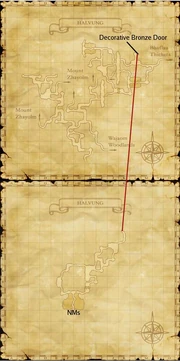
Halvung map
Halvung
- The 3 NM in the BCNM are Trolls. Exact jobs are as follows:
- Chiliarch Gordarvor (PLD) (Boss)
- Hetairoi Vuryargur (MNK)
- Hetairoi Zarwarkur (RDM)
- The PLD and RDM Trolls will cast Cure IV on weak Trolls when any of the Trolls' HP is low. It is recommended that you separate them from the MNK and defeat the MNK Troll first using a PLD tank or NIN with lots of -Damage gear. Then defeat the RDM Troll and finally the PLD.
- These NMs are heavily resistant to all enfeebles. However, we found that the RDM can be slept somewhat easily. It's recommended to bring 2 Tanks (for the MNK and PLD), and to keep the RDM slept or kited.
- Any of the Trolls within Halvung can drop the key items Musical Score - 1st Page and Musical Score - 2nd Page to enter this BC. The Troll Cannoneers, Troll Cameist (MNK, RDM, RNG, and PUP Trolls) drop Musical Score - 1st Page and the Troll Hoplites, Troll Gemologist (WAR, PLD, and DRK Trolls) drop Musical Score - 2nd Page.
- To reach the BC Area, head to the Decorative Bronze Door at (L-5) on first map. In order to enter this door, you must posess the Musical Score - 1st Page which drops from any Troll cannoneer in Halvung (the item is not lost when you pass through the door). There is a second brass door at (F-12) on the map past the first door - This is the BCNM area. Note that all Trolls in this 2nd map area are True Sight, but it is still quite possible to walk past many of the stationary sentry trolls by walking next to them and not directly in front of them.
- Fastest the AC has been recovered here was approximately 5h 30m.
See also: Halvung Invasion

Arrapago Map 1

Arrapago Map 2

Arrapago Map 8

Arrapago Map 4
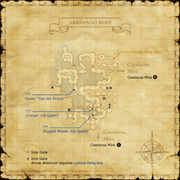
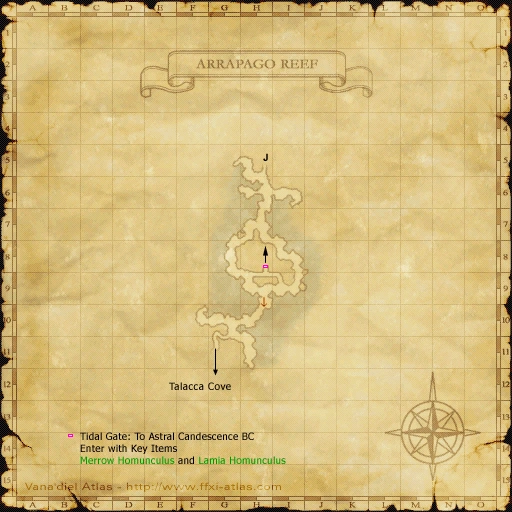
Arrapago Reef
Trip to BC
- Zone into Arrapago from Caedarva as you would for the PUP or COR quest.
- While in Arrapago, you will need to kill Merrow-type beastmen until everyone in your party or alliance obtains a Merrow Homunculus, and Lamia-type beastmen until everyone in your party or alliance obtains a Lamia Homunculus. Note that zoning, logging, disconnecting, or accepting Tractor will cause a player to lose these key items.
- Pass the first boat and head through the Iron Gate at (J-9). A Lamian Fang Key or THF with tools is necessary
- Head West to point B at (F-10) and continue onto Map 2.
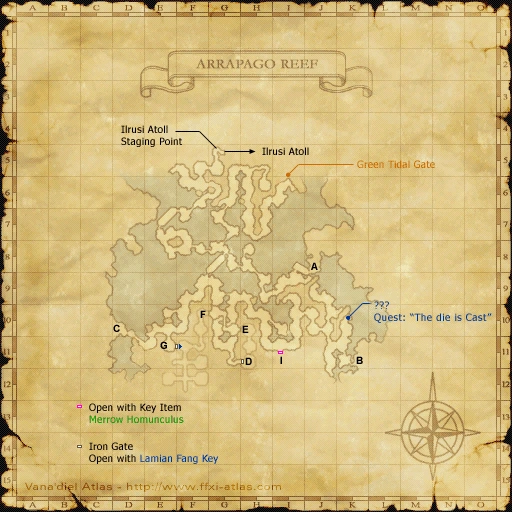
- Head to point I at (I-11). If you have not picked up the two key items on the way, do so now. If you hear a message involving a woman singing, this is the right way.
- Use the Merrow Homunculus to enter this gate (and Map 8). The key item is not consumed upon going through the gate.
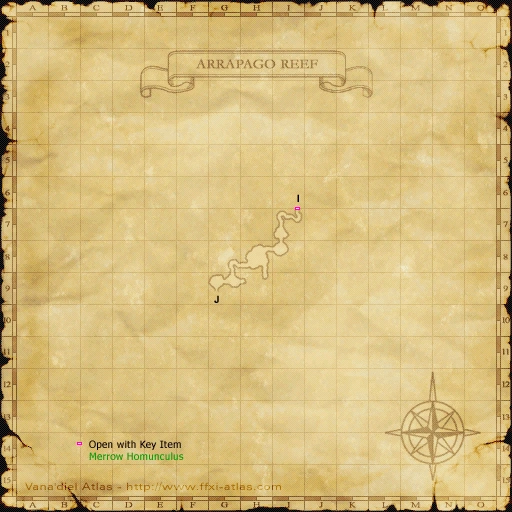
- Head SW towards point J at (G-9) and continue onto Map 4. From this point on, the "Merrow" and "Lamia" type beastmen are "Nix" and "Lamie" instead, and they are all true sight. The surrounding skeletons are not true sound, and do not need to be fought.
- From here, head south until you reach an open area. Head either east or west, as this area is basically a ring of land. There will be an tunnel at (H/I-9) leading into the central rock area, and the Tidal Gate (BC entrance) will be inside.
- The BC allows a single 6-person party inside at a time. All party members must have both key to enter the Tidal Gate, and both items are consumed upon entering.
- The 3 NM are Lamiae:
- Lamia No.11 (RNG) (Boss)
- Lamia No.18 (COR)
- Lamia No.24 (BLM)
- Kill the mobs, if possible, in that order. It has been reported once Lamia No.24 is down, the other 2 Lamiae will go down quickly. Lamia No.11 is known to stand back and shoot without meleeing if the person who has hate is out of melee range, but she is immune to sleep. Also note that No.11, as the main boss, can use Belly Dance (Charmga).
- If any of the NMs in the battlefield dies, but the battlefield is not cleared completely, the defeated NMs will repop at 33% HP.
- Best way to get to the key items repeatedly is to have a party that can kill the Merrow Chantress at the main enterence area where you do the COR quest. There's a Lamie Deathdancer and a Lamie Bellydancer west of the Tidal Gate that you go through to do the AC fight, which drops the key item also.
See also: Lamia Reprisal